
Android SDK V6
# Android SDK V6
Sobot SDK provides the enterprises with a full set of perfect intelligent agent solutions. Sobot SDK includes both agent business logic and interactive interface; With only two simple steps, enterprises can integrate Sobot in the APP, so that the APP has a 7 x 24 hour customer service capability.
Admins can add APP in 「 Home - Live Chat - Settings - Docking Channel Settings - Add Channel 」 in the backend, and then follow this access description to complete SDK docking.
Sobot SDK has the following features:
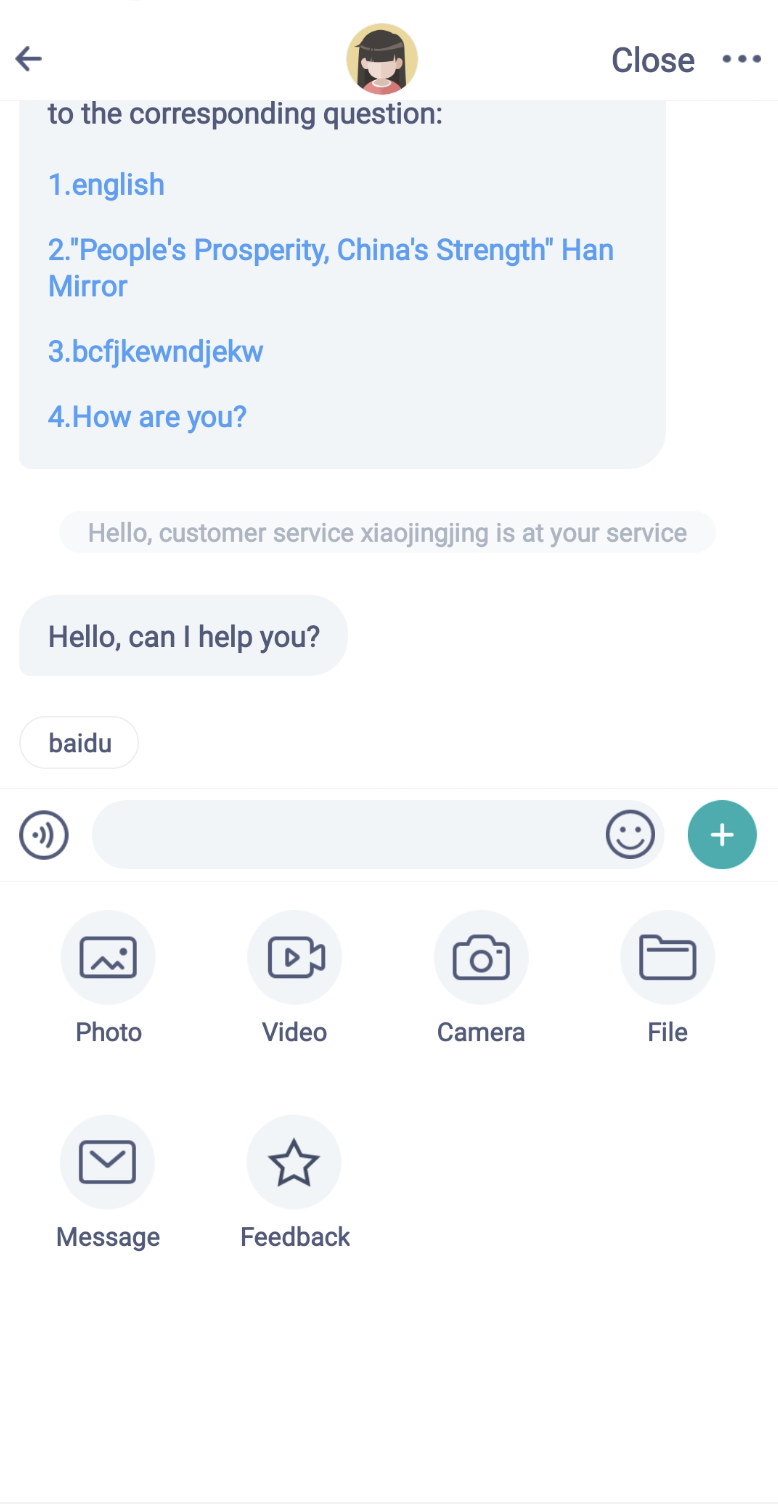
- Online inquiry: Inquire bot, inquire agent, submission, and Help Center.
- Designate the skill groups for reception.
- Guide users to make submissions when they are queuing or agents are not online.
- Under the bot first mode, the trans-to-agent button is hidden, and will be displayed when there are N bot unknown questions.
- Satisfaction evaluation: Users proactively make satisfaction evaluation + agents ask for evaluation when users exit.
- Pass user profile: User docking ID + basic profile + custom fields.
- Pass product source page: Source page title + source page URL.
- Highly customized UI.
Related limits and notes:
Android SDK supports Android above 4.2 (API 17) and supports both portrait mode and landscape mode.
Android Studio should be upgraded to versions above 3.0.
Android SDK requires storage, MIC and camera permissions; otherwise, some functions are not available.
# File Introduction
# ● Schematic Diagram of Integration Process
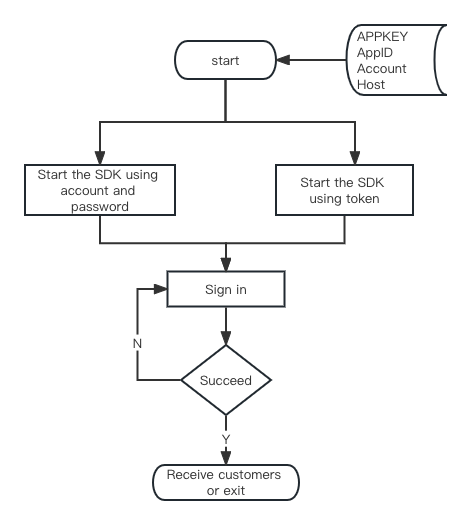
# ● File Description
SDK files include SDK source package (sobotsdk_x) , Demo source code (Sobot_Sdk_Demo_Android_V6) , and Doc related documentation.
| File | Description |
|---|---|
| ZCSobotApi | The file provides an access function |
| Information | Initiation configuration info param class |
# Integration Method
# ● Import Integration
Download:Android_SDK_V6 (opens new window)
Import Module:
Unzip the downloaded Sobot Android_SDK_XXX.zip file, copy sobotsdk-x file to your project, then Build --> Clean Project, and add project dependencies in build.gradle.
After the above steps, content in build.gradle will be displayed as follows:
dependencies {
      implementation project(':sobotsdk-x')
      implementation 'com.squareup.okhttp3:okhttp:4.4.0'
      implementation 'androidx.appcompat:appcompat:1.0.0'
      implementation 'androidx.recyclerview:recyclerview:1.0.0'
      //Three common image loader libraries are supported, and dependencies should be added to one of them
      //implementation 'com.nostra13.universalimageloader:universal-image-loader:1.9.5 '
      //implementation 'com.squareup.picasso:picasso:2.71828'
      //implementation 'com.facebook.fresco:fresco:2.6.0'
      implementation 'com.github.bumptech.glide:glide:4.9.0'
}
2
3
4
5
6
7
8
9
10
11
[Note]
If you are using the Picasso framework, starting from version 4.1.4, the SDK supports version 2.71828 and above by default.
If you are using the Glide v4 framework, starting from version 4.1.4 the SDK supports version 4.9.0 and above by default.
If you are using SDK versions before 4.1.4, but Glide v4 is using version 4.9.0 or higher, you can also add a separate dependency: 'com.sobot.chat:sobotsupport-glidev4:2.3'.
If you want to use your own image loading method, you can use the following methods: SobotBitmapUtil. setImageLoader (new SobotImageLoader() {}); After using this method, the image loading method within the SDK will no longer be used when displaying network images.
# ● Dependency Integration
Starter:Latest version address (opens new window)
implementation 'com.sobot.chat:sobotsdk_x:+'
2
E-commerce version:Latest version address (opens new window)
implementation 'com.sobot.chat:sobotsdk-mall-x:+'
In build.gradle:
dependencies {
      implementation 'com.sobot.chat:sobotsdk_x:+'
      implementation 'com.squareup.okhttp3:okhttp:4.4.0'
      implementation 'androidx.appcompat:appcompat:1.0.0'
      implementation 'androidx.recyclerview:recyclerview:1.0.0'
      //Three common image loader libraries are supported, and dependencies should be added to one of them
      //implementation 'com.nostra13.universalimageloader:universal-image-loader:1.9.5 '
      //implementation 'com.squareup.picasso:picasso:2.71828'
      //implementation 'com.facebook.fresco:fresco:2.6.0'
      implementation 'com.github.bumptech.glide:glide:4.9.0'
}
2
3
4
5
6
7
8
9
10
11
[Note]
If you are using the Picasso framework, starting from version 4.1.4, the SDK supports version 2.71828 and above by default.
If you are using the Glide v4 framework, starting from version 4.1.4 the SDK supports version 4.9.0 and above by default.
If you are using SDK versions before 4.1.4, but Glide v4 is using version 4.9.0 or higher, you can also add a separate dependency: 'com.sobot.chat:sobotsupport-glidev4:2.3'.
If you want to use your own image loading method, you can use the following methods: SobotBitmapUtil. setImageLoader (new SobotImageLoader() {}); After using this method, the image loading method within the SDK will no longer be used when displaying network images.
About ProGuard:
Refer to the ProGuard configuration in the ProGuard file (Android_SDK_x.x.x\Sobot_Sdk_Demo_Android\sobotsdkdemo\proguard-rules.pro) to add ProGuard rules.
-keep class com.sobot.** {*;}
Note: The image frame used needs to be configured and confused by oneself.
# Function Description
# ● Domain Name Settings
Domain name description:
Default SaaS platform domain name: https:// api.sobot.com.
If you use Tencent Cloud server, please set to: https:// www.soboten.com.
If you use localized deployment, please use your deployed server domain name.
Sample code:
[Note: Domain name shall be set before all API requests; i.e., such setting must be finished before initialization.]
SobotBaseUrl.setApi_Host("your host");
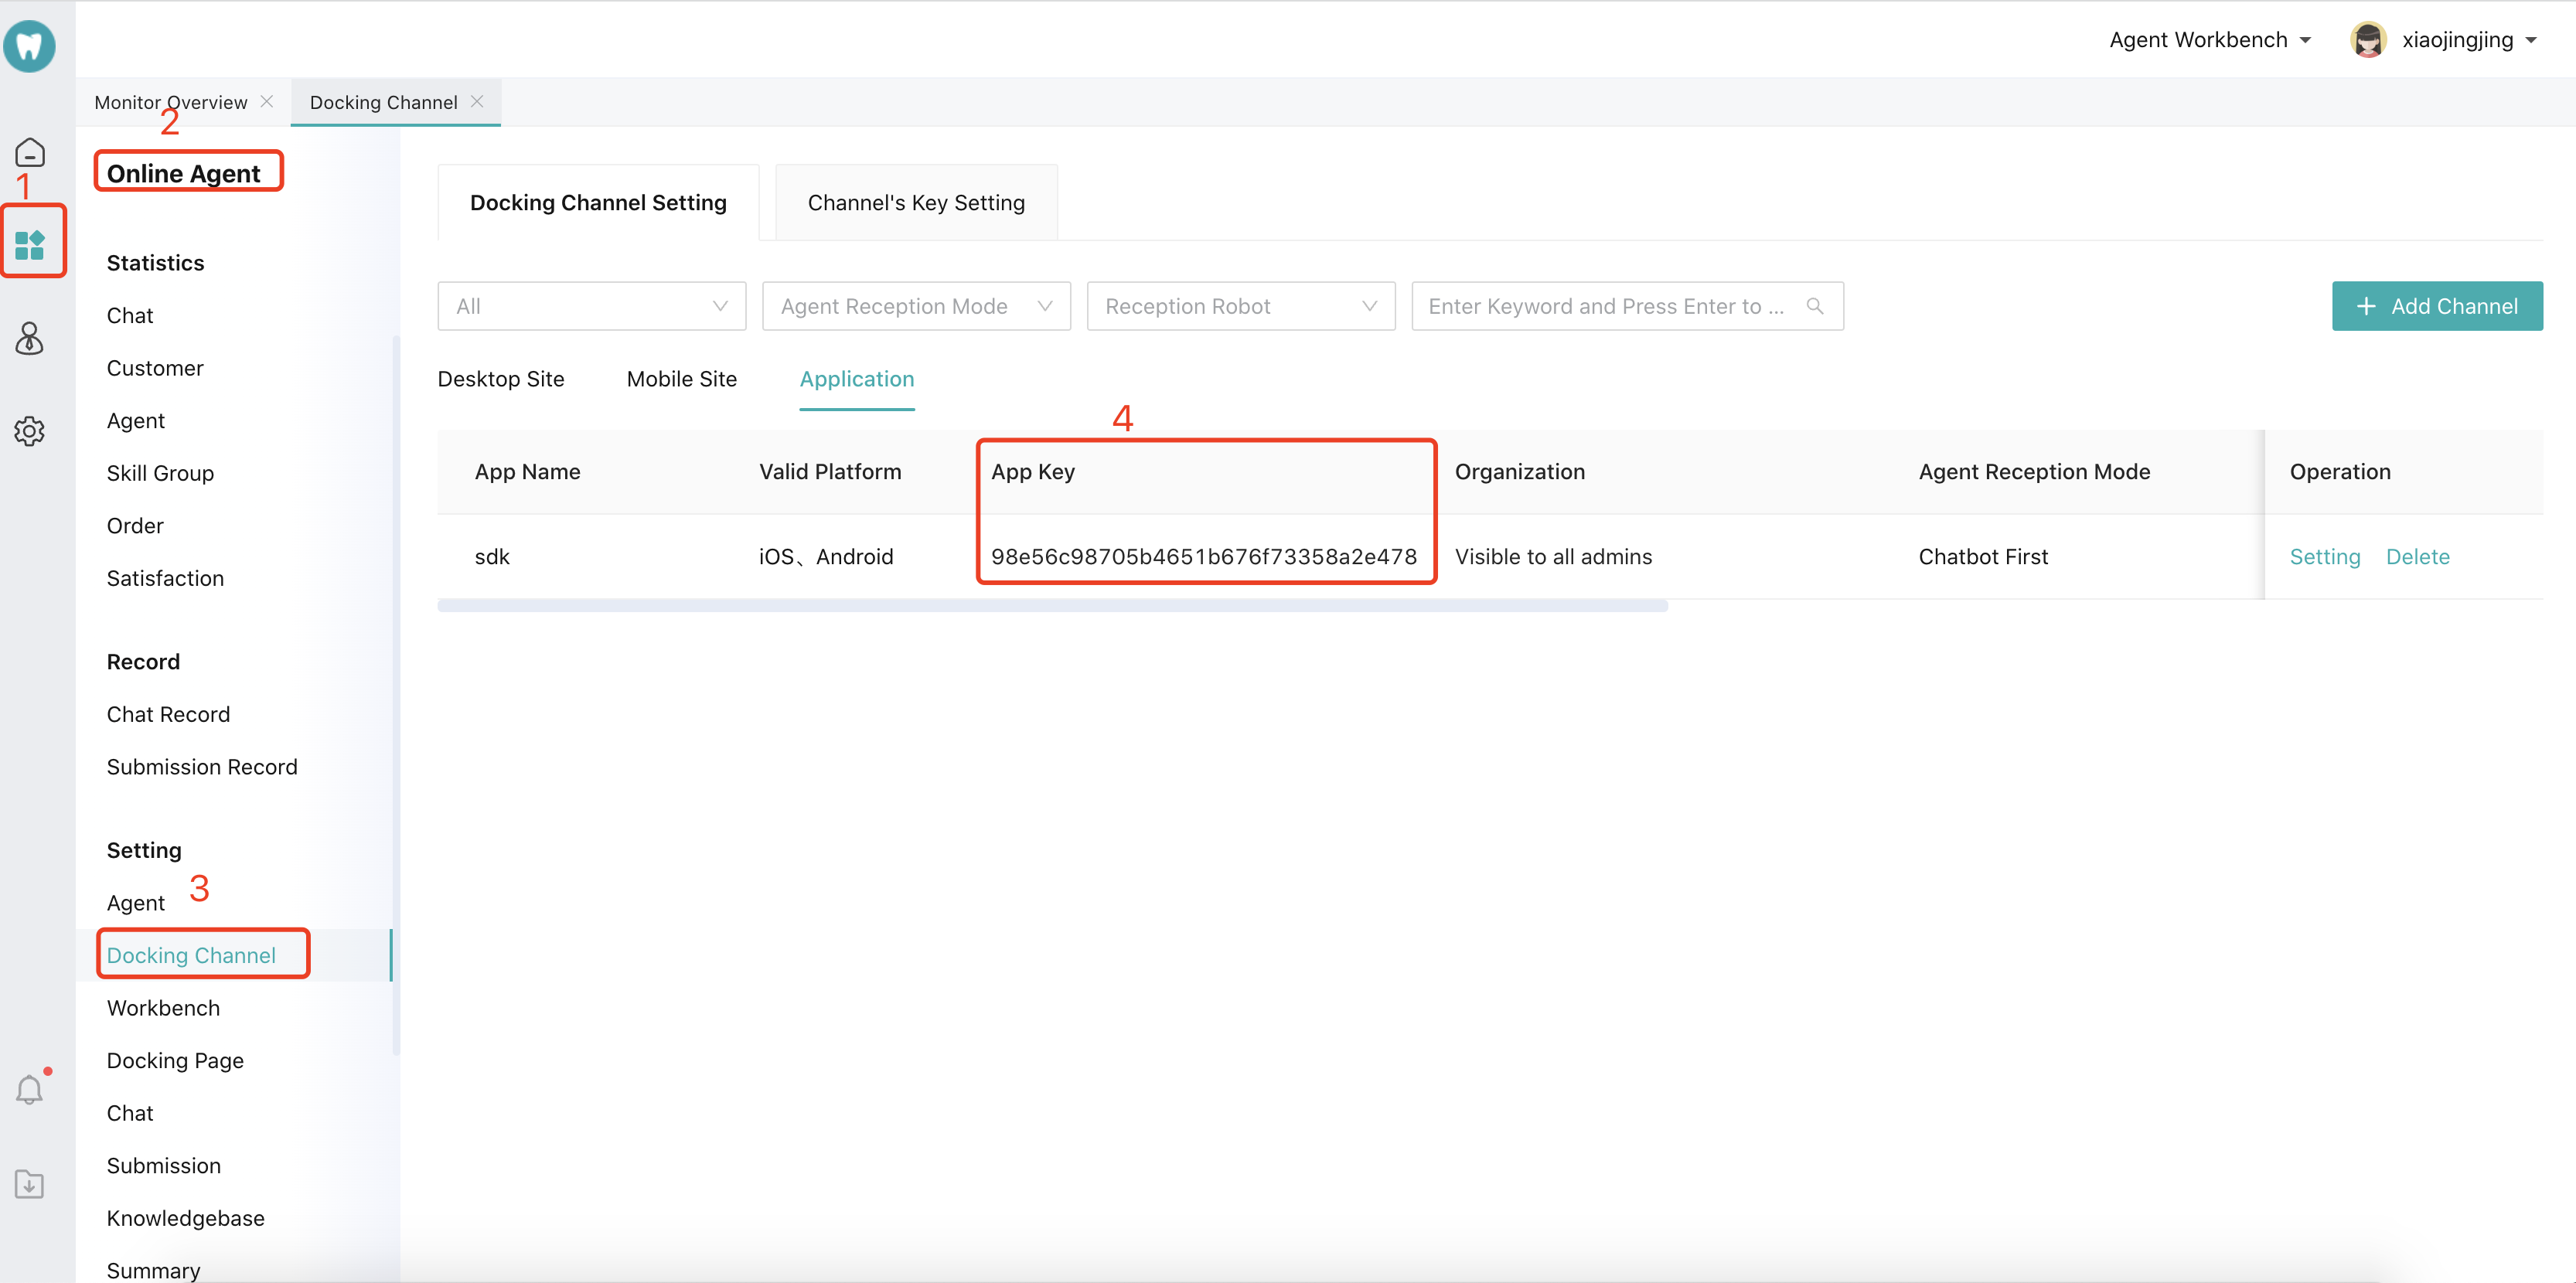
# ● Get Appkey
Log in to Sobot Management Platform (opens new window) to get, as shown in the figure
# ● Initialization
# 1. Basic
Initialization params and call method:
[Note1: Before initiating Sobot SDK, call the initialization method initSobotSDK; otherwise the SDK cannot be initiated.]
[Note 2: Other functions in ZCSobotApi need to be called after the initialization method is executed, otherwise it will not take effect.]
API:
/**
* Initialize SDK
* @param applicationcontext  Context  Required
* @param appkey  User's appkey  Required  If you are a platform user, you have to pass the HQ appkey
* @param partnerid     User's unique ID. You cannot pass the same value but can set it to null
*/
ZCSobotApi.initSobotSDK(Context application,String appkey,final String partnerid);
2
3
4
5
6
7
Sample code:
private void initSobotApp() {
      ZCSobotApi.initSobotSDK(your application,"your appkey", "");
}
2
3
# 2. E-commerce
Initialization params and call method:
[Note 1: Before initiating Sobot SDK, call the initialization methods initPlatformUnion and initSobotSDK; otherwise the SDK cannot be initiated.]
[Note 2: Other functions in ZCSobotApi need to be called after the initialization method is executed, otherwise it will not take effect.]
API:
/**
* Initialization platform ID
* @param applicationcontext  Context  Required
* @param  platformUnionCode  platform ID      Required     Please contact the corresponding customer service to apply
* @param platformSecretkey Platform identifier  Key  Please contact the corresponding agent to apply
*/
ZCSobotApi.initPlatformUnion(Context application, String platformUnionCode,String platformSecretkey);

// Merchant docking ID (E-commerce only. In case of no app_key, it must be provided)
// info.setCustomer_code("your customer code");
2
3
4
5
6
7
8
9
10
API (optional):
// Set overflow mall home site company ID
ZCSobotApi.setFlow_Company_Id(context,"your flowCompanyId");
// Set overflow mall home site company skill group ID
ZCSobotApi.setFlow_GroupId(context,"your flowGroupId");
// Set whether to overflow to main merchant  flowType  0-Not overflow, 1-All overflow, 2-Overflow at occupied status, 3-Overflow at offline status; not overflow by default.
ZCSobotApi.setFlow_Type(context,"your flowType");
2
3
4
5
6
7
Sample code:
private void initApp() {
     ZCSobotApi.initSobotSDK(your application, getResources().getString(R.string.sobot_appkey), "");
     // initPlatformUnion() is called after initSobotSDK()
     // platformUnionCode  platform ID
     ZCSobotApi.initPlatformUnion(your application, "your platformUnionCode", "");
}
2
3
4
5
6
# 3. Permission description
SDK has used 3 highly sensitive permissions (file storage, MIC, camera).
permission usage description table:
| Permission | Functions requiring this permission |
|---|---|
| File storage | Voice messages to agents; photos, videos, camera, files in the "+" icon; uploading photos/videos in submission; |
| MIC | Voice messages to agents; camera in the "+" icon; |
| Camera | Camera in the "+" icon; taking photos in submission; |
These highly sensitive permissions are only used in the functions listed in the above table. Upon usage, the system will dynamically detect and request. The functions can be used only after the user agrees; Without these highly sensitive permissions, other functions of the SDK will not be affected.
If you need to inform the user of the purpose of the permission before applying for it, you can use this method Pop up permission use prompt bo .
# ● Initiate Sobot Page
# 1. Initiate Sobot page
Basic and E-commerce editions have the same initiation method.
API
Information info = new Information();
// appkey  required be passed in
info.setApp_key("Your appkey");
/**
* @param context Context object
* @param information Initialization parameter
*/
ZCSobotApi.openZCChat(context, information);
2
3
4
5
6
7
8
Sample code:
Information info = new Information();
// appkey  required
info.setApp_key(et_appkey.getText().toString());
// Note: It's the user's unique ID. You cannot pass the same value. It is optional with the maximum length of 300
info.setPartnerid("");
// User's nickname, optional
info.setUser_nick("");
// User's name, optional
info.setUser_name("");
// User's phone no., optional
info.setUser_tels("");
// User's email, optional
info.setUser_emails("");
// Custom avatar, optional
info.setFace("");
// User's QQ account, optional
info.setQq("");
// User's notes, optional
info.setRemark("");
// Access landing page title, optional
info.setVisit_title("");
// Access landing page link URL, optional
info.setVisit_url("");
//corporate name 4.1.5 add
info.setEnterprise_name("xxx");
ZCSobotApi.openZCChat(context, info);
2
3
4
5
6
7
8
9
10
11
12
13
14
15
16
17
18
19
20
21
22
23
24
25
26
If you have special requirements, the SDK also provides a function of integrating chat interface in the way of Fragment embedding, so that developers can use the SDK more flexibly. Below shows sample code (you also can refer to the Fragment implementation in SobotChatActivity).
Bundle informationBundle = new Bundle();
informationBundle.putSerializable(ZhiChiConstant.SOBOT_BUNDLE_INFO, info);
SobotChatFragment fragment = SobotChatFragment.newInstance(informationBundle);
FragmentManager fm = getSupportFragmentManager();
FragmentTransaction transaction = fm.beginTransaction();
// containerId is ViewGroup resId
transaction.replace(containerId, fragment);
try {
    transaction.commitAllowingStateLoss();
} catch (Exception e) {
}
2
3
4
5
6
7
8
9
10
11
# 2. Initiate merchant list (E-commerce only)
/**
 * Initiate merchant list
 *
 * @param context Context object
 * @param uid User's unique ID  Consistent with partnerid passed in information
 */
ZCSobotApi.openZCChatListView(Context context,String partnerid);
2
3
4
5
6
7
Set Message Center item callback:
SobotOption.sobotConversationListCallback = new SobotConversationListCallback(){
   @Override
   public void onConversationInit(Context context,Information info) {
     // Click a chat in the chat list to initiate the chat page
     // The default initiation method cannot access the agent chat configuration, so you need to set this callback manually
     /**
      *  For example:
      *  User's nickname, optional
      *  info.setUser_nick("");
      *  .....
      *  ZCSobotApi.openZCChat(context, info);
      **/
   }
};
2
3
4
5
6
7
8
9
10
11
12
13
14
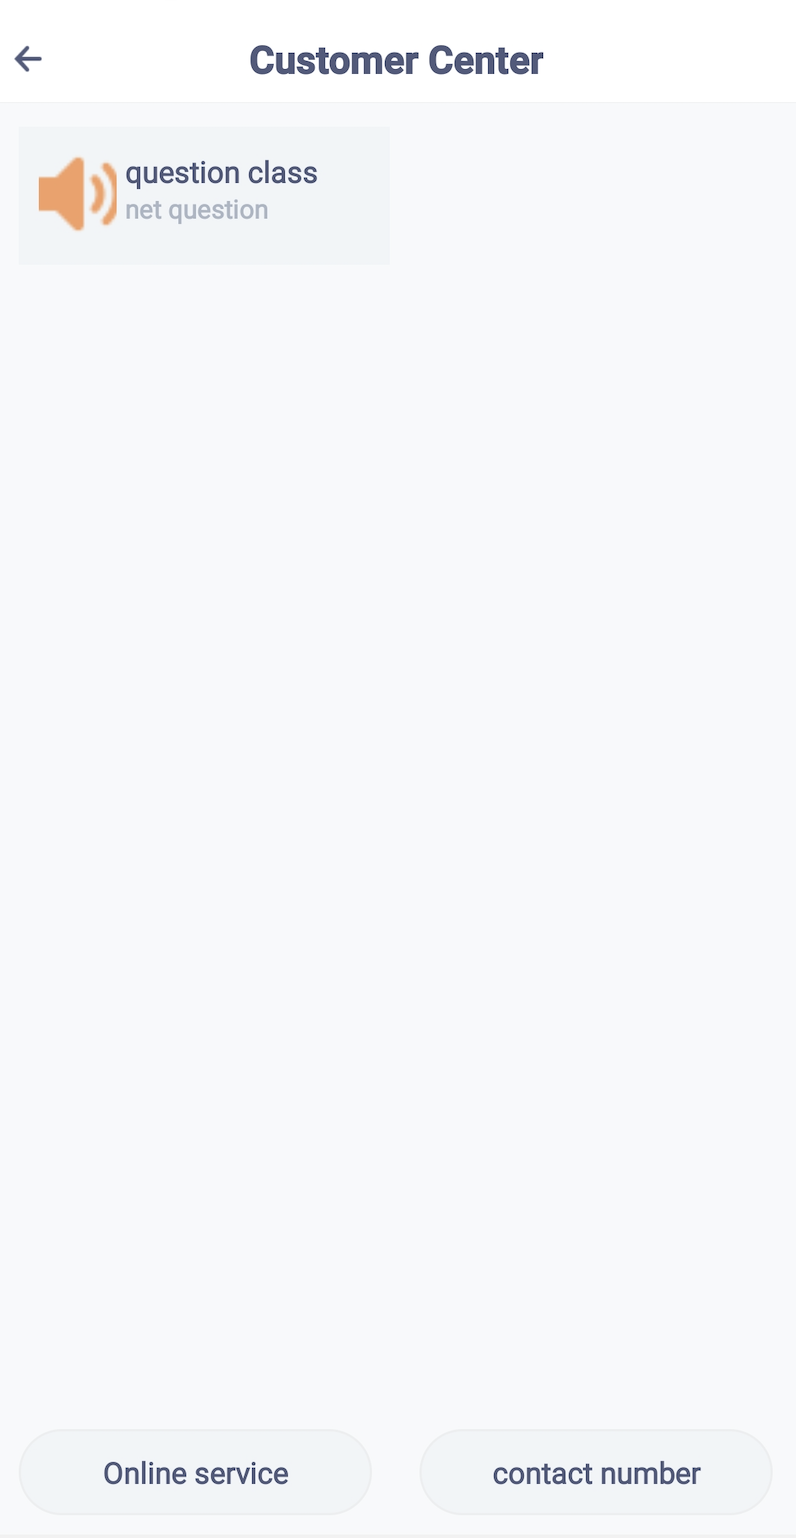
# 3. Initiate Help Center
Information info = new Information();
info.setApp_key("Your AppKey");    // Key assigned to App

// SDK 2.9.3 is added with Help Center phone button, which can be displayed only when phone no. and display text are filled
info.setHelpCenterTel("18510000000");// Phone no.
info.setHelpCenterTelTitle("contact number");// Phone button display text

/**
* @param context Context object
* @param information Initialization parameter
*/
ZCSobotApi.openZCServiceCenter(context, information);
2
3
4
5
6
7
8
9
10
11
12
Sketch:
# ● End Chat
When users log out of the app, they can call the SDK logout operation (when switching accounts). This operation will notify the server to unbind the information push to avoid that the user has logged out but the push is still sent to the current device.
Call the following method when it's used for user logout:
[Note: Calling this method will disconnect the channel, and the user can no longer receive any message.]
/**
* @param context Context object
*/
ZCSobotApi.outCurrentUserZCLibInfo(context);
2
3
4
# ● Chatbot
# 1. Dock with the designated bot
Get the bot no. at backend:
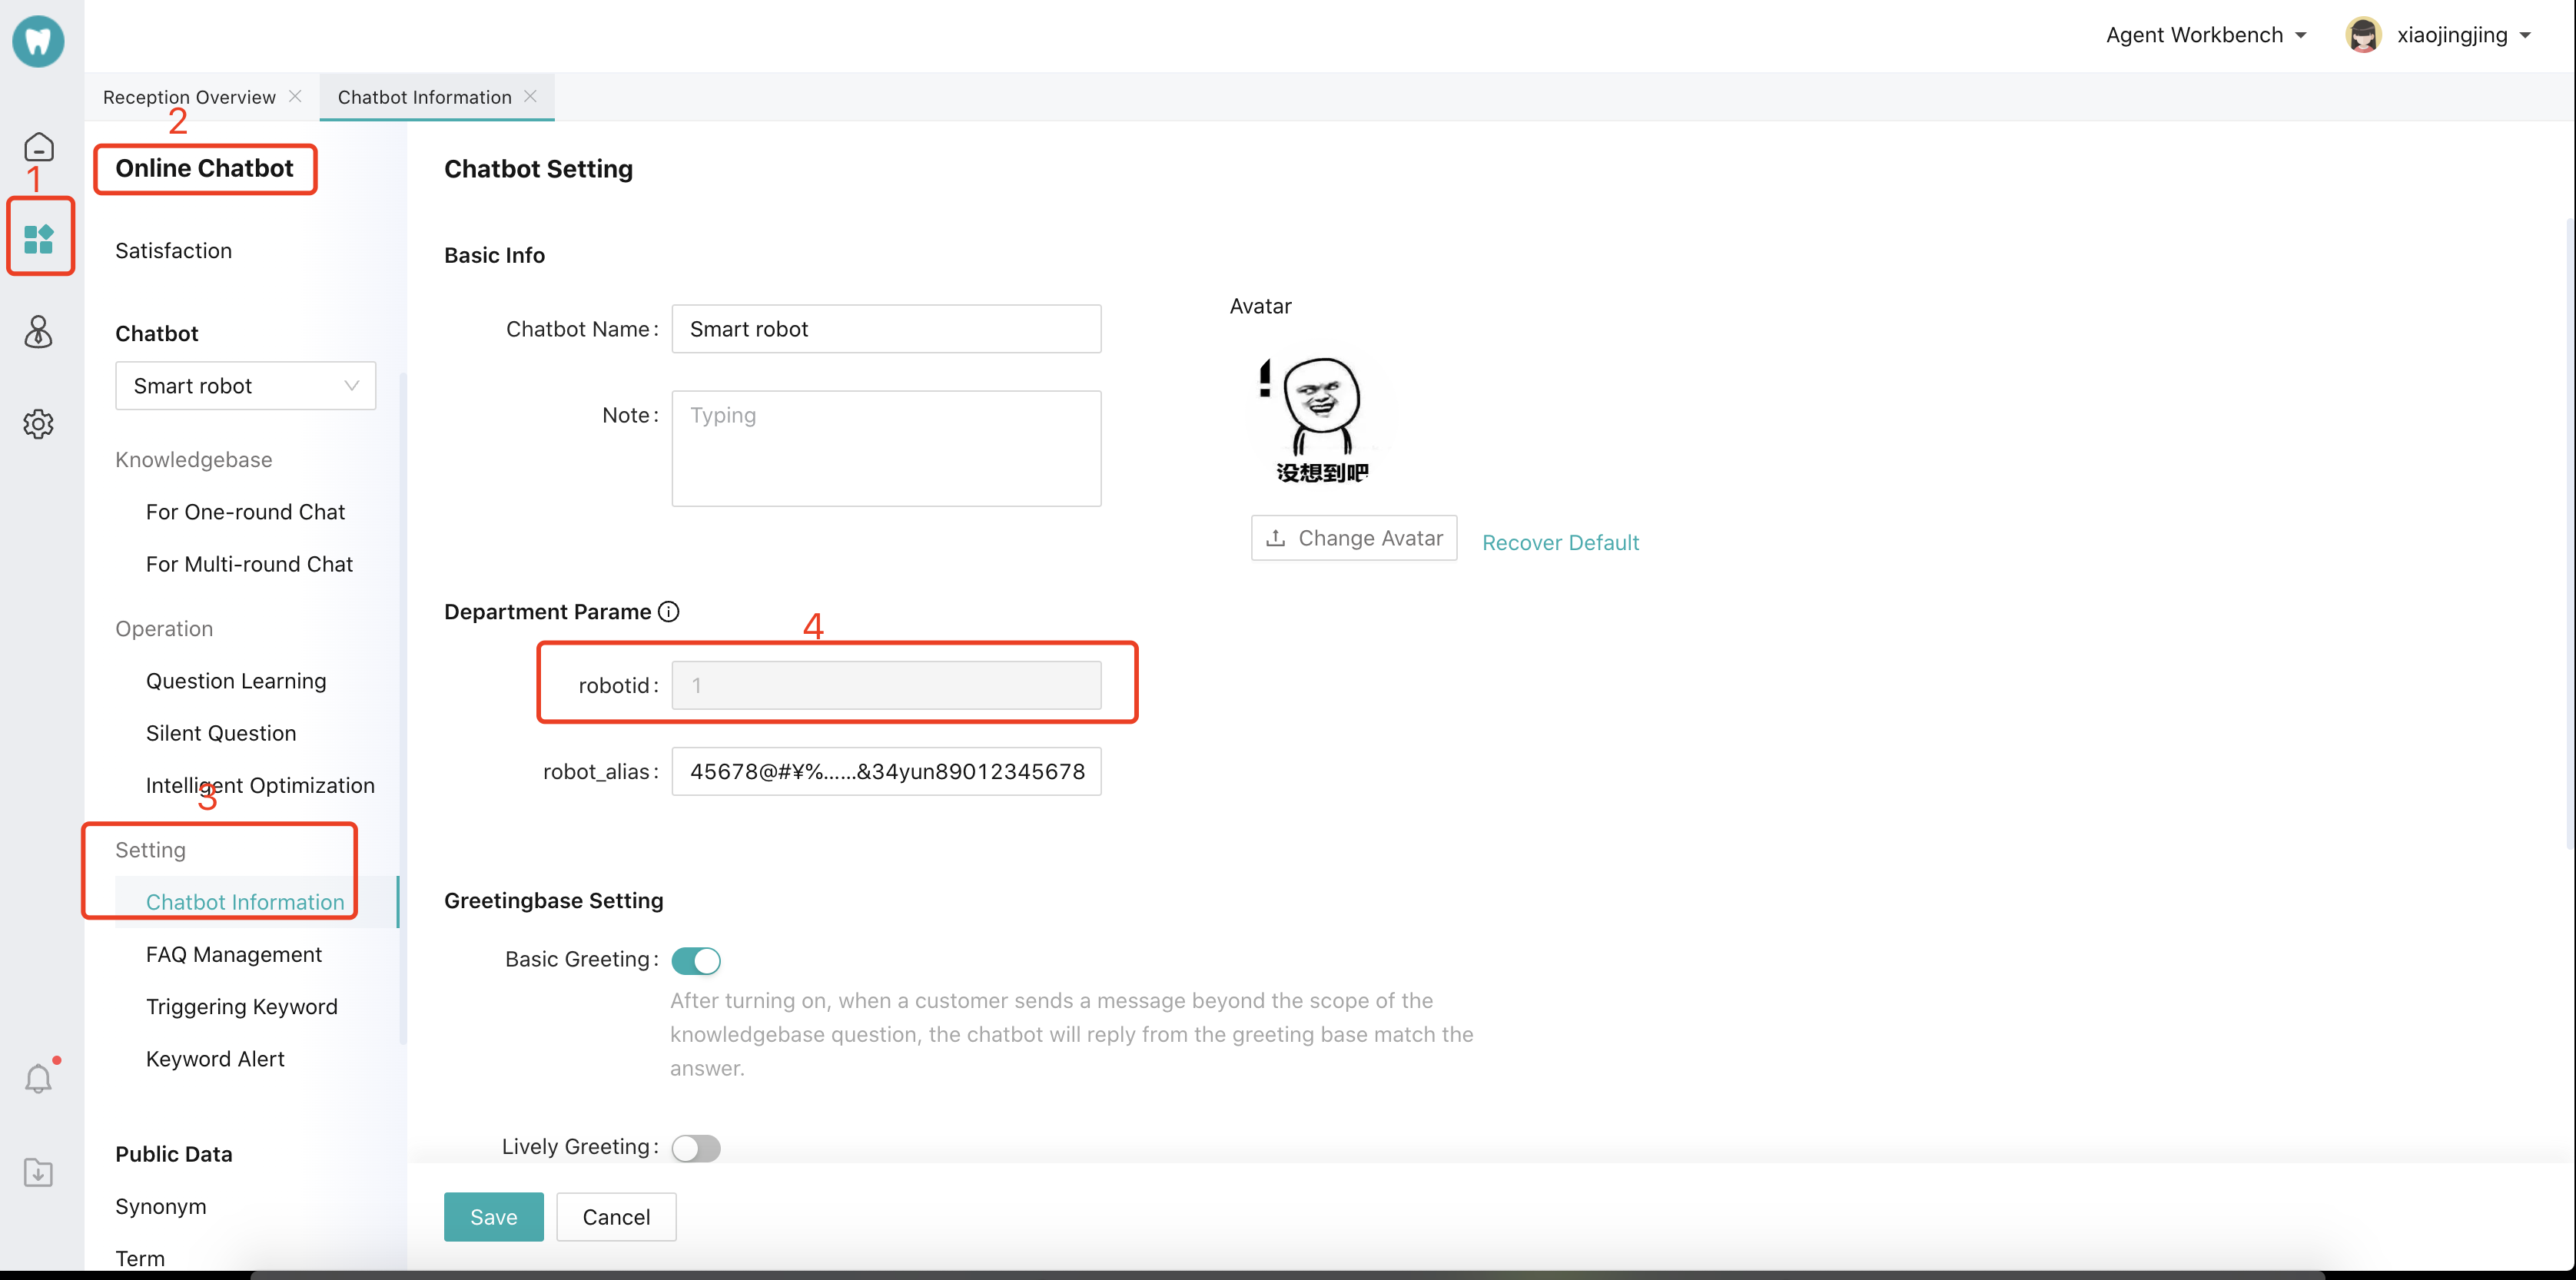
Configure in SDK codes:
// Set bot no.
info.setRobotCode("your robot code");

// Set alias to the bot no.
// The designated alias and no. have the same ID effect
info.setRobot_alias("your robot alias");
2
3
4
5
6
# 2. Customize access mode
As per business requirements, you can configure the following initialization params to control access mode:
// Default false: Display Trans-to-Agent button. true: Intelligent Trans-to-Agent
info.setArtificialIntelligence(false);
// When unknown questions or guide questions exceed (X), display Trans-to-Agent button.
// Note: It works only when ArtificialIntelligence param is true
info.setArtificialIntelligenceNum(X);
// Whether to use voice function true: Yes false: No true by default
info.setUseVoice(true);
// Whether to use bot voice function true: Yes false: No false by default, because you have to pay for use
info.setUseRobotVoice(false);
// Agent mode control --- 1 Not control Run in the mode set by the server backend
// 1 Bot only 2 Agent only 3 Bot first 4 Agent first
info.setService_mode(-1);
// Enter Trans-to-Agent keywords in bot mode
HashSet<String> tmpSet = new HashSet<>();
tmpSet.add("Transfer to manual labor");
tmpSet.add("man-made");
info.setTransferKeyWord(tmpSet);
2
3
4
5
6
7
8
9
10
11
12
13
14
15
16
17
# 3. Customize trans-to-agent event
SDK can configure trans-to-agent interceptor and make some additional logic processing before trans-to-agent; e.g. customize skill group selector Dialog.
- Set interceptor
SobotOption.transferOperatorInterceptor = new SobotTransferOperatorInterceptor() {
    @Override
    public void onTransferStart(final Context context, final SobotTransferOperatorParam param) {
        // do something
    }
};
2
3
4
5
6
- Modify trans-to-agent params SobotTransferOperatorParam. below are modifiable params:
// Skill group ID
String groupId;
// Skill Group Name
String groupName;
// Whether to prompt after trans-to-agent
boolean isShowTips;
// Product card info
ConsultingContent consultingContent;
2
3
4
5
6
7
8
- Use trans-to-agent params to proactively call trans-to-agent API:
/**
   * Externally call trans-to-agent
   * @param context
   * @param param Trans-to-agent parameter
   */
ZCSobotApi.connectCustomerService(context, param);
2
3
4
5
6
# 4. Trans-to-agent overflow setting
Note: If reception by designated agent or skill group is set, the overflow configuration won't work.
- Configuration parameter object example
Information info = new Information();
// Set overflow skill group or agent, 4 levels max.
List<SobotTransferAction> datas = new ArrayList<>();
// E.g.: Set reception by designated agent; overflow rules are the same with skill group
SobotTransferAction firstData = new SobotTransferAction.ServiceBuilder()
        .conditionIntelligentudgement()
        .overflow()
        .designatedServiceId(" d679e5b8d45b484e9475a2ca051b44a0 ")// Designated agent ID
        .ServiceBuilder();
// E.g.: SVIP skill group
SobotTransferAction guibinData = new SobotTransferAction.Builder()
        .designatedSkillId(" ae654754311e4fa59sdfdsafdsffc ")
        .conditionIntelligentudgement()
        .overflow()
        .Build();

// E.g.: VIP skill group
SobotTransferAction vipData = new SobotTransferAction.Builder()
        .designatedSkillId(" ae654754311e4fa590b0e3a4298672fc ")
        .conditionIntelligentudgement()
        .overflow()
        .Build();
// E.g.: General skill group
SobotTransferAction data = new SobotTransferAction.Builder()
        .designatedSkillId(" a71100c5463d42bfb467762bccfef511 ")
        .conditionIntelligentudgement()
        .overflow()
        .Build();
datas.add(firstData);
datas.add(guibinData);
datas.add(vipData);
datas.add(data);
JSONArray jsonArray = GsonUtil.praseList2Json(datas);
info.setTransferAction(jsonArray.toString());
2
3
4
5
6
7
8
9
10
11
12
13
14
15
16
17
18
19
20
21
22
23
24
25
26
27
28
29
30
31
32
33
34
- Configuration param description
① Set whether to overflow
// Overflow
overflow()
// Not overflow
no_overflow()
② Set the designated skill group
designatedSkillId("Skill Groupid")
   Set the designated agent
designatedServiceId("customer serviceid")


③ Set overflow conditions
// When designating an agent group: No agent online in the skill group
conditionServiceOffline()
// When designating an agent group: All agents occupied in the skill group
conditionServiceBusy()
// When designating an agent group: The skill group is off duty
conditionServiceOffWork()
// When designating an agent group: Intelligent judgement
conditionIntelligentudgement()
2
3
4
5
6
7
8
9
10
11
12
13
14
15
16
17
18
19
20
# 5. In bot mode, buttons in the "+" menu bar can be hidden
// Hide submission function. It will be hidden in both agent and bot modes  true: Hide, false: Display; false by default
info.setHideMenuLeave(true);
// Hide evaluation function  true: Hide, false: Display; false by default
info.setHideMenuSatisfaction(true);
2
3
4
# 6. Designate FAQ guide
// New function for SDK 2.9.2. When entering in different scenarios, you can configure the FAQ guide for the faqid designated bot
info.setFaqId("robot faqid");
2
# ● Agent
# 1. Dock with the designated skill group
Get the skill group no. in the backend:
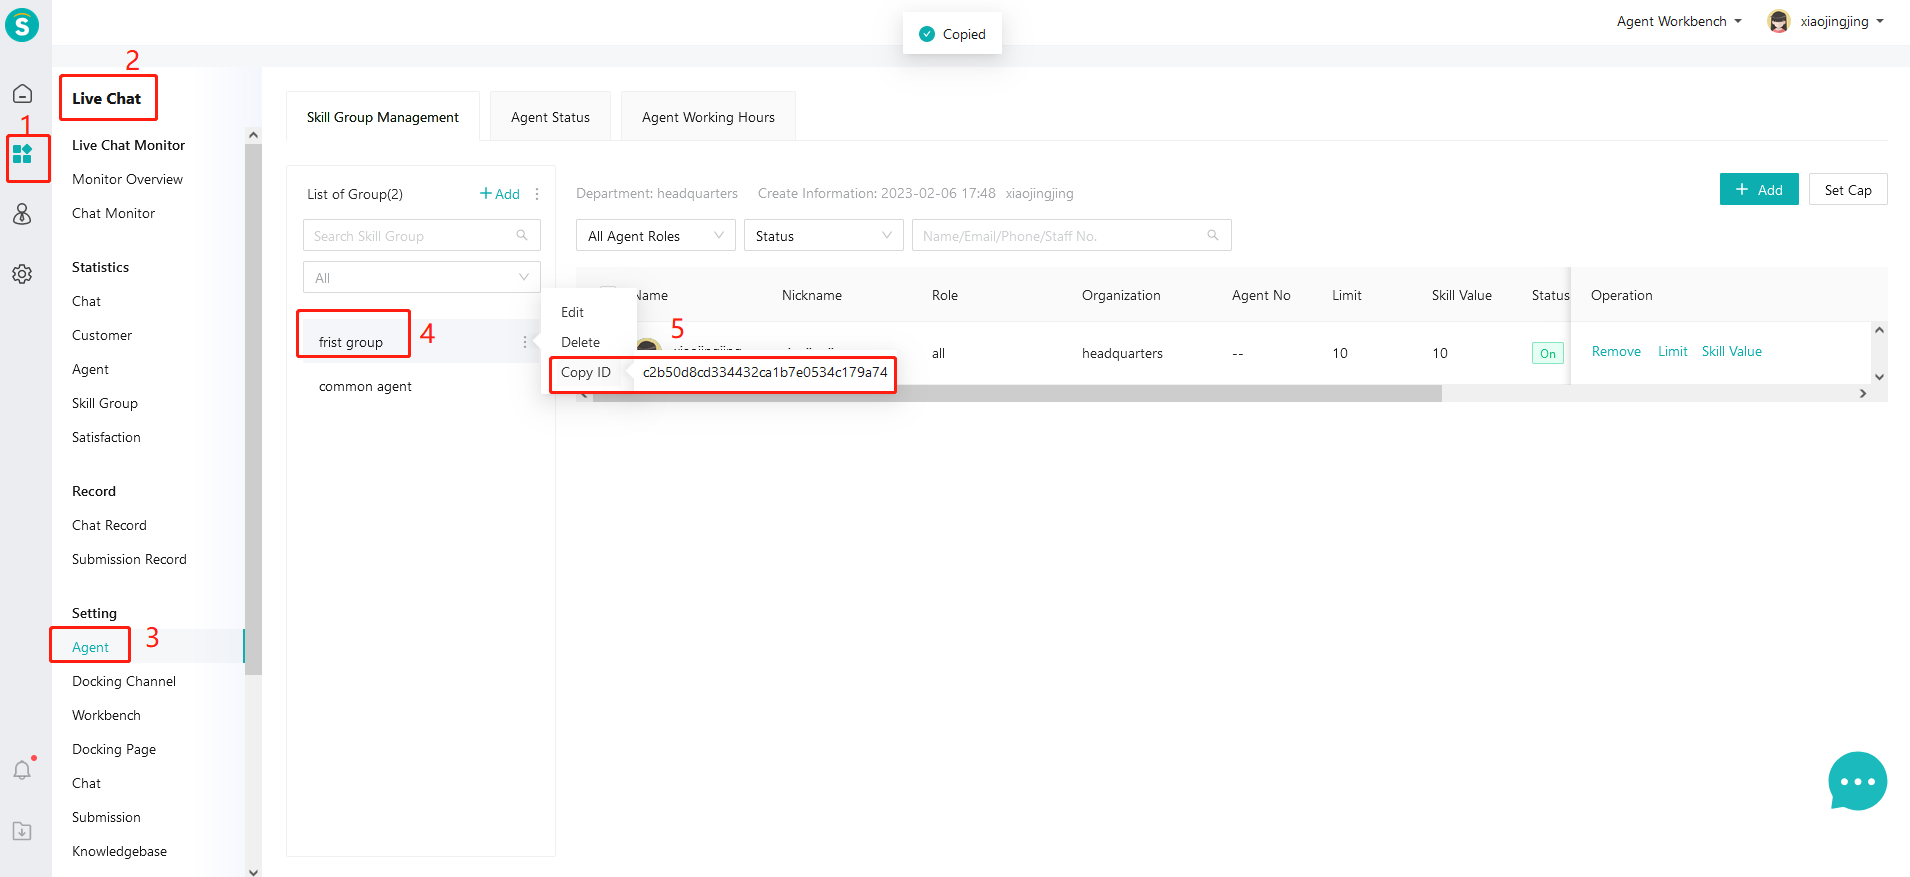
Configure skill group ID in SDK codes:
// Set skill group no.
info.setGroupid("your groupId");
// Set skill group name, optional
info.setGroup_name("your groupName");
2
3
4
Note: This field is optional. If a skill group ID is passed in, it will not pop up skill group selection box after trans-to-agent in SDK; it will directly jump to the skill group corresponding to the passed ID.
# 2. Dock with the designated agent
Get the designated agent ID in the backend:
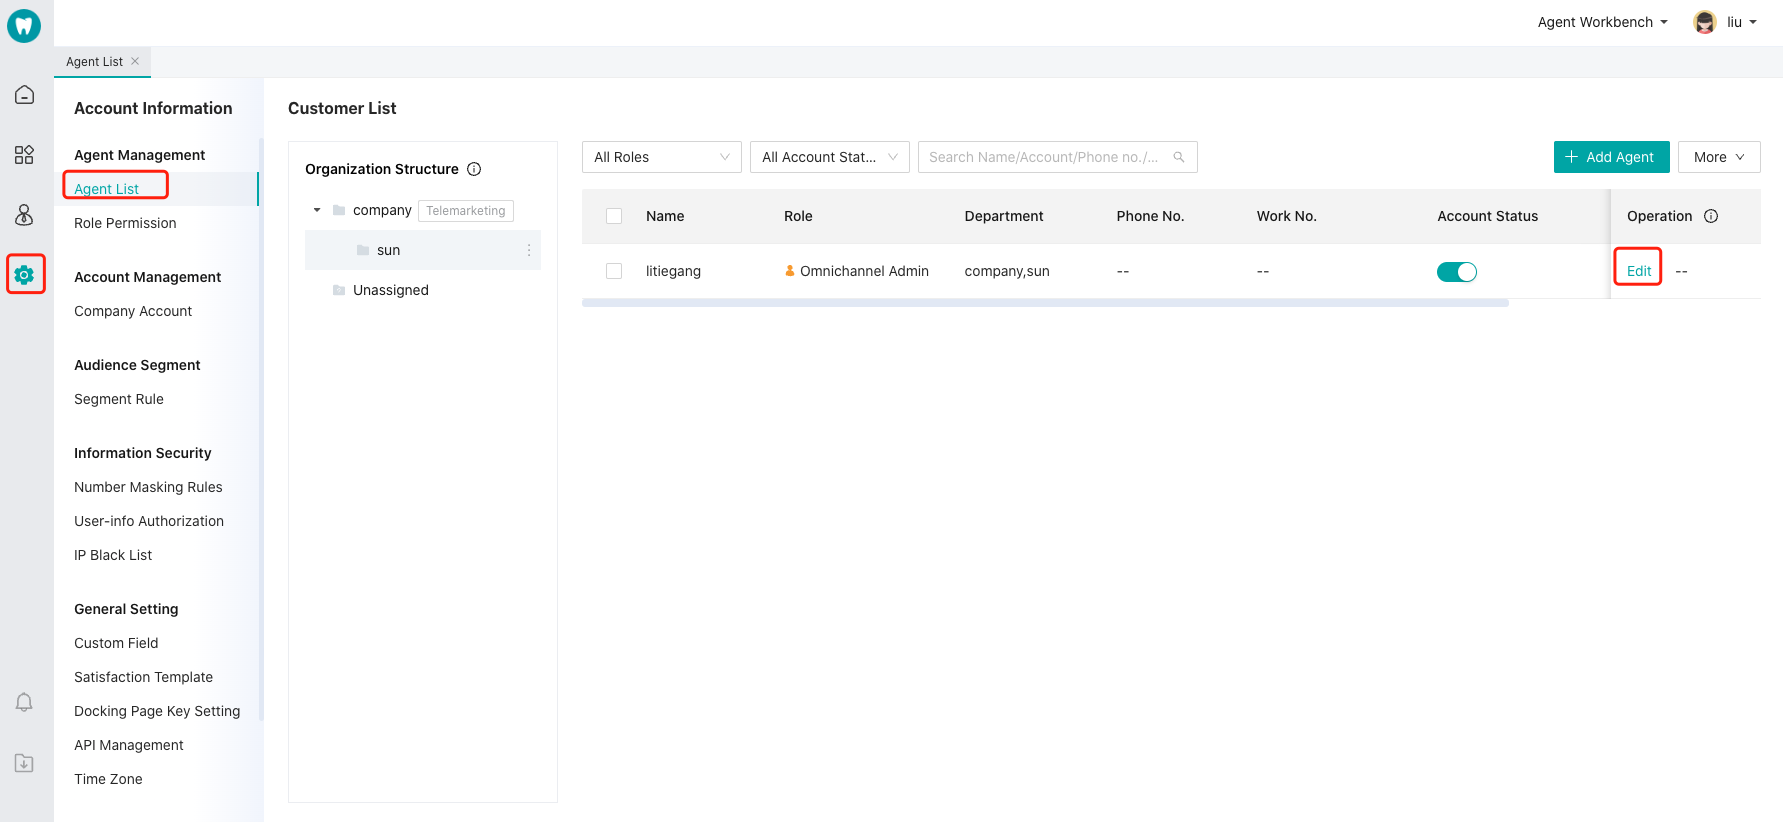
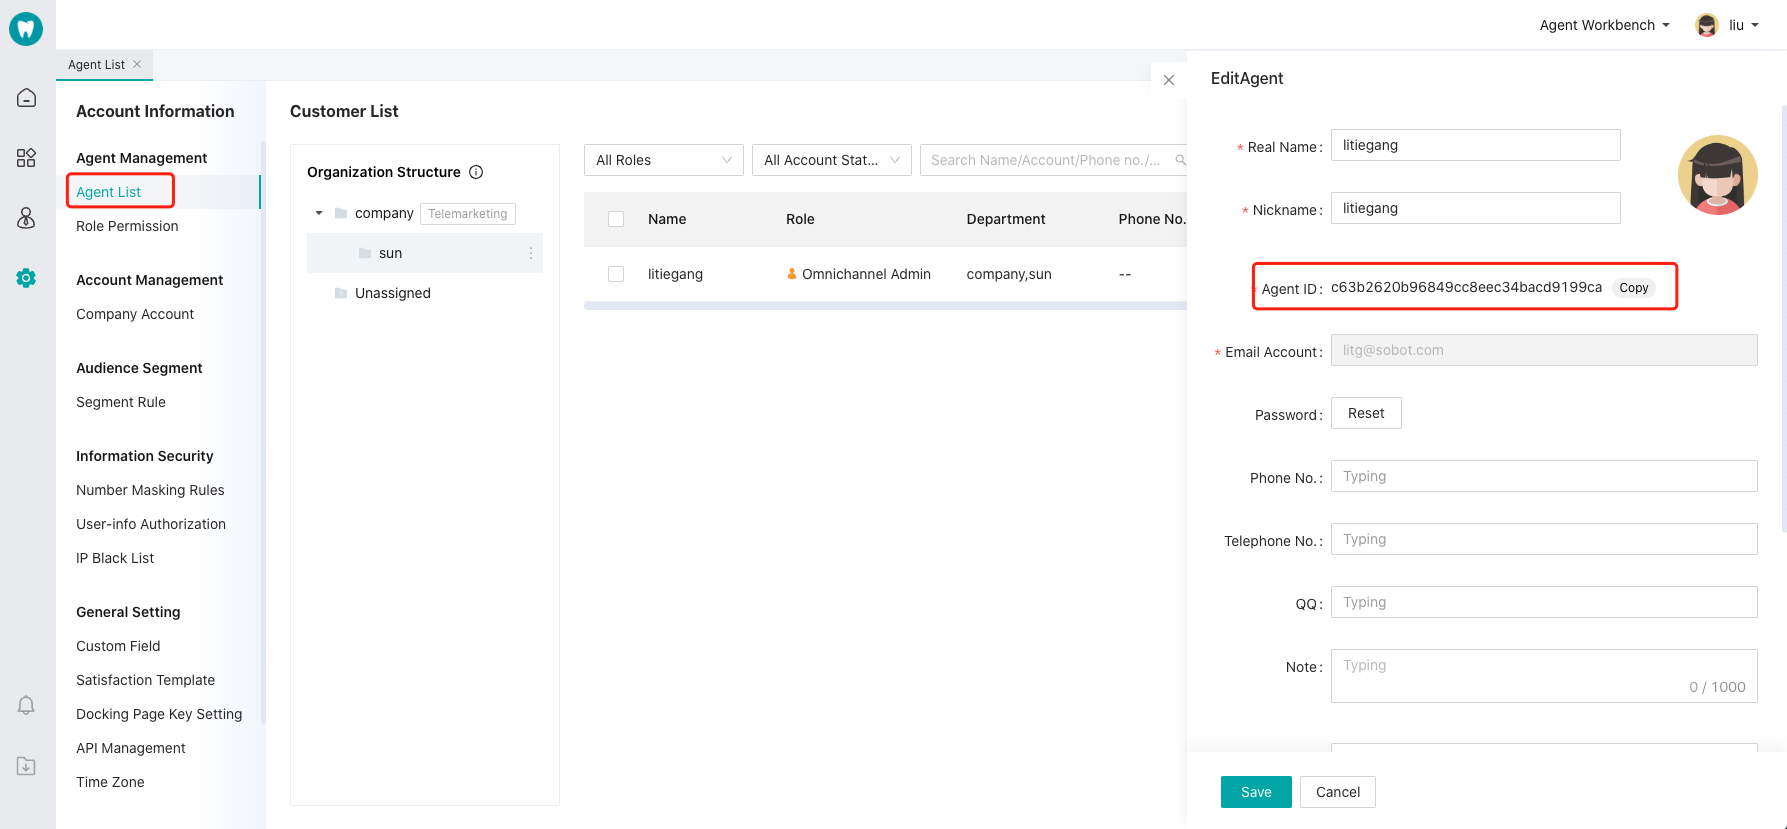
Configure in SDK codes:
// Transfer type (0-Transfer to any agent, 1-Transfer to the designated agent alone)
info.setTranReceptionistFlag(1);
// Designate agent ID
info.setChoose_adminid("your Customer service id");
2
3
4
Note:
choose_adminid: Designate the docking agent. If it's not designated, the default setting applies.
tranReceptionistFlag :After setting the specified customer service, do you want to Transfer to the designated agent alone 0 :Can be transferred to other customer service, 1: Transfer to the designated agent alone, Note: If it's set to 1, when the designated agent is offline, it cannot transfer to other agents .
# 3. Set user custom profile and fields
Developers can directly pass these user data for agents to view.
When configuring fields to be displayed at the console, refer to the configuration method below:
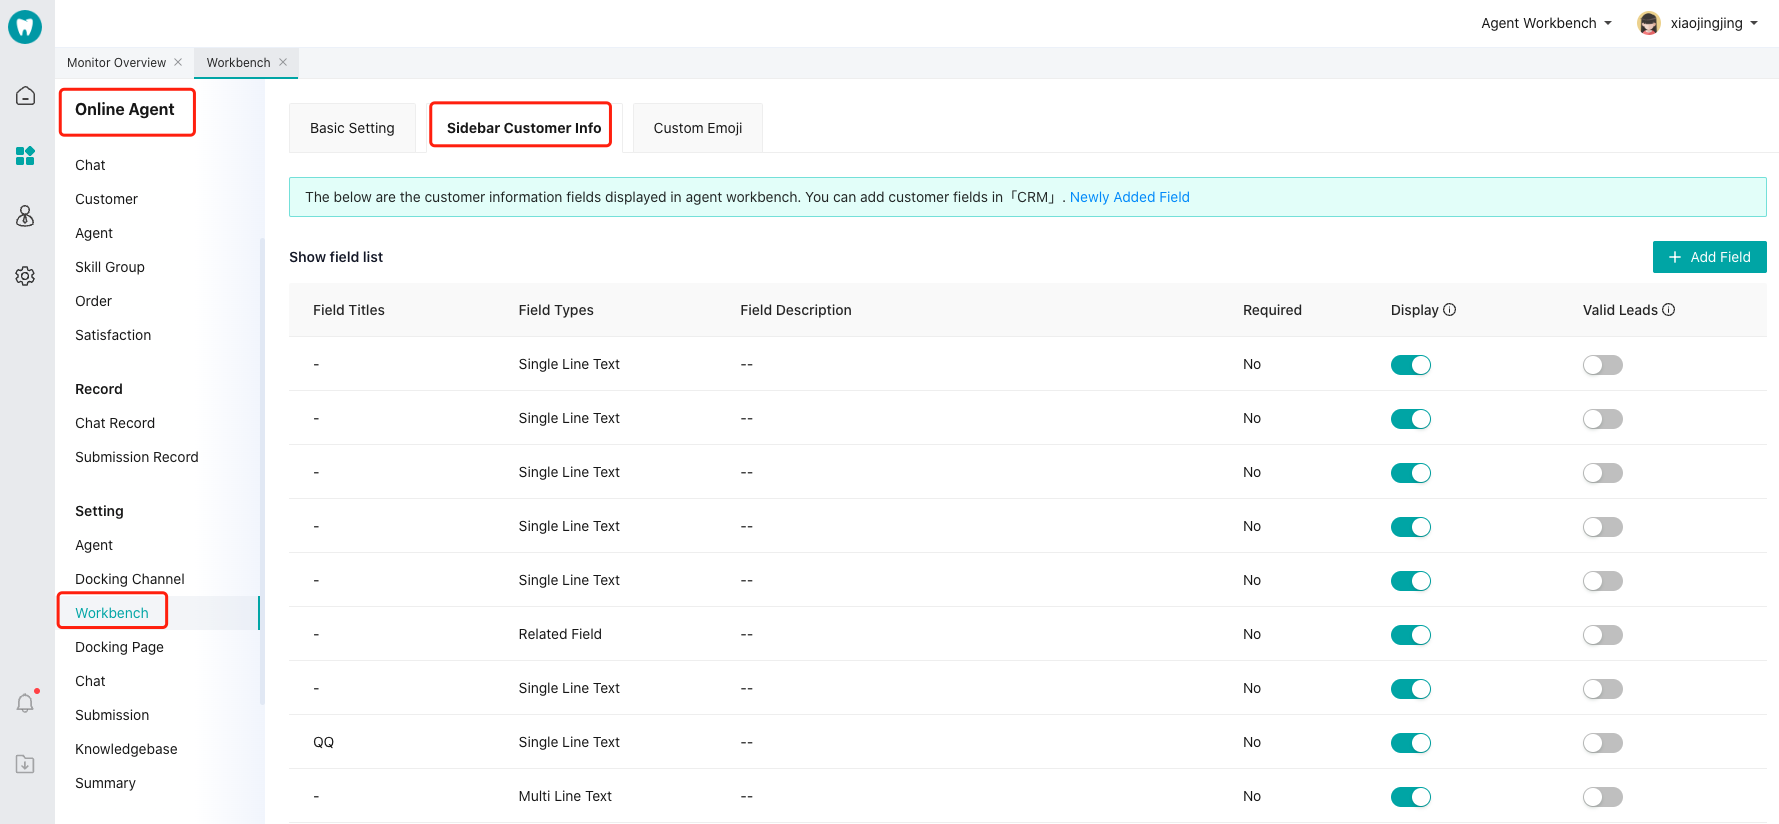
// Set user custom fields. Key must be the ID corresponding to the backend fields
Map<String,String> customerFields = new HashMap<>();
customerFields.put("weixin","your wechat");
customerFields.put("weibo","your weibo");
customerFields.put("sex","woman");
customerFields.put("birthday","2017-05-17");
info.setCustomer_fields(customerFields);
2
3
4
5
6
7
User custom profile
Method 1: Map method
//Custom User Material
Map<String, String> customInfo = new HashMap<>();
customInfo.put("means", "aaaaa");
info.setParams(customInfo);
2
3
4
Method 2: Json method
//The custom user profile string must be in JSON format, otherwise it may not be displayed
 info.setParams("{\"title\":\"title\",\"url\":\"https://www.baidu.com\"}");
2
Sketch: 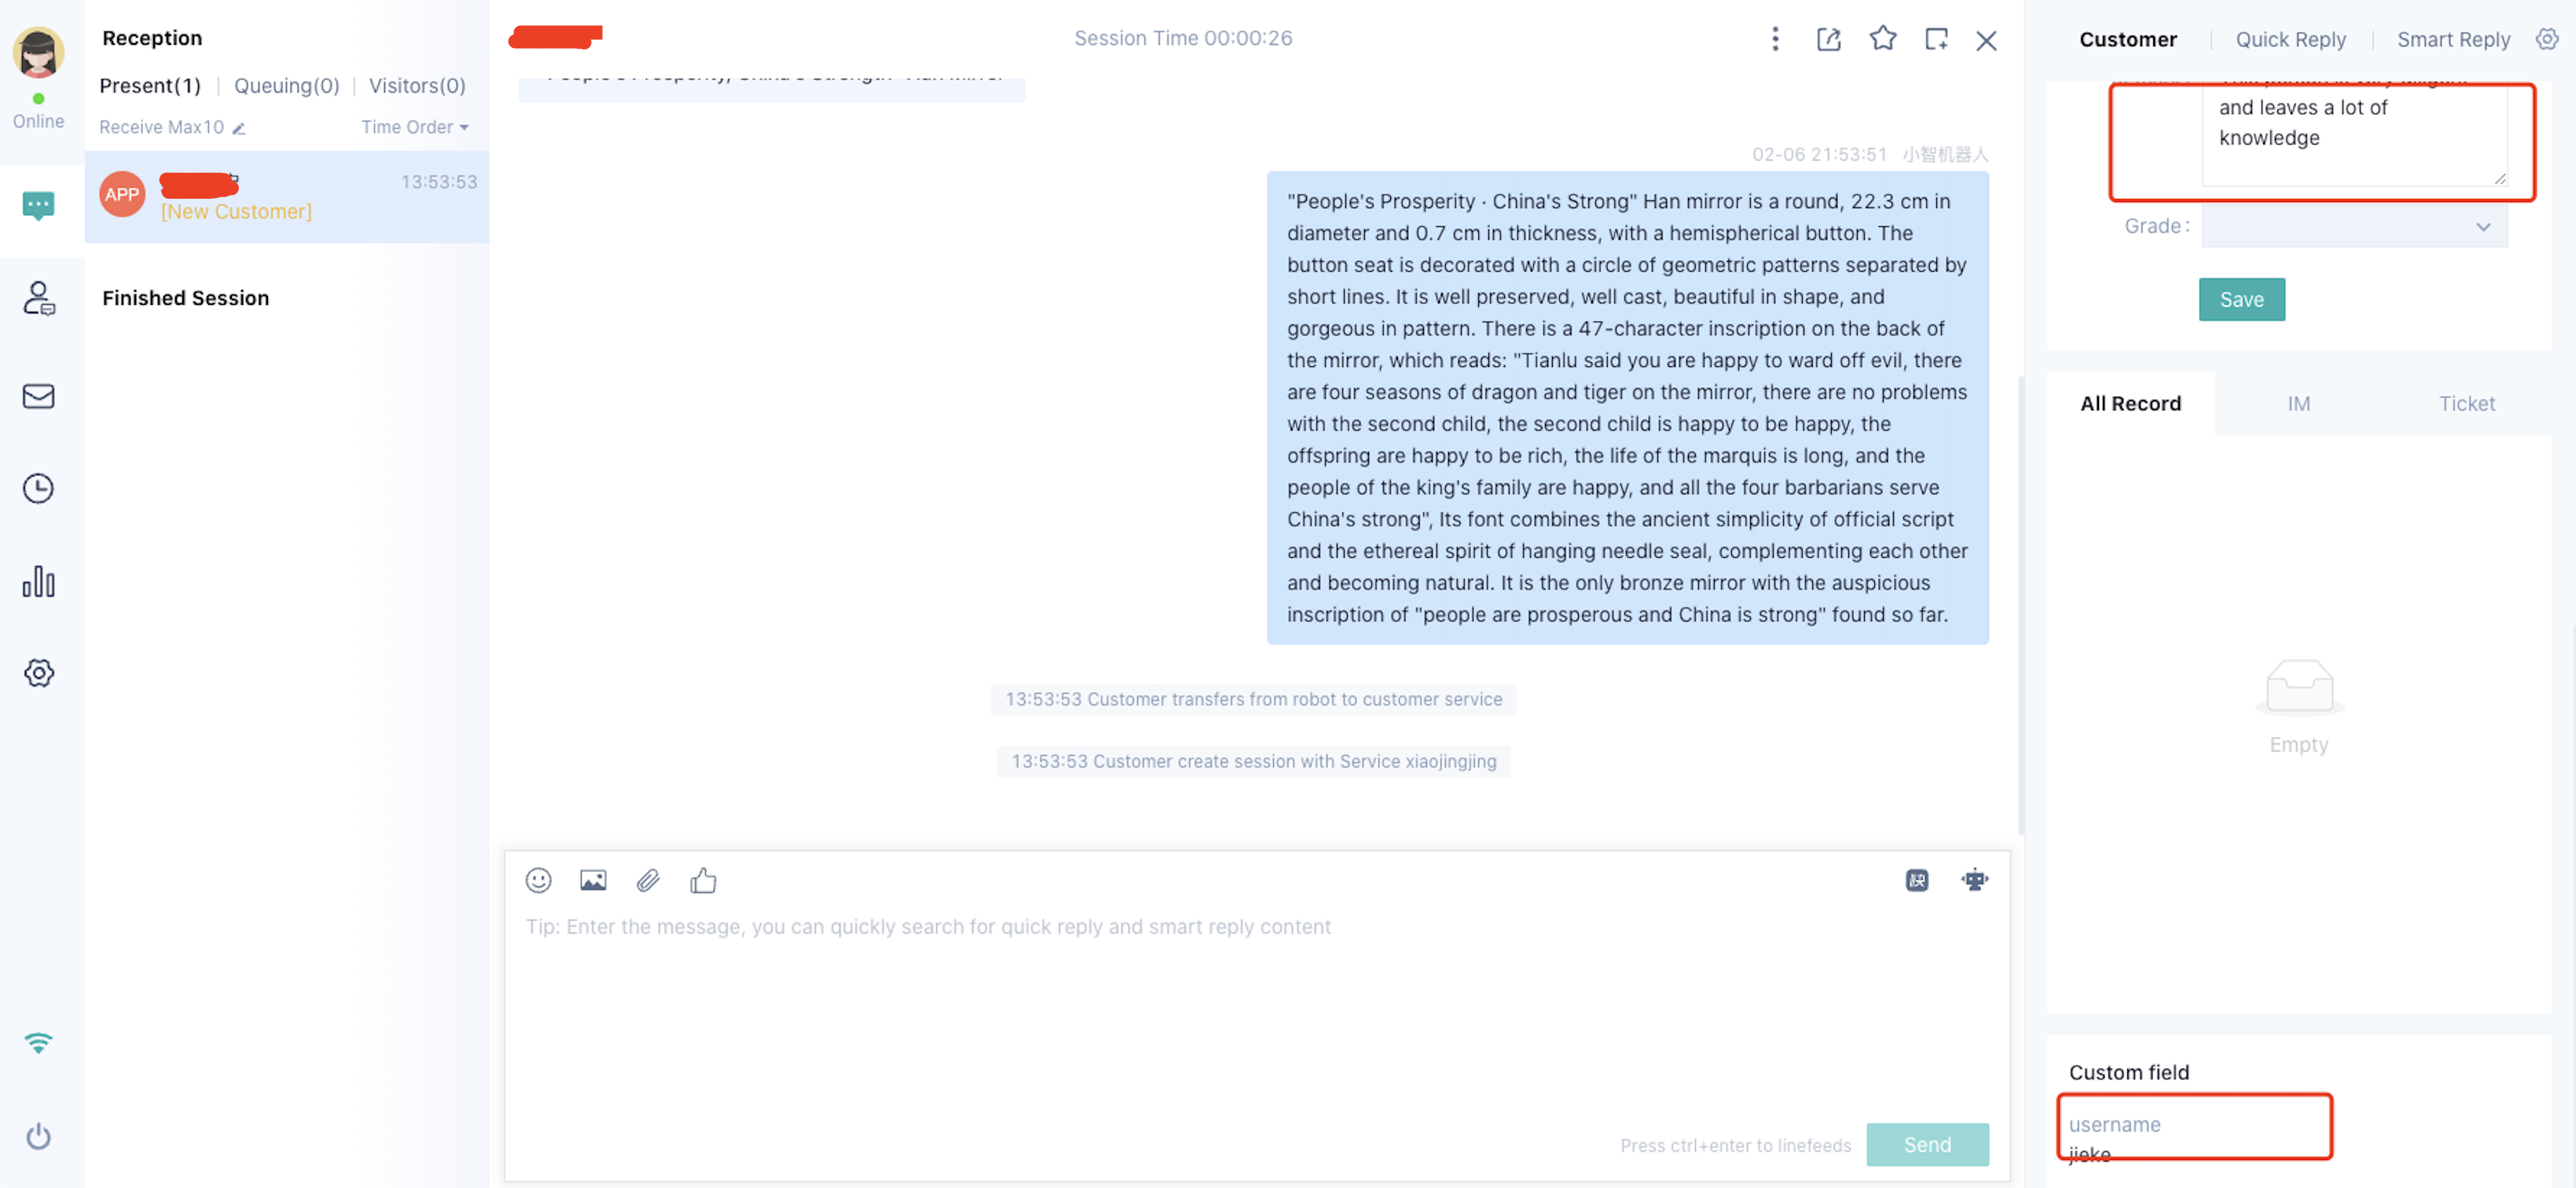
# 4. Set auto message sending after transfer
SDK can set auto message sending after successful transfer (new function for SDK 2.9.3). You can set whether to send one message automatically every time when entering the chat page. It sends once by default.
// Send text messages
// Set sending mode
// SobotAutoSendMsgMode.Default  Not send by default
// SobotAutoSendMsgMode.SendToRobot  Send to bot alone
// SobotAutoSendMsgMode.SendToOperator   Send to agent alone
// SobotAutoSendMsgMode.SendToAll   Send to all
// setIsEveryTimeAutoSend Whether to send every time when entering the chat page
info.setAutoSendMsgMode(SobotAutoSendMsgMode.SendToAll.setContent("your msg").setIsEveryTimeAutoSend(false));

// After trans-to-agent, you can send texts, photos, videos and files (only in agent mode), but have to set the local path and sending mode.
// SobotAutoSendMsgMode.ZCMessageTypeText   Text (default)
// SobotAutoSendMsgMode.ZCMessageTypePhoto  Photo
// SobotAutoSendMsgMode.ZCMessageTypeFile   File
// SobotAutoSendMsgMode.ZCMessageTypeVideo  Video
String path = CommonUtils.getSDCardRootPath() + File.separator + "2.jpg";
// path =  "sending content";
// path =  CommonUtils.getSDCardRootPath() + File.separator + "3.mp4";
// path = CommonUtils.getSDCardRootPath() + File.separator + "1.txt";
info.setAutoSendMsgMode(SobotAutoSendMsgMode.SendToOperator.setContent(path).setAuto_send_msgtype(SobotAutoSendMsgMode.ZCMessageTypePhoto));
2
3
4
5
6
7
8
9
10
11
12
13
14
15
16
17
18
19
# 5. Set the designated customer to be received first in queue
SDK can configure the current user to queue first. When entering the queue, the user will be received first.
// Set prior reception in queue  true: Prior reception  false: Default, queue as usual
info.setIs_Queue_First(true);
2
# 6. Set custom service summary fields
SDK can configure custom service summary fields, so that agents can make service summary for chats more quickly.
- Get custom field ID
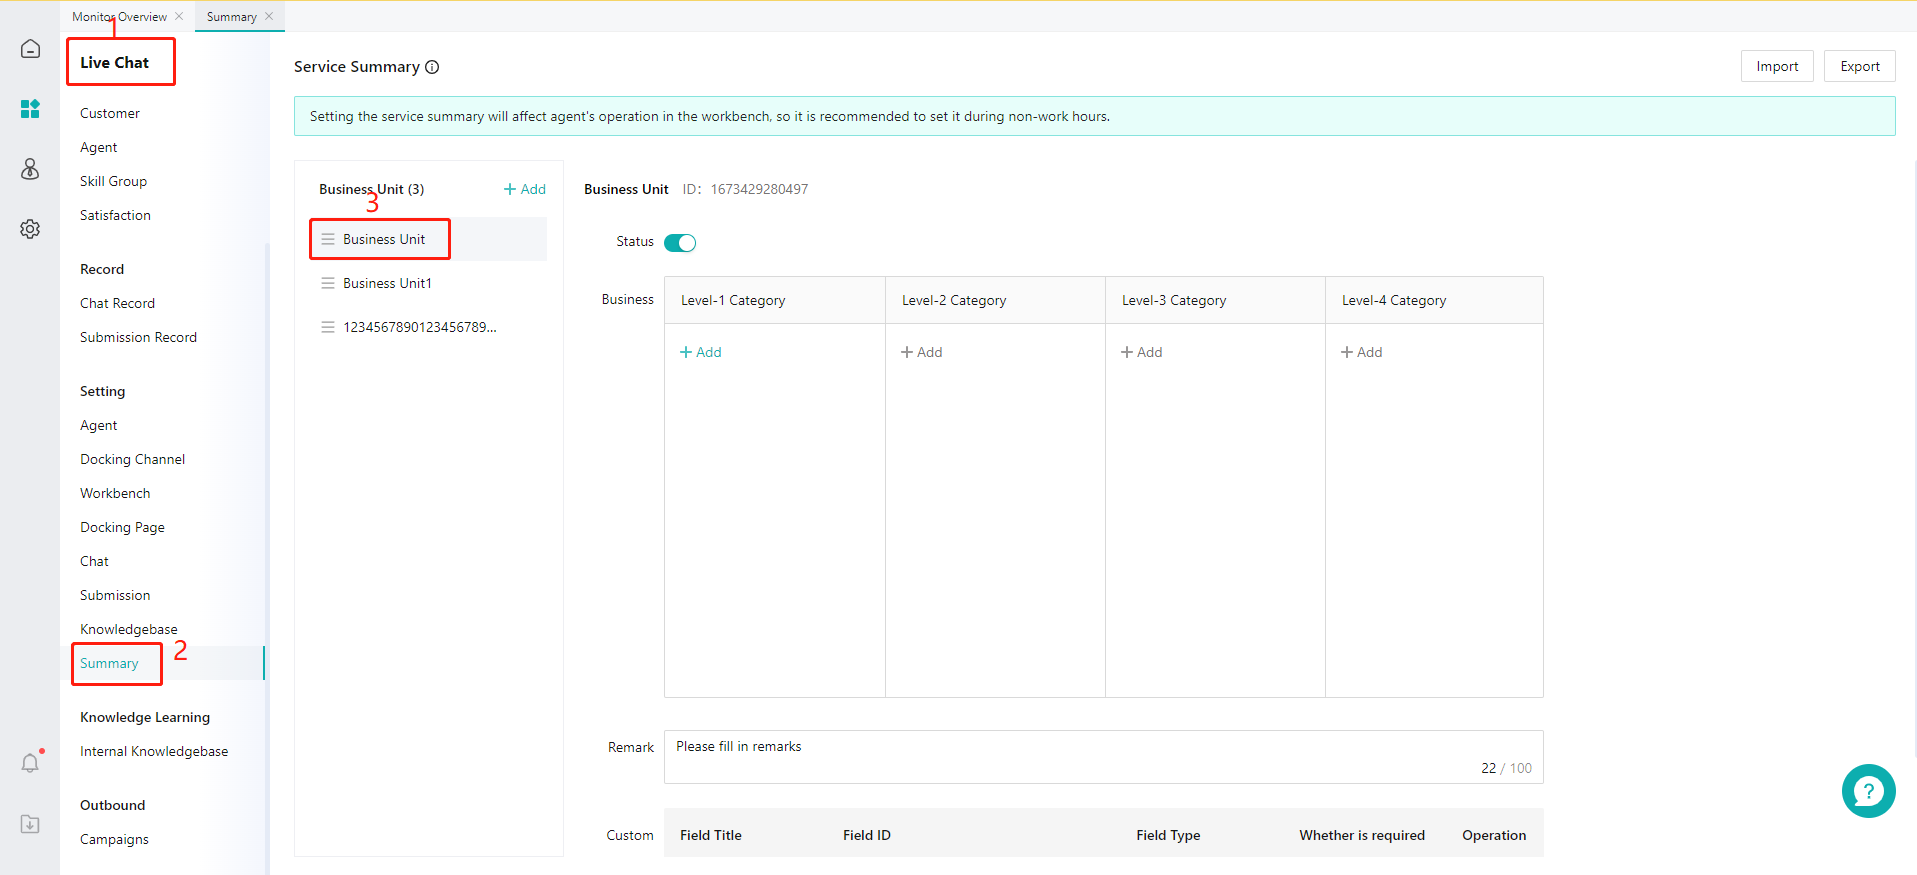
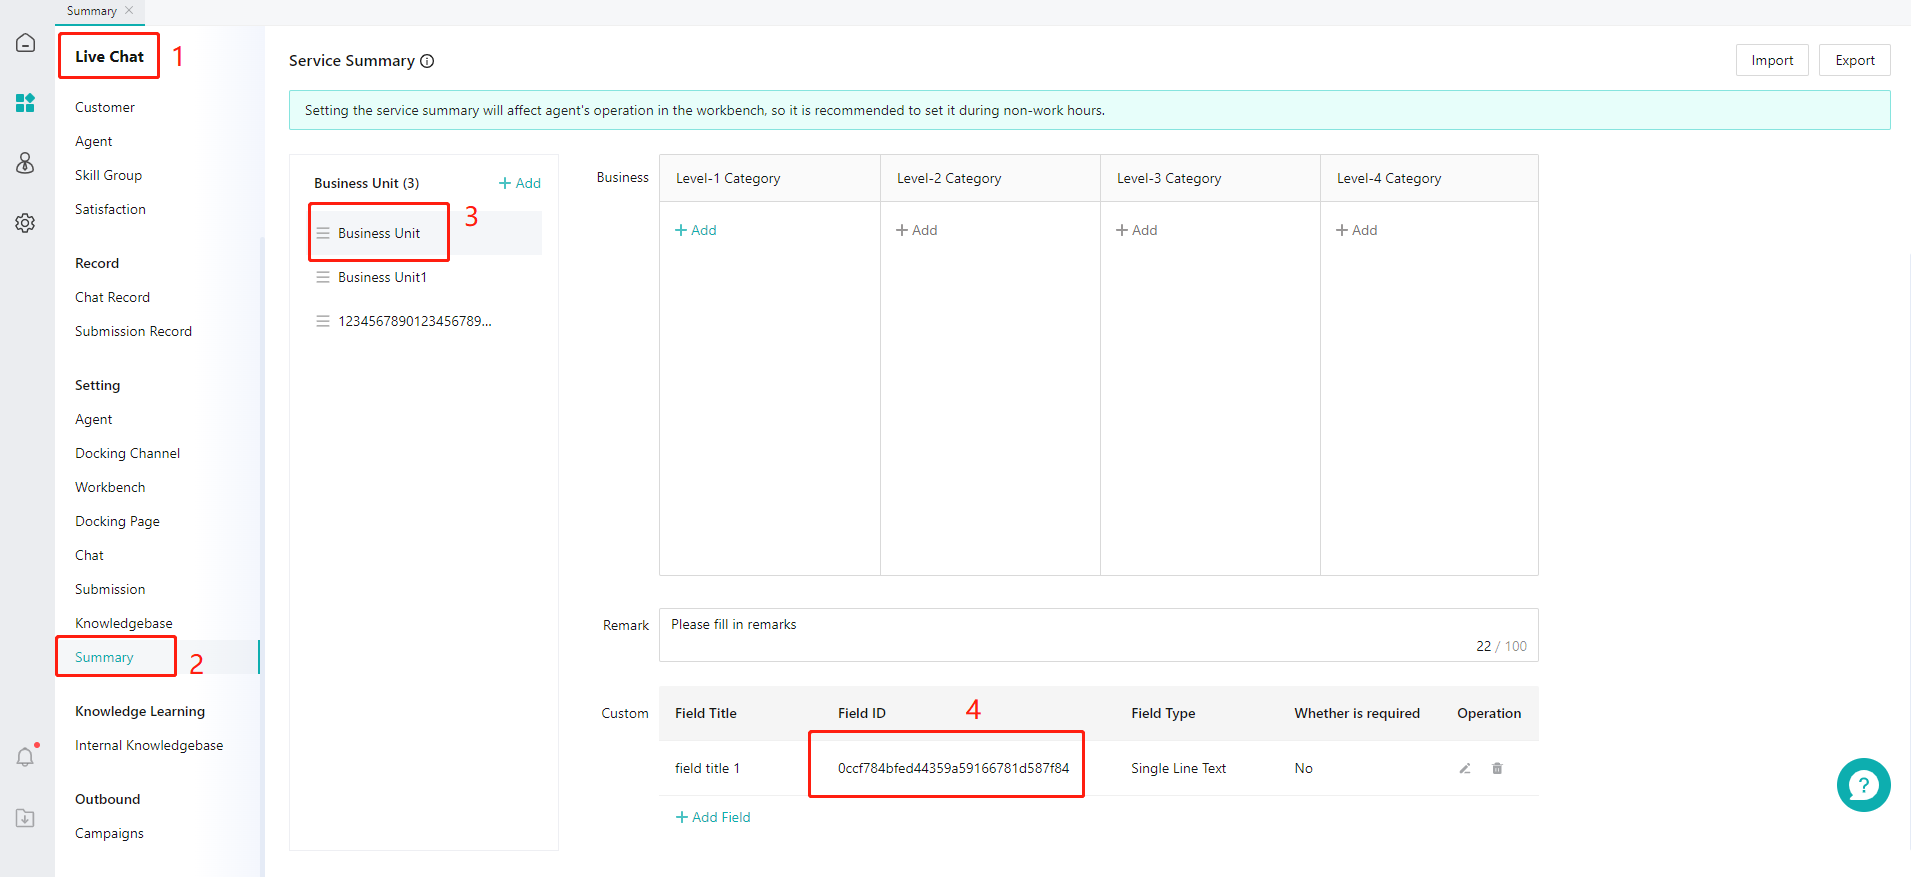
- Set service summary custom fields (trans-to-agent supports passing service summary params)
// Service summary custom fields
Map<String, String> summaryInfo = new HashMap<>();
summaryInfo.put("your keyId", "your value");
info.setSummary_params(summaryInfo);
2
3
4
# 7. Configure multi-round chat API params
When using the multi-round chat function, we will pass uid and mulitParams, two fixed custom params, for each API. uid is the unique user ID, and mulitParams is the json string of custom fields. If the user has docked these two fields, we will return these two fields to the third-party API. If not, we will pass a null field.
// Multi-round chat custom params
info.setMulti_params("{\"key1\",\"val1\"}");
2
# 8. Support inquiring for product information and directly sending message card in agent mode
In chats between users and agents, users often need to send the inquired product information or order to agents for check. Currently support inquiry objects to send 5 attributes at most (title,imgUrl,fromUrl,describe,lable), of which (title,fromUrl) are required fields. Below is sample product inquiry:
// Inquiry content
ConsultingContent consultingContent = new ConsultingContent();
// Inquiry content and title, required
consultingContent.setSobotGoodsTitle("Super TV 50 inch 2D smart LED black");
// Inquiry content image, optional, but it must be the image URL
consultingContent.setSobotGoodsImgUrl("http:// www.li7.jpg ");
// Inquiry source page, required
consultingContent.setSobotGoodsFromUrl("www.sobot.com");
// Description, optional
consultingContent.setSobotGoodsDescribe("Super TV S5");
// Tag, optional
consultingContent.setSobotGoodsLable("¥2150");
// Whether to send automatically after trans-to-agent
consultingContent.setAutoSend(true);
// Whether to send again every time when returning to the chat page   true: Send every time,  false: Send once by default
consultingContent.setEveryTimeAutoSend(false);
// Initiate Sobot page   Add in Information  Send card messages after trans-to-agent
info.setConsultingContent(consultingContent);
2
3
4
5
6
7
8
9
10
11
12
13
14
15
16
17
18
19
Sketch: 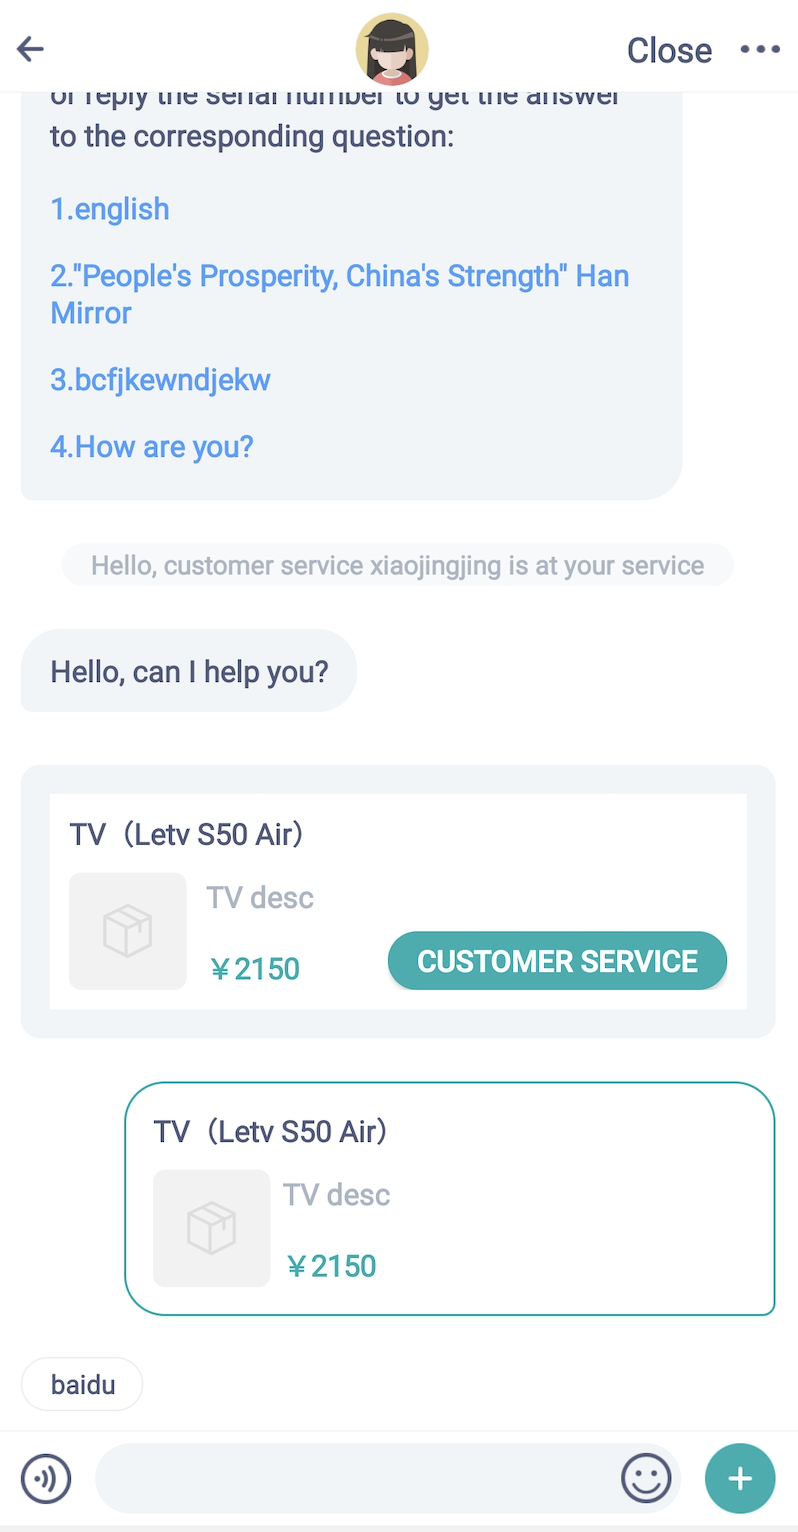
# 9. Support sending order cards only in agent mode. You can intercept order card click events
Method 1: When initiating Sobot, send order card messages automatically.
List<OrderCardContentModel.Goods> goodsList = new ArrayList<>();
goodsList.add(new OrderCardContentModel.Goods("apple", "https:// img.sobot.com/chatres/66a522ea3ef944a98af45bac09220861/msg/20190930/7d938872592345caa77eb261b4581509.png "));
goodsList.add(new OrderCardContentModel.Goods("1111111", "https:// img.sobot.com/chatres/66a522ea3ef944a98af45bac09220861/msg/20190930/7d938872592345caa77eb261b4581509.png "));
goodsList.add(new OrderCardContentModel.Goods("2222", "https:// img.sobot.com/chatres/66a522ea3ef944a98af45bac09220861/msg/20190930/7d938872592345caa77eb261b4581509.png "));
goodsList.add(new OrderCardContentModel.Goods("33333333", "https:// img.sobot.com/chatres/66a522ea3ef944a98af45bac09220861/msg/20190930/7d938872592345caa77eb261b4581509.png "));
OrderCardContentModel orderCardContent = new OrderCardContentModel();
// Order no. (required)
orderCardContent.setOrderCode("zc32525235425");
// Order status
// To be paid: 1 To be delivered: 2 On the way: 3 Delivering: 4: Finished: 5 To be evaluated: 6 Canceled: 7
orderCardContent.setOrderStatus(1);

// New function for SDK 2.9.7: Customize order status name. It works only when the order status is 0, and other values follow the original logic
// orderCardContent.setOrderStatus(0);
// orderCardContent.setStatusCustom("Your custom status");

// Total order amount (unit: )
orderCardContent.setTotalFee(1234);
// Total no. of ordered product
orderCardContent.setGoodsCount("4");
// Order link
orderCardContent.setOrderUrl("https:// item.jd.com/1765513297.html ");
// Order time
orderCardContent.setCreateTime(System.currentTimeMillis() + "");
// Whether to send automatically after trans-to-agent
orderCardContent.setAutoSend(true);
// Whether to send again every time when returning to the chat page   true: Send every time,  false: Send once by default
orderCardContent.setEveryTimeAutoSend(false);
// Ordered product set
orderCardContent.setGoods(goodsList);
// Order card content
info.setOrderGoodsInfo(orderCardContent);
2
3
4
5
6
7
8
9
10
11
12
13
14
15
16
17
18
19
20
21
22
23
24
25
26
27
28
29
30
31
32
Method 2: After trans-to-agent, you can add an order button in the "+" icon. After clicking the button, an order message will be sent to the agent.
final String ACTION_SEND_ORDERCARD = "sobot_action_send_ordercard";
ChattingPanelUploadView.SobotPlusEntity ordercardEntity = new ChattingPanelUploadView.SobotPlusEntity(ResourceUtils.getDrawableId(getApplicationContext(), "sobot_ordercard_btn_selector"), ResourceUtils.getResString(getApplicationContext(), "sobot_ordercard"), ACTION_SEND_ORDERCARD);
tmpList.add(ordercardEntity);
SobotUIConfig.pulsMenu.operatorMenus = tmpList;
// Only one sSobotPlusMenuListener, otherwise the content below will overwrite the content above (E.g.: In the "+" icon,
// after customizing addition location and order button at the same time, it can judge which button is clicked as per the action and make corresponding processing)
SobotUIConfig.pulsMenu.sSobotPlusMenuListener = new SobotPlusMenuListener() {
    @Override
    public void onClick(View view, String action) {
        if (ACTION_SEND_ORDERCARD.equals(action)) {
            Context context = view.getContext();
            List<OrderCardContentModel.Goods> goodsList = new ArrayList<>();
            goodsList.add(new OrderCardContentModel.Goods("apple", "https:// img.sobot.com/chatres/66a522ea3ef944a98af45bac09220861/msg/20190930/7d938872592345caa77eb261b4581509.png "));
            OrderCardContentModel orderCardContent = new OrderCardContentModel();
            // Order no. (required)
            orderCardContent.setOrderCode("zc32525235425");
            // Order status
            // To be paid: 1 To be delivered: 2 On the way: 3 Delivering: 4: Finished: 5 To be evaluated: 6 Canceled: 7
            orderCardContent.setOrderStatus(1);

            // New function for SDK 2.9.7: Customize order status name. It works only when the order status is 0, and other values follow the original logic
            // orderCardContent.setOrderStatus(0);
            // orderCardContent.setStatusCustom("Your custom status");

            // Total order amount (unit: )
            orderCardContent.setTotalFee(1234);
            // Total no. of ordered product
            orderCardContent.setGoodsCount("4");
            // Order link
            orderCardContent.setOrderUrl("https:// item.jd.com/1765513297.html ");
            // Order time
            orderCardContent.setCreateTime(System.currentTimeMillis() + "");
            // Whether to send automatically after trans-to-agent
            orderCardContent.setAutoSend(true);
            // Whether to send again every time when returning to the chat page   true: Send every time,  false: Send once by default
            orderCardContent.setEveryTimeAutoSend(false);
            // Ordered product set
            orderCardContent.setGoods(goodsList);
            ZCSobotApi.sendOrderGoodsInfo(context, orderCardContent);
        }
    }
};
2
3
4
5
6
7
8
9
10
11
12
13
14
15
16
17
18
19
20
21
22
23
24
25
26
27
28
29
30
31
32
33
34
35
36
37
38
39
40
41
42
Configure order card interception. You also can use ZCSobotApi.setNewHyperlinkListener() for interception. After interception by setOrderCardListene, setNewHyperlinkListener will not intercept.
ZCSobotApi.setOrderCardListener(new SobotOrderCardListener() {
    @Override
    public void onClickOrderCradMsg(OrderCardContentModel orderCardContent) {
        ToastUtil.showToast(getApplicationContext(), "Clicked on the order card" );
    }
});
2
3
4
5
6
Sketch: 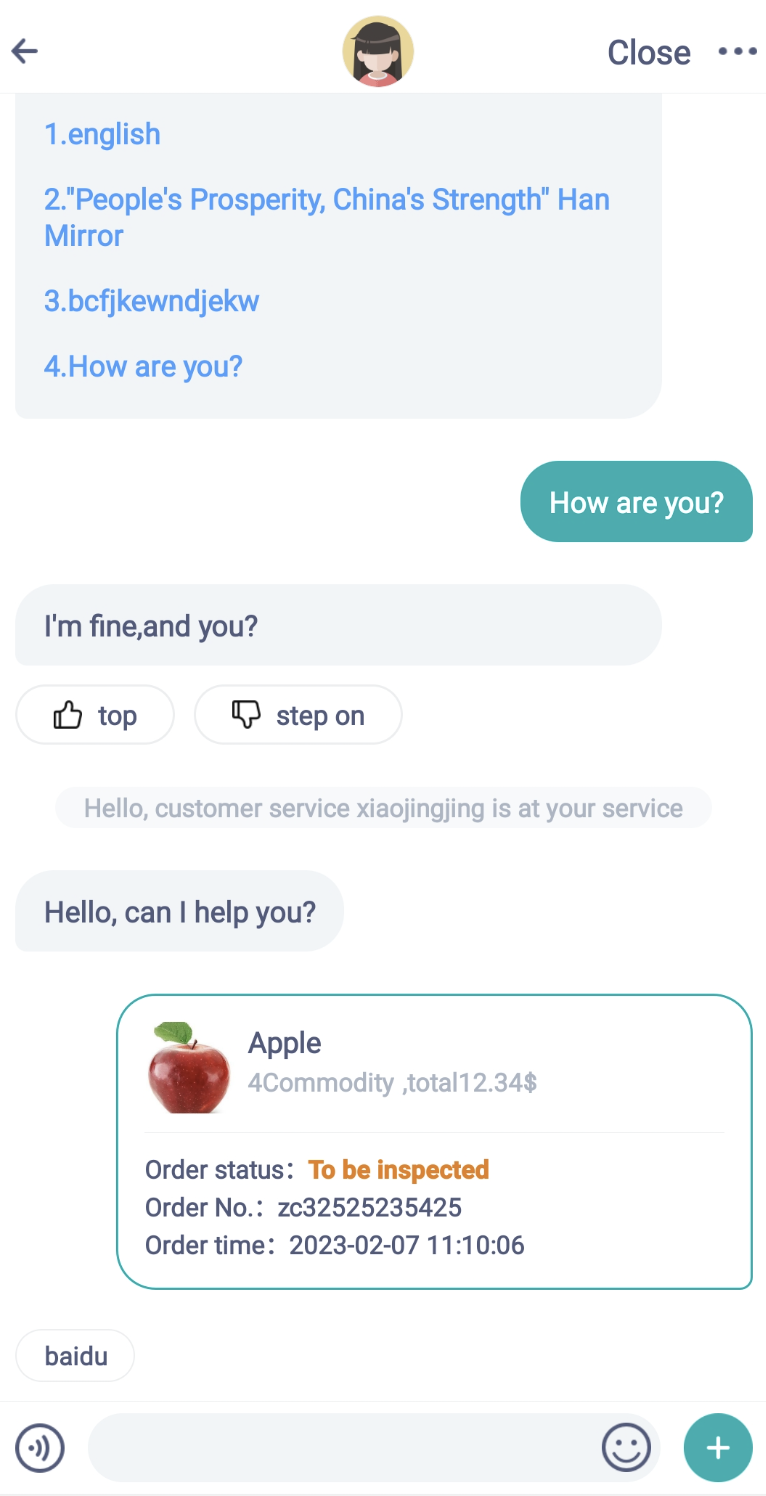
# 10. Check if merchant agent is chatting with a user (E-commerce only)
/**
 * Judge whether the current user is chatting with the current merchant agent
 *
 * @param appkey Current merchant's appkey
 * @return true : Chatting with the current merchant agent
 *           false : Not chatting with the current merchant agent
 */
ZCSobotApi.isActiveOperator(appkey);
2
3
4
5
6
7
8
# 11. Set whether the user is VIP and user's VIP level
// You can set when initiating Sobot
// Designate whether the customer is VIP, 0: General 1: VIP
info.setIsVip("1");
// Set VIP level by name; VIP level can be edited at the Sobot admin side (System Settings > Custom Fields > Customer Fields) to get the ID or name corresponding to the level
info.setVip_level("honourable");
2
3
4
5
# 12. Set user custom tags
// You can set when initiating Sobot
// User tags can be edited at the Sobot admin side (System Settings > Custom Fields > Customer Fields) to get the ID or name corresponding to the tag
// You can add two or more user tags, and separate these tag IDs or names by comma ","
info.setUser_label("Star, journalist");
2
3
4
# 13. After trans-to-agent, buttons in the "+" menu bar can be hidden
// Hide submission function. It will be hidden in both agent and bot modes  true: Hide, false: Display; false by default
info.setHideMenuLeave(true);
// Hide submission function. It will be hidden only in agent mode  true Hide, false Display; false by default
info.setHideMenuManualLeave(true);
// Hide evaluation function  true: Hide, false: Display; false by default
info.setHideMenuSatisfaction(true);
// Hide photo function  true Hide, false Display; false by default
info.setHideMenuPicture(true);
// Hide video function  true Hide, false Display; false by default
info.setHideMenuVedio(true);
// Hide file function  true Hide, false Display; false by default
info.setHideMenuFile(true);
// Hide camera function  true Hide, false Display; false by default
info.setHideMenuCamera(true);
2
3
4
5
6
7
8
9
10
11
12
13
14
# 14.Send custom cards to session records and recommend them to customers in a systematic manner
//1.Create SobotChatCustomCard data
SobotChatCustomCard customCard = new SobotChatCustomCard();

//Card ID
customCard.setCardId("cardId12121212");

//Recommended display mode,false(Default):cards can only be pushed to users in manual mode; true:True machine mode can also push cards to users; A session can only be sent once
customCard.setShowCustomCardAllMode(true);

//Card type, 0:Order card ; 1:Product card
customCard.setCardType(rg_card_type.getCheckedRadioButtonId() == R.id.rg_dingdan?0:1);
//Card Style, 0:Tile ; 1:List
customCard.setCardStyle(rg_card_style.getCheckedRadioButtonId()==R.id.rg_pingpu?0:1);

//Configure top guide words, images, and card descriptions
customCard.setCardDesc("test text text text text text text text text text");
customCard.setCardGuide("test title");
customCard.setCardImg("https://hk.sobot.com/auth/_next/static/media/sideZh.74024132.png");
customCard.setCardLink("https://www.sobot.com");

// Configure custom click buttons
 List<SobotChatCustomMenu> menus = new ArrayList<>();
SobotChatCustomMenu m = new SobotChatCustomMenu();
m.setMenuLink("https://www.sobot.com");
m.setMenuLinkType(0);
m.setMenuType(2);
m.setMenuName("send");
m.setMenuTip("Successfully sent");
menus.add(m);
SobotChatCustomMenu mm = new SobotChatCustomMenu();
mm.setMenuLink("https://www.sobot.com");
mm.setMenuLinkType(2);
mm.setMenuType(1);
mm.setMenuName("confirm");
mm.setMenuTip("Successfully sent");
menus.add(mm);
SobotChatCustomMenu mmm = new SobotChatCustomMenu();
mmm.setMenuLink("https://www.sobot.com");
mmm.setMenuLinkType(2);
mmm.setMenuType(0);
mmm.setMenuName("Long text text text text text text text");
mmm.setMenuTip("");
menus.add(mmm);
customCard.setCardMenus(menus);

// Configure Custom Fields
 Map<String ,Object> param = new HashMap<>();
 param.put("my key","my value");
 customCard.setCustomField(param);

// Configure the middle list section of the custom card
 List<SobotChatCustomGoods> goods = new ArrayList<>();
 int goodsNum = 3;
for (int i = 0; i < goodsNum; i++) {
      SobotChatCustomGoods g = new SobotChatCustomGoods();
      g.setCustomCardAmount("222.9");
      g.setCustomCardTime("2023-06-25 14:32:21");
      g.setCustomCardCode("sobot121u321u3");
      g.setCustomCardStatus("Goods to be received");
      g.setCustomCardCount("5");
      g.setCustomCardAmountSymbol("¥");
      g.setCustomCardName(i+"cardName");
      g.setCustomCardId("cardId_"+i);
      g.setCustomCardDesc("Card Description");
      g.setCustomCardThumbnail("https://hk.sobot.com/auth/_next/static/media/sideZh.74024132.png");
      if(i==0){
          List<SobotChatCustomMenu> menus2 = new ArrayList<>();
          menus2.add(m);
          g.setCustomMenus(menus2);
      }else if(i == 1){
          List<SobotChatCustomMenu> menus2 = new ArrayList<>();
          menus2.add(m);
          menus2.add(mm);
          g.setCustomMenus(menus2);
      }else {
          List<SobotChatCustomMenu> menus2 = new ArrayList<>();
          menus2.add(m);
          menus2.add(mm);
          menus2.add(mmm);
          g.setCustomMenus(menus2);

      }
      goods.add(g);
}
customCard.setCustomCards(goods);

//Set Card
info.setCustomCard(customCarddange);
2
3
4
5
6
7
8
9
10
11
12
13
14
15
16
17
18
19
20
21
22
23
24
25
26
27
28
29
30
31
32
33
34
35
36
37
38
39
40
41
42
43
44
45
46
47
48
49
50
51
52
53
54
55
56
57
58
59
60
61
62
63
64
65
66
67
68
69
70
71
72
73
74
75
76
77
78
79
80
81
82
83
84
85
86
87
88
89
# ● About Submission Ticket
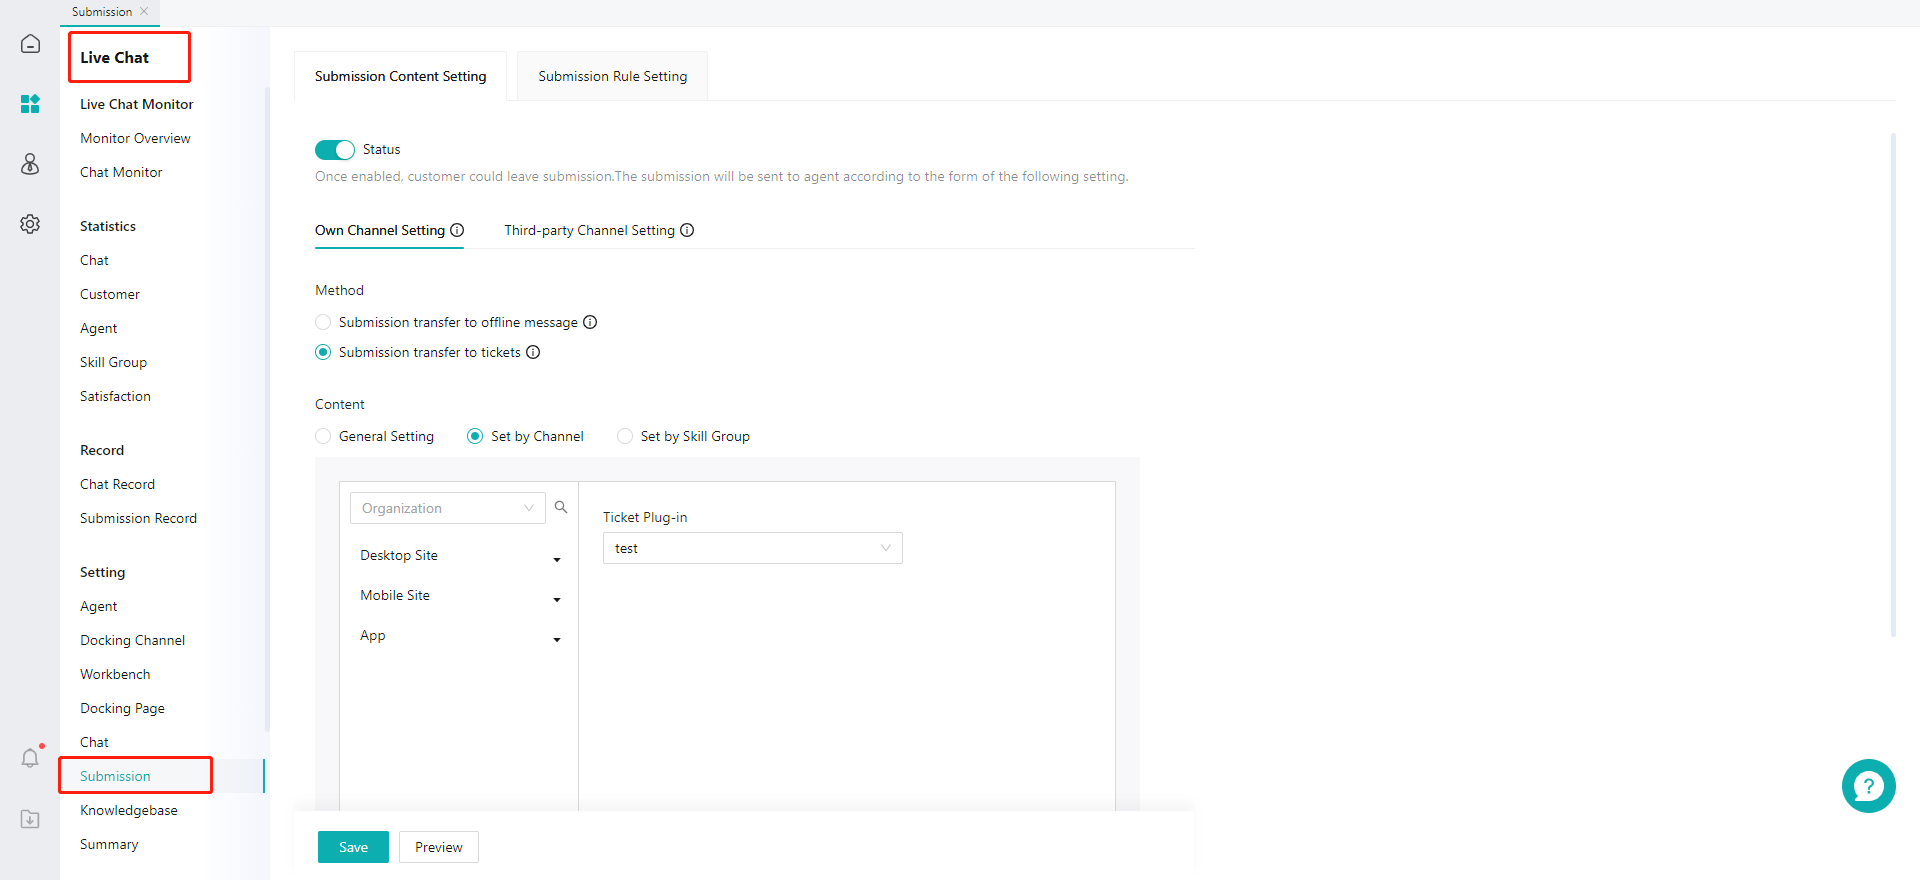
# 1. Set submission interface at the console
You can set submission interface at the console
# 2. Configure custom user info on the submission page
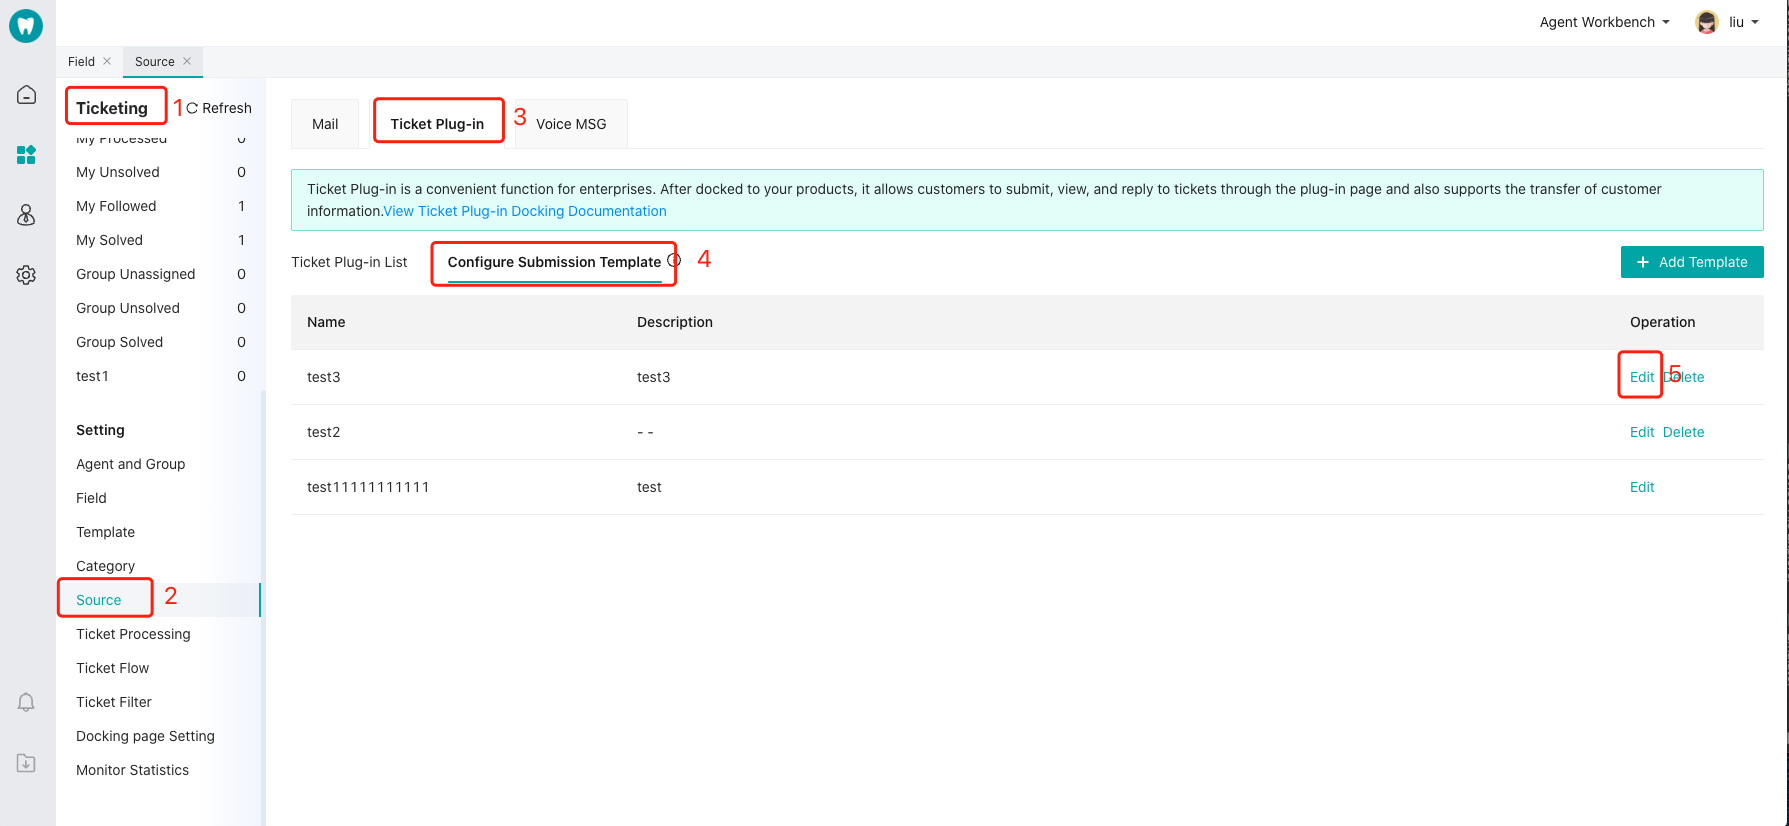
The verification and display logic of email, phone no., attachment in the submission can be configured at the PC console.
# 3. Jump to the submission page
/**
   * Jump to the submission interface
   *
   * @param context      Required
   * @param info User's appkey  Required  If you are a platform user, you have to pass the HQ appkey
   * @param isOnlyShowTicket true: Display submission record interface only; false: Display both submission and submission record interfaces
 */
ZCSobotApi.openLeave(Context context,Information info,boolean isOnlyShowTicket);
2
3
4
5
6
7
8
Sample code:
Information info = new Information();
info.setApp_key(et_appkey.getText().toString());/* Required */
// Ticket skill group
info.setLeaveMsgGroupId(" 6576d173af904d97b1d5d01a11cc66f5 ");
Map<String,String> map=new HashMap<>();
// Custom field, corresponding to key and the backend added field ID
map.put(" 834b34870b2e47daa1904d8f63ee55c2 ","zzz");
info.setLeaveCusFieldMap(map);
// New function for SDK 2.9.5: Designate submission template ID, jump to the designated submission interface
info.setLeaveTemplateId(" 7800560a37784ce1be064915c8389d28 ");
ZCSobotApi.openLeave(SobotStartActivity.this, info, false);
2
3
4
5
6
7
8
9
10
11
# 4. Submission page event interception
In SDK, submission can jump to the custom page. If you require it, you can configure by the following method:
ZCSobotApi.setSobotLeaveMsgListener(new SobotLeaveMsgListener() {
    @Override
    public void onLeaveMsg() {
      ToastUtil.showToast(getApplicationContext(),"Implement the method here and jump to the page");
   }
});
2
3
4
5
6
# 5. You can configure whether to display the reply button on the completed submission details page
// For completed submission, whether the user can reply continuously   true: Yes, false: No;
// It's true by default; i.e., the user can reply continuously
ZCSobotApi.setSwitchMarkStatus(MarkConfig.LEAVE_COMPLETE_CAN_REPLY,true);
2
3
# 6. Get submission reply
/**
 * Get the unread submission reply list. If the system receives any unread submission reply, it will display the latest one in the notification bar. Click the notification bar to jump to the submission details page
 *
 * If you get the latest submission reply in real time through a way similar to a scheduled task, the interval between two requests must be greater than 60s before the API returns data
 *
 * @param context   Context  Required
 * @param partnerId  User's unique ID Consistent with partnerid passed in information
 * @param noReadLeaveReplyListener Get unread submission reply list callback, SobotLeaveReplyModel: single submission reply object
 */
ZCSobotApi.getLastLeaveReplyMessage(SobotStartActivity.this,"your partnerid", new SobotNoReadLeaveReplyListener() {
        @Override
        public void onNoReadLeaveReplyListener(List<SobotLeaveReplyModel> sobotLeaveReplyModelList) {
            if(sobotLeaveReplyModelList!=null&&sobotLeaveReplyModelList.size()>0){
            // Send submission reply notification. Click the notification on the notification bar to jump to the submission details page
            ZCSobotApi.sendLeaveReplyNotification(SobotStartActivity.this, sobotLeaveReplyModelList.get(0), R.drawable.sobot_logo_small_icon, R.drawable.sobot_logo_small_icon);
            }
        }
});
2
3
4
5
6
7
8
9
10
11
12
13
14
15
16
17
18
# 7. Add submission evaluation active reminder ON/OFF button
// Completed submission details page - not evaluated: Whether to pop up service evaluation window upon clicking Back (it only pops up upon first Back click and won't pop up next time). false (not pop up) by default
info.setShowLeaveDetailBackEvaluate(true);
2
# 8. Add submission extension params
// Add submission docking fields
List<SobotLeaveMsgFieldModel> leaveParamsExtends = new ArrayList<>();
// SobotLeaveMsgFieldModel attribute description; ID: The ID automatically generated by the docking field system; Value: The passed data; Params: The displayed field ID, such as city and address, corresponding to the ID; Data is configured at the backend console
leaveParamsExtends.add(new SobotLeaveMsgFieldModel("your id", "your value", "your params"));
info.setLeaveParamsExtends(leaveParamsExtends);

// Add submission skill group
info.setLeaveMsgGroupId("your groupId");

// Add submission custom fields, corresponding to key and backend added field ID
Map<String,String> map=new HashMap<>();
map.put("your field key","zzz");
info.setLeaveCusFieldMap(map);
2
3
4
5
6
7
8
9
10
11
12
13
# ● Evaluation
# 1. Set evaluation interface
You can set satisfaction evaluation interface at the console:
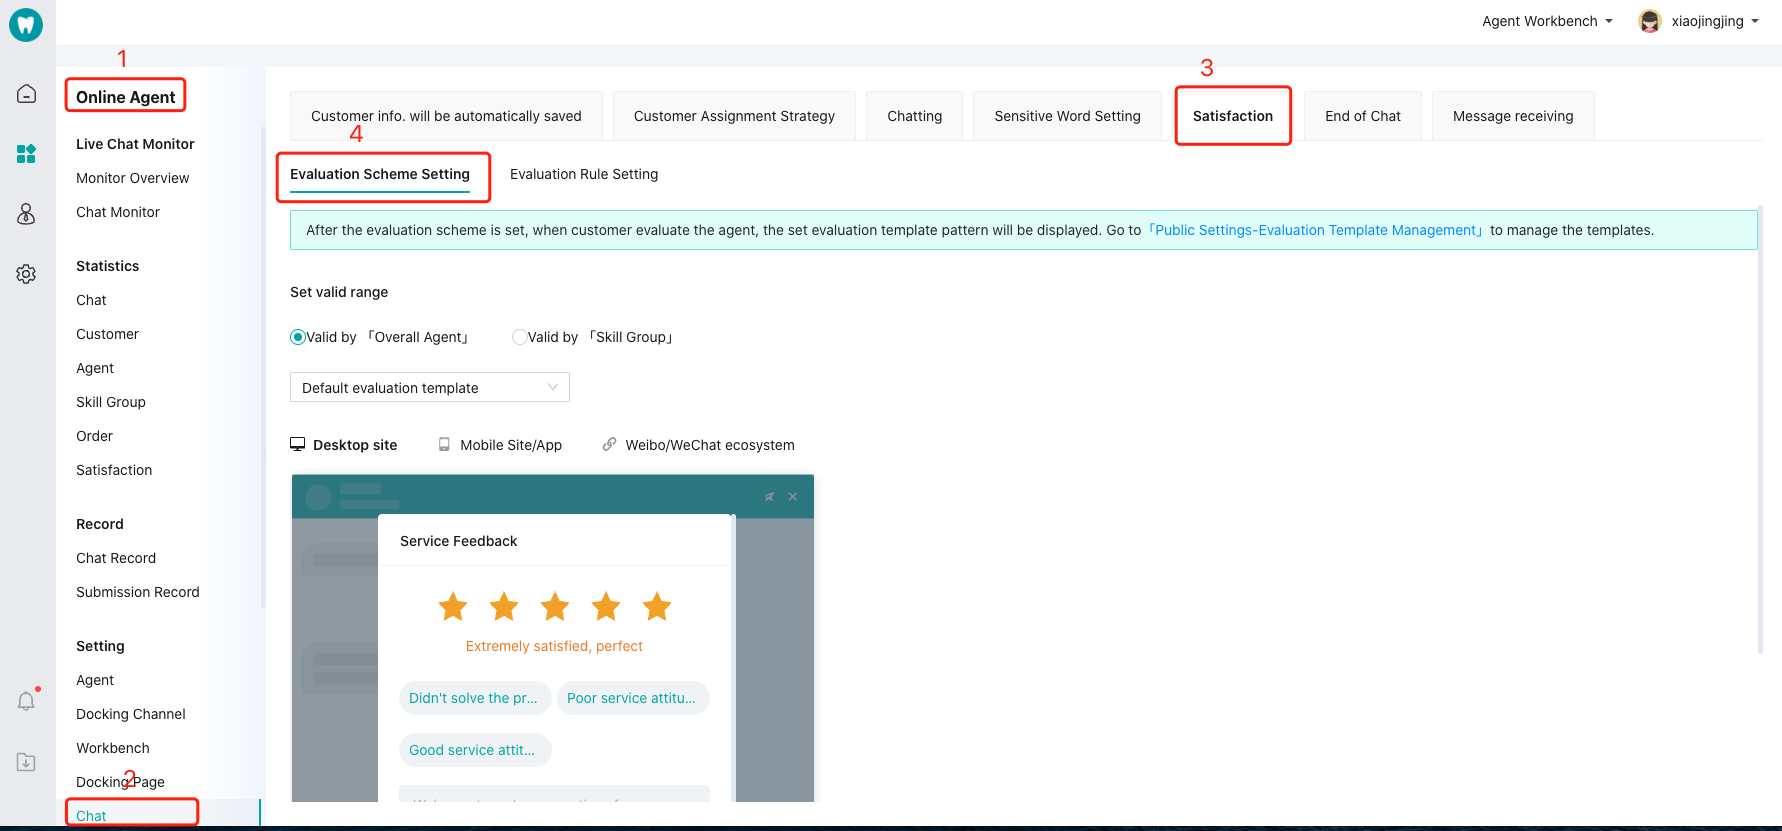
# 2. When clicking Back on the left side of navigation bar, whether to pop up satisfaction evaluation window
Note: Satisfaction evaluation window can pop up only if users have sent any message.
// Whether to pop up window (Do you want to end the chat?) upon clicking Back
info.setShowLeftBackPop(true);
// When clicking Back on the left side of navigation bar, whether to pop up satisfaction evaluation window. true: Pop up, false: Not pop up; false by default
info.setShowSatisfaction(false);
2
3
4
Sketch: 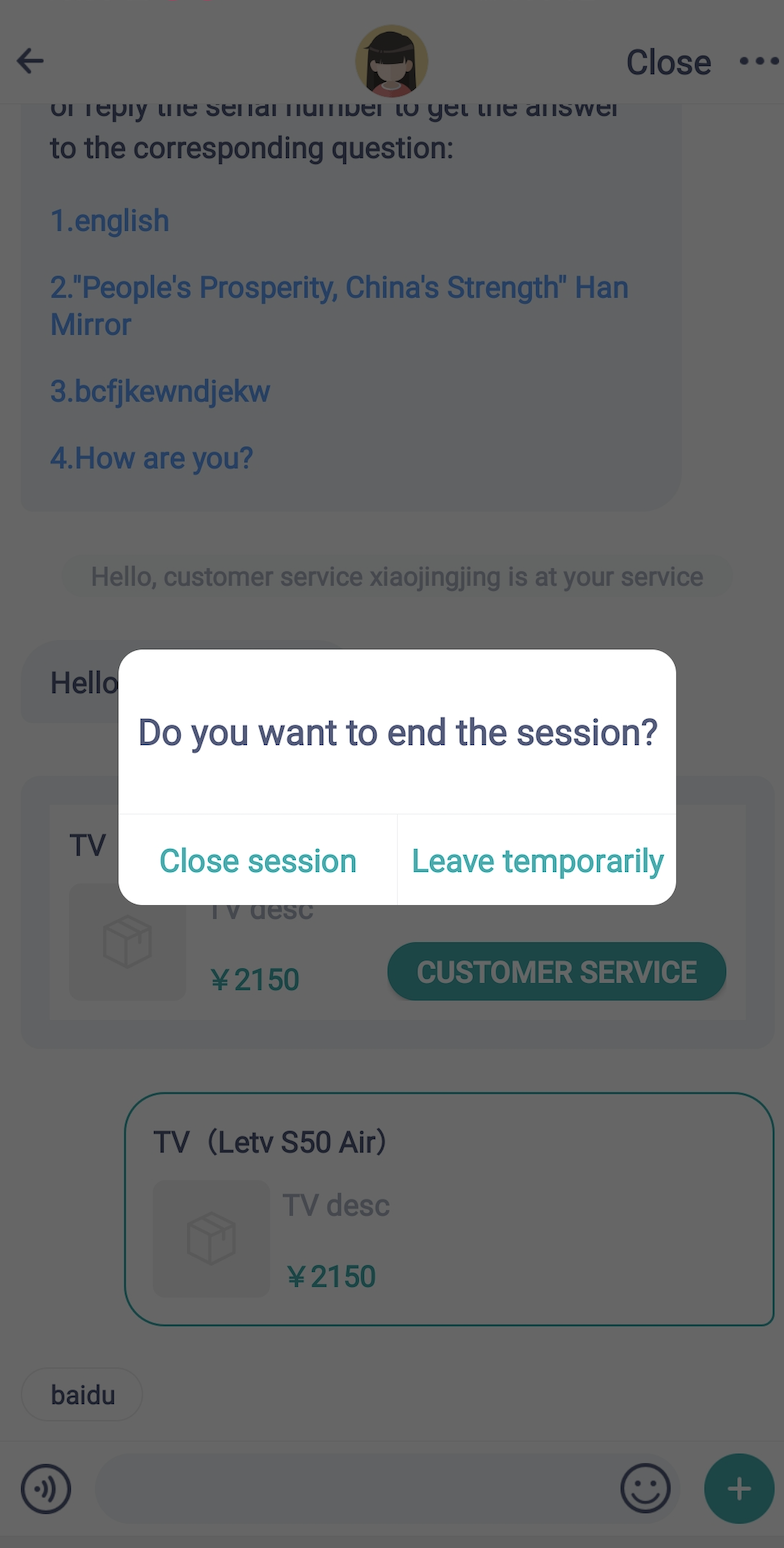
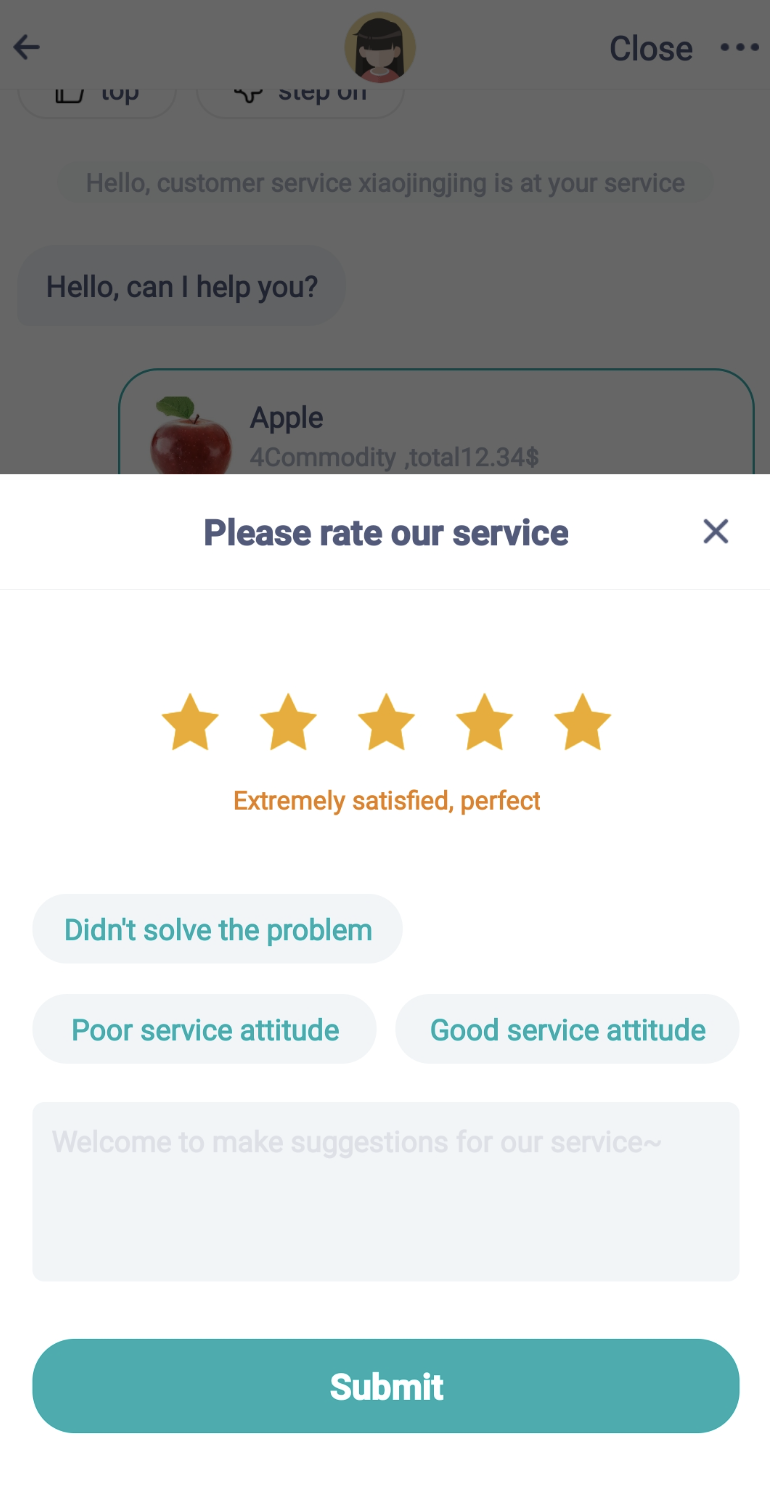
# 3. Whether to display Close button on the right side of navigation bar, and whether to pop up satisfaction evaluation window when clicking Close
Note: Satisfaction evaluation window can pop up only if users have sent any message.
// Set whether to display Close button on the right side of navigation bar, true: Display, false: Hide; false by default
info.setShowCloseBtn(false);
// When clicking Close on the right side of navigation bar, whether to pop up satisfaction evaluation window. true: Pop up, false: Not pop up; false by default
info.setShowCloseSatisfaction(false);
2
3
4
# 4. Configure chat release after users submit agent satisfaction evaluation
/**
   * Configure chat release after users submit agent satisfaction evaluation
   * @param context Context object
   * @param flag true: Release chat  false: Not release chat
   */
ZCSobotApi.setEvaluationCompletedExit(context,flag);
2
3
4
5
6
# 5. When clicking Back on the top left corner or Close on the top right corner, configure whether to display Not Evaluate Now button on the agent satisfaction evaluation pop-up window
/**
   * When clicking Back on the top left corner or Close on the top right corner, configure whether to display Not Evaluate Now button on the evaluation pop-up window   false (not display) by default
   */
info.setCanBackWithNotEvaluation(true);
2
3
4
# ● About Message
# 1. Send text message
If your APP requires proactively sending text messages to agents, please use the codes below:
/**
   * Send text message
   * @param context
   * @param content Text content
   */
ZCSobotApi.sendTextToUser(Context context,String content);
2
3
4
5
6
7
# 2. Set whether to enable message reminder
If a user is not on the chat page but receives any message from the agent, APP can give a reminder on the notification bar or chat entry. Notification bar reminder can display the latest one message and provide users a shortcut APP entry.
/**
* Set whether to enable message reminder  Not enable by default
* @param context
* @param flag
* @param smallIcon Small icon ID Set the small image in the notification bar, with the recommended size of 24×24
* @param largeIcon Large icon ID
*/
public static void setNotificationFlag(Context context,boolean flag,int smallIcon,int largeIcon);
2
3
4
5
6
7
8
Sample code:
// Set whether to enable message reminder
ZCSobotApi.setNotificationFlag(getApplicationContext(), true, R.drawable.sobot_logo_small_icon, R.drawable.sobot_logo_icon);
2
# 3. Set offline message
Enable offline message:
// Enable the channel to receive offline messages. After enabling, the message will be sent in the form of broadcast. If this function is not required, you don't have to call it
ZCSobotApi.checkIMConnected(getApplicationContext(), "partnerid");
2
Disable offline message:
// Disable the channel and clear current chat cache
ZCSobotApi.closeIMConnection(getApplicationContext());
2
# 4. Register the broadcast receiver and get new messages and unread messages
After registering the broadcast receiver, when the message channel is connected, the new messages can be obtained.
1 Register the broadcast receiver
/**
* action:ZhiChiConstants.sobot_unreadCountBrocast
*/
IntentFilter filter = new IntentFilter();
filter.addAction(ZhiChiConstant.sobot_unreadCountBrocast);
contex.registerReceiver(receiver, filter);
2
3
4
5
6
2 Receive new messages and unread messages
Receive messages with onReceive() method of BroadcastReceiver.
public class MyReceiver extends BroadcastReceiver {
    @Override
    public void onReceive(Context context, Intent intent) {
    // Unread messages
    int noReadNum = intent.getIntExtra("noReadCount", 0);
    // New message content
    String content = intent.getStringExtra("content");
    Bundle bundle = intent.getExtras();
    ZhiChiPushMessage message = (ZhiChiPushMessage) bundle.get("sobotMessage");
   LogUtils. i ("Unread messages:"+noReadNum+"New message content:"+content);
LogUtils. i ("Message object:"+message. toString());
    unread_msg_num.setText(noReadNum + "");
    }
}
2
3
4
5
6
7
8
9
10
11
12
13
14
When a user is not on the chat page, the received unread messages from the agent will be saved to the local storage. If the user wants to get the locally saved unread messages, call this method where required. As follows:
/**
* @param context Context object
* @param partnerId  User's unique ID  Consistent with partnerid passed in information,
* @return int
*/
ZCSobotApi.getUnReadMessage(Context context,String partnerid);// If you didn't set the partnerid in information, please pass null.
2
3
4
5
6
# 5. Send location message
If your APP has to send customer's location info, please follow the steps below to set (map positioning needs to be developed by developers themselves).
- Configure the location sending button on the agent chat interface (displayed on the menu panel after clicking the "+" button, only displayed after trans-to-agent). The code is as follows:
// Menu action  When clicking the button, the corresponding action will be returned to callback.
// On this basis, judge which button the user clicked. It can be customized
final String ACTION_LOCATION = "sobot_action_location";
// Configure location sending button
ChattingPanelUploadView.SobotPlusEntity locationEntity = new ChattingPanelUploadView.SobotPlusEntity(R.drawable.sobot_location_btn_selector, ResourceUtils.getResString(getApplicationContext(), "sobot_location"), ACTION_LOCATION);
List<ChattingPanelUploadView.SobotPlusEntity> tmpList = new ArrayList<>();
tmpList.add(locationEntity);
SobotUIConfig.pulsMenu.operatorMenus = tmpList;
2
3
4
5
6
7
8
- Set the location sending button callback:
// Only one sSobotPlusMenuListener, otherwise the content below will overwrite the content above (E.g.: In the "+" icon,
// after customizing addition location and order button at the same time, it can judge which button is clicked as per the action and make corresponding processing)
SobotUIConfig.pulsMenu.sSobotPlusMenuListener = new SobotPlusMenuListener() {
    @Override
    public void onClick(View view, String action) {
        if (ACTION_LOCATION.equals(action)) {
            Context context = view.getContext();
            // Get location info on the map positioning page and send it to the agent:
            SobotLocationModel locationData = new SobotLocationModel();
            // Map snapshot. You must pass the local image storage directory; otherwise, it will display the default map image
            locationData.setSnapshot(Environment.getExternalStorageDirectory().getAbsolutePath()  +"/1.png");
            // Latitude
            locationData.setLat("40.057406655722");
            // Longitude
            locationData.setLng("116.2964407172");
            // Location name
            locationData.setLocalName("Jinma Building");
            // Location address
            locationData.setLocalLabel("Jinma Building, Liudaokou, Haidian District, Beijing");
            ZCSobotApi.sendLocation(context, locationData);
        }
    }
};
2
3
4
5
6
7
8
9
10
11
12
13
14
15
16
17
18
19
20
21
22
23
# 6. Customize hyperlink click event (interception scope: Help Center, submission, chat, submission record, product card, order card, location card)
// For link click events, judge whether to intercept as per the return result. true: Intercept; false: Not intercept
// Customers can customize interception rules, such as order no., product details URL, etc. If it returns true, it will return the custom information.
// Interception scope (Help Center, submission, chat, submission record, product card, order card)
ZCSobotApi.setNewHyperlinkListener(new NewHyperlinkListener() {
    @Override
    public boolean onUrlClick(String url) {
        // For example
        if (url.contains("baidu.com")) {
            ToastUtil.showToast(getApplicationContext(), "Clicked on the hyperlink,url=" + url);
            // Intercept if the URL link is Baidu
            // do().....
            return true;
        }
        // For example
        if (url.contains("Order number:123456789")) {
            ToastUtil.showToast(getApplicationContext(), "Clicked on the hyperlink,url=" + url);
            // Intercept if the link is order card
            // do().....
            return true;
        }
        return false;
    }
    @Override
    public boolean onEmailClick(String email) {
        ToastUtil.showToast(getApplicationContext(), "Clicked on the email,email=" + email);
        return false;
    }
    @Override
    public boolean onPhoneClick(String phone) {
        ToastUtil.showToast(getApplicationContext(), "Clicked on the phone,phone=" + phone);
        return false;
    }
});
2
3
4
5
6
7
8
9
10
11
12
13
14
15
16
17
18
19
20
21
22
23
24
25
26
27
28
29
30
31
32
33
Set location card click event callback :
// After clicking the location card, Baidu Map will be opened first by default. If Baidu Map is not installed, Amap will be opened next. You can intercept the location card click event and handle it by yourself
SobotOption.mapCardListener = new SobotMapCardListener() {
     @Override
     public boolean onClickMapCradMsg(Context context, SobotLocationModel locationModel) {
          if (context != null && locationModel != null) {
               ToastUtil.showCustomToast(context, "Click to intercept the location card event");
               // First open Amap
               // StMapOpenHelper.firstOpenGaodeMap(context, locationModel);
               // First open Baidu Map
               // StMapOpenHelper.firstOpenBaiduMap(context, locationModel);
          }
       // Return true: Intercept; false: Not intercept
       return true;
     }
};
2
3
4
5
6
7
8
9
10
11
12
13
14
15
# 7. Monitor any change of the current chat mode
ZCSobotApi.setChatStatusListener(new SobotChatStatusListener() {
    @Override
    public void onChatStatusListener(SobotChatStatusMode chatStatusMode) {
        switch (chatStatusMode) {
            case ZCServerConnectRobot:
                ToastUtil.showToast(getApplicationContext(), "Robot chat mode");
                break;
            case ZCServerConnectArtificial:
                ToastUtil.showToast(getApplicationContext(), "Switch to manual customer service chat mode");
                break;
            case ZCServerConnectOffline:
                ToastUtil.showToast(getApplicationContext(), "Offline");
                break;
            case ZCServerConnectWaiting:
                ToastUtil.showToast(getApplicationContext(), "Only in manual queue");
                break;
        }
    }
});
2
3
4
5
6
7
8
9
10
11
12
13
14
15
16
17
18
19
# 8. Replace the regular expression for mobile phone or landline telephone identification in messages
ZCSobotApi.replacePhoneNumberPattern(String regex);
# 9. Replace the regular expression for hyperlink identification in messages
ZCSobotApi.replaceWebUrlPattern(String regex);
# 10. Hide time prompt in the message list
// isHide true: Hide, false: Display; false by default
ZCSobotApi.hideTimemsgForMessageList( Context context, boolean isHide);
2
# ● Customize UI Settings on Chat Page
In order to keep an overall uniform style between the inquiry agent window interface and the APP integrated with the Sobot SDK, the Sobot SDK provides simple UI custom configuration options.
# 1. Configure attributes
You can set the following attributes with oncreate() method in the Application:
// Set whether to display the toolbar right first button, display by default
SobotUIConfig.sobot_title_right_menu1_display = true;
// Set whether to display the toolbar right second button, hide by default (Evaluation)
SobotUIConfig.sobot_title_right_menu2_display = true;
// Set whether to display the toolbar right third button, hide by default
SobotUIConfig.sobot_title_right_menu3_display = true;
// Modify the toolbar right third button icon (phone icon R.drawable.sobot_phone)
SobotUIConfig.sobot_title_right_menu3_bg = R.drawable.sobot_phone;
// Set phone nos to be dialed for the toolbar right third button
SobotUIConfig.sobot_title_right_menu3_call_num = "18510000000";
2
3
4
5
6
7
8
9
10
# 2. Dynamically control to display the title bar avatar, nickname and company name
/**
 * Set the nickname display mode of the header navigation bar of the chat interface
 *
 * @param context Context object
 * @param title_type   title display mode
 *    SobotChatTitleDisplayMode.Default: Display agent nickname (default)
 *    SobotChatTitleDisplayMode.ShowFixedText: Display fixed text
 * @param custom_title If you need to display the fixed text, you have to pass this parameter. It cannot be passed in other modes
 * @param isShowTitle  Whether to display the title true Display; false Hide; false by default
 */
ZCSobotApi.setChatTitleDisplayMode(getApplicationContext(),
        SobotChatTitleDisplayMode.ShowFixedText, "nickname", false);


/**
 * Set the avatar mode of the header navigation bar of the chat interface
 *
 * @param context Context object
 * @param avatar_type       Avatar display mode
 * SobotChatAvatarDisplayMode.Default: Display agent avatar (default)
 * SobotChatAvatarDisplayMode.ShowFixedAvatar: Display fixed avatar
 * @param custom_avatar_url If you need to display the fixed avatar, you have to pass this parameter. It cannot be passed in other modes
 * @param isShowAvatar      Whether to display avatar
 */
ZCSobotApi.setChatAvatarDisplayMode(getApplicationContext(),SobotChatAvatarDisplayMode.Default, "https:// sobot-test.oss-cn-beijing.aliyuncs.com/console/66a522ea3ef944a98af45bac09220861/userImage/20191024164346682.PNG", false);

/**
 * Set the company name display mode of the header navigation bar of the chat interface
 *
 * @param context Context object
 * @param company_type        Company name display mode
 *                            SobotChatCompanyDisplayMode.Default: Display company name (default)
 *                            SobotChatCompanyDisplayMode.ShowFixedText: Display fixed text
 * @param custom_company_name If you need to display the fixed text, you have to pass this parameter. It cannot be passed in other modes
 * @param isShowCompany       Whether to display the title true Display; false Hide; false by default
 */
ZCSobotApi.setChatCompanyDisplayMode(getApplicationContext(), SobotChatCompanyDisplayMode.ShowFixedText,"Company name", false);
2
3
4
5
6
7
8
9
10
11
12
13
14
15
16
17
18
19
20
21
22
23
24
25
26
27
28
29
30
31
32
33
34
35
36
37
38
# 3. Control landscape/portrait mode display ON/OFF
// true: Landscape, false: Portrait; false: Portrait by default
ZCSobotApi.setSwitchMarkStatus(MarkConfig.LANDSCAPE_SCREEN,false);
2
# 4. Whether to turn on notched display in landscape mode
// It only works in landscape mode; it's already adapted in portrait mode. You can modify the status bar color
// true: ON, false: OFF; false: OFF by default
ZCSobotApi.setSwitchMarkStatus(MarkConfig.DISPLAY_INNOTCH, true);
2
3
# 5. Replace UI pattern with namesake resources
You can add the namesake color to colors.xml in the customer app to cover the color style in the Sobot SDK; replace the images in the Sobot SDK interface by placing a namesake image resource at the same location in the main project; replace the text in the Sobot SDK interface by placing a namesake text resource at the same location in the main project.
The following are common color configurations. More color and image resources can be found in the Download Source Package in the manual integration module.
    <!-- Theme color  Green by default -->
    <color name="sobot_color">@color/sobot_common_green</color>

    <!-- Start with header -->
    <!-- Header navigation bar and status bar background  gradient  Left  Start -->
    <color name="sobot_color_title_bar_left_bg">@color/sobot_gradient_start</color>
    <!-- Header navigation bar and status bar background  gradient  Right  End -->
    <color name="sobot_color_title_bar_bg">@color/sobot_gradient_end</color>
    <!-- Header nickname color -->
    <color name="sobot_color_title_bar_nike_name">@color/sobot_white</color>
    <!-- Header company name color -->
    <color name="sobot_color_title_bar_company_name">@color/sobot_white</color>
    <!-- Header both-side menu font color -->
    <color name="sobot_color_title_bar_menu_text">@color/sobot_white</color>

    <color name="sobot_color_title_bar_title">@color/sobot_common_gray1</color>

    <!-- Middle   Chat list -->
    <!-- Chat background -->
    <color name="sobot_color_chat_bg">@color/sobot_white</color>
    <!-- Text message bubble  Black font -->
    <color name="sobot_left_msg_text_color">@color/sobot_common_gray1</color>
    <!-- Text message bubble   Right side   White font -->
    <color name="sobot_right_msg_text_color">@color/sobot_white</color>
    <!-- Hyperlink color Left -->
    <color name="sobot_color_link">@color/sobot_common_blue</color>
    <!-- Hyperlink color Right -->
    <color name="sobot_color_rlink">@color/sobot_common_blue</color>
    <!-- Message interval  Time  Color -->
    <color name="sobot_color_remind_time_color">@color/sobot_common_gray2</color>
    <!-- Background color of chat interface prompt-->
    <color name="sobot_listview_remind">@color/sobot_common_bg</color>
    <!-- Font color of chat interface prompt-->
    <color name="sobot_listview_remind_text_color">@color/sobot_common_gray2</color>
    <!-- Message reminder hyperlink color -->
    <color name="sobot_color_link_remind">@color/sobot_color</color>
    <!-- File message bubble color -->
    <color name="sobot_chat_file_bgColor">@color/sobot_color</color>
    <!-- Default color of the left background of message bubble -->
    <color name="sobot_chat_left_bgColor">@color/sobot_common_gray4</color>
    <!-- Message bubble right-side background default color  Gradient  Left  Start -->
    <color name="sobot_chat_right_bgColor_start">@color/sobot_gradient_start</color>
    <!-- Message bubble right-side background default color  Gradient  Right  End -->
    <color name="sobot_chat_right_bgColor_end">@color/sobot_gradient_end</color>
    <!-- Left-side message bubble nickname color -->
    <color name="sobot_chat_left_nikename_color">@color/sobot_common_gray2</color>
    <!-- Right-side message bubble nickname color -->
    <color name="sobot_chat_right_nikename_color">@color/sobot_common_gray2</color>
    <!--Quote message-->
    <!--Text message bubble left side reference type color black text -->
    <color name="sobot_left_appoint_msg_type_color">@color/sobot_common_gray2</color>
    <!--Text message bubble left side citation content color black text -->
    <color name="sobot_left_appoint_msg_text_color">@color/sobot_common_gray3</color>
    <!--The color inside the reference card on the left side of the text message bubble is black -->
    <color name="sobot_left_appoint_msg_card_text_color">@color/sobot_common_gray1</color>
    <!--Text message bubble right side reference type color white text -->
    <color name="sobot_right_appoint_msg_type_color">#E6FFFFFF</color>
    <!--Text message bubble right side citation content color white text -->
    <color name="sobot_right_appoint_msg_text_color">#D9FFFFFF</color>
    <!-- Right line color of message bubble-->
    <color name="sobot_chat_right_line">#99FFFFFF</color>
    <!--Color of the left line of the message bubble-->
    <color name="sobot_chat_left_line">#CCCCCC</color>
    <!--Right side reference message reference section background color-->
    <color name="sobot_chat_appoint_right_transparent_bg">#24FFFFFF</color>
    <!--Left side reference message reference section background color-->
    <color name="sobot_chat_appoint_left_transparent_bg">#FFFFFF</color>
    <!--Quote message small square occupying background color-->
    <color name="sobot_chat_appoint_zhanwei_bg">#CDD9EA</color>

    <!-- Bottom -->
    <!-- After clicking "+"  Panel background -->
    <color name="sobot_color_bottom_bg">@color/sobot_white</color>
    <!-- Message input box  Text  Color -->
    <color name="sobot_color_bottom_msg_input_color">@color/sobot_common_gray1</color>
    <!-- After clicking "+"  Panel background  Button font color -->
    <color name="sobot_color_bottom_btn_wz_color">@color/sobot_common_gray1</color>

    <!-- About submission -->
    <!-- Submission  Navigation bar switch  Text bottom  Underscore  Color  -->
    <color name="sobot_postMsg_nav_indicator_color">@color/sobot_white</color>
    <!-- Submission  Navigation bar switch  Selected  Font  Color  -->
    <color name="sobot_postMsg_nav_sel_tx_color">@color/sobot_white</color>
    <!-- Submission  Navigation bar switch Unselected font  Color -->
    <color name="sobot_postMsg_nav_tx_color">@color/sobot_white</color>
    <!-- Submission guidance text  Hyperlink color -->
    <color name="sobot_postMsg_url_color">@color/sobot_common_blue</color>
    <!-- Submission  Upload image  Pop-up window  Option background color  -->
    <color name="sobot_color_setting_item_pressed">@color/sobot_common_white</color>


    <!-- Chat interface button background color -->
    <color name="sobot_btn_bg">@color/sobot_color</color>
    <color name="sobot_btn_bg_pressed">@color/sobot_color</color>
    <color name="sobot_btn_bg_disable">#EFF3FA</color>
    <color name="sobot_text_btn_color">#ffffff</color>
    <color name="sobot_text_btn_color_pressed">#80ffffff</color>

    <!-- Announcement layout background color -->
    <color name="sobot_announcement_bgcolor">#FFFBE6</color>
    <!-- Announcement title font color -->
    <color name="sobot_announcement_title_color">@color/sobot_common_gray1</color>
    <!-- Top announcement hyperlink  Font color -->
    <color name="sobot_announcement_link_color">@color/sobot_common_hese</color>

    <!-- Deleted history font color -->
    <color name="sobot_text_delete_hismsg_color">@color/sobot_common_red</color>

    <!-- Input box top  Custom tag  Overall background color -->
    <color name="sobot_lable_bg_color">@color/sobot_common_gray6</color>
    <!-- Custom tag frame color -->
    <color name="sobot_lable_stroke_color">#EDEEF0</color>
    <!-- Custom tag default fill color -->
    <color name="sobot_lable_nomal_bg_color">@color/sobot_white</color>
    <!-- Custom tag selected fill color -->
    <color name="sobot_lable_press_bg_color">@color/sobot_white</color>
    <!-- Custom tag font color -->
    <color name="sobot_lable_text_color">@color/sobot_common_gray1</color>


    <!-- Product info title color -->
    <color name="sobot_goods_title_text_color">@color/sobot_common_gray1</color>
    <!-- Product info description color -->
    <color name="sobot_goods_des_text_color">@color/sobot_common_gray2</color>
    <!-- Product price color -->
    <color name="sobot_goods_price_text_color">@color/sobot_color</color>

    <!-- Order card  Text general color -->
    <color name="sobot_order_label_text_color">@color/sobot_common_gray1</color>
    <!-- Order card  Order status color -->
    <color name="sobot_order_status_text_color">#E67F17</color>
    <!-- Order card  Product description color -->
    <color name="sobot_order_des_text_color">@color/sobot_common_gray2</color>

    <!-- Submission record details timeline line color -->
    <color name="sobot_ticket_deal_line_grey">@color/sobot_common_gray5</color>
    <!-- Submission  Select business  Font color -->
    <color name="sobot_post_msg_template_text_color">@color/sobot_color</color>

    <!-- Evaluation, skill group, switch business, submission pop-up window   Selection button selected background color -->
    <color name="sobot_dialog_btn_select">@color/sobot_color</color>


    <!-- Evaluation  Tag button default text color -->
    <color name="sobot_chat_evaluate_question_select_textColor">@color/sobot_color</color>
    <!--Evaluation  Submission button -->
    <color name="sobot_evaluate_btn_press">@color/sobot_color</color>
    <color name="sobot_evaluate_btn_nor">@color/sobot_color</color>

    <!-- Ten-point evaluation (square) selected color -->
    <color name="sobot_ten_evaluate_select">#FFF0AC0E</color>
    <!-- Five-star evaluation control bottom  Corresponding description color -->
    <color name="sobot_color_evaluate_ratingBar_des_tv">@color/sobot_common_hese</color>

    <!-- Multi-round chat  Tag  Font color -->
    <color name="sobot_template2_lable_text_color">@color/sobot_color</color>
    <color name="sobot_template4_more_text_color">@color/sobot_common_blue</color>


    <!-- Line  Separator color -->
    <color name="sobot_line_1dp">@color/sobot_common_gray5</color>

    <!-- XListView background color -->
    <color name="sobot_lv_message_bg">@color/sobot_white</color>
    <!-- In history  Guidance question color -->
    <color name="sobot_color_suggestion_history">@color/sobot_common_gray1</color>
    <!-- File message  Send and download  Button background -->
    <color name="sobot_btn_normal_color">@color/sobot_color</color>

    <!-- File progress bar forecolor -->
    <color name="sobot_sectorProgressView_fgColor">#4D000000</color>

    <!-- Auto-completion background color -->
    <color name="sobot_auto_complete_press">#EFF3FA</color>
    <color name="sobot_auto_complete">@color/sobot_white</color>
2
3
4
5
6
7
8
9
10
11
12
13
14
15
16
17
18
19
20
21
22
23
24
25
26
27
28
29
30
31
32
33
34
35
36
37
38
39
40
41
42
43
44
45
46
47
48
49
50
51
52
53
54
55
56
57
58
59
60
61
62
63
64
65
66
67
68
69
70
71
72
73
74
75
76
77
78
79
80
81
82
83
84
85
86
87
88
89
90
91
92
93
94
95
96
97
98
99
100
101
102
103
104
105
106
107
108
109
110
111
112
113
114
115
116
117
118
119
120
121
122
123
124
125
126
127
128
129
130
131
132
133
134
135
136
137
138
139
140
141
142
143
144
145
146
147
148
149
150
151
152
153
154
155
156
157
158
159
160
161
162
163
164
165
166
167
168
169
170
171
172
173
174
175
# 6.Set Night (Dark) Mode
Added in version 4.1.4
  /** Set the interface to either day or night mode or follow the system, with the default following system
     * Set after SDK initialization, as it will be restored after each initialization.
     * @param mode     0 / AppCompatDelegate.MODE_NIGHT_AUTO:Switch between day/night themes based on the current time
     *                 1 / AppCompatDelegate.MODE_NIGHT_NO:Daytime mode
     *                 2 / AppCompatDelegate.MODE_NIGHT_YES:Night mode
     *                 other / AppCompatDelegate.MODE_NIGHT_FOLLOW_SYSTEM:Follow system
     *
     */
ZCSobotApi.setLocalNightMode(context, int mode);
2
3
4
5
6
7
8
9
# ● Other Configuration
# 1. Customize auto response
Auto response in SDK can be set dynamically at the PC console. If the PC console setting cannot meet your requirement, you can use the API below to conduct local configuration in the code.
Note: Local setting works first, and PC setting will no longer work.
information.setAdmin_Hello_Word( "Customized customer service welcome message");// Custom agent greeting, blank by default (If any field is passed, the field will be used first)
information.setRobot_Hello_Word( "Customized robot welcome message");// Custom bot greeting, blank by default (If any field is passed, the field will be used first)
information.setUser_Tip_Word( "Custom user timeout prompt");// Custom user timeout prompt, blank by default (If any field is passed, the field will be used first)
information.setAdmin_Tip_Word("Custom customer service timeout prompt");// Custom agent timeout prompt, blank by default (If any field is passed, the field will be used first)
information.setAdmin_Offline_Title( "Customizing customer service offline excuses");// Custom reply of agent offline, blank by default (If any field is passed, the field will be used first)
information.setUser_Out_Word( "Custom user timeout offline prompt");// Custom prompt of user timeout & offline, blank by default (If any field is passed, the field will be used first)
2
3
4
5
6
# 2. Customize chat history display time range
If you want to set chat history within xx day(s) viewable by users, you can call the method below:
/**
   * Control the time range for displaying chat history. Only messages within 60 days can be displayed at most, in minutes
 * If this parameter is not passed, it will display all chat history
   * @param time  Query time (e.g.:100- means the chat history in the latest 100min)
*/
ZCSobotApi.setScope_time(context,time);
2
3
4
5
6
# 3. "+" panel menu extension
On the menu panel after clicking "+" button on the agent chat interface, you can add menu as per your needs. The code is as follows:
private void customMenu(){
    // Add extension menu data
        ArrayList<ChattingPanelUploadView.SobotPlusEntity> objects = new ArrayList<>();
    /**
     * SobotPlusEntity: Custom menu entity class
     * @param iconResId Menu icon drawableId
     * @param name      Menu name
     * @param action    Menu action  When clicking the button, the corresponding action will be returned to callback
     *                  On this basis, judge which button the user clicked
     */
     objects.add(new ChattingPanelUploadView.SobotPlusEntity(R.drawable.sobot_camera_picture_button_selector, "seat", "action_location"));
     objects.add(new ChattingPanelUploadView.SobotPlusEntity(R.drawable.sobot_camera_picture_button_selector, "register", "action_sing_in"));
     objects.add(new ChattingPanelUploadView.SobotPlusEntity(R.drawable.sobot_camera_picture_button_selector, "collect", "action_ollection"));
      // Add data in both robot mode and manual mode
     //SobotUIConfig.pulsMenu.menus = objects;
     // Add data only in manual mode
     SobotUIConfig.pulsMenu.operatorMenus =objects;
     // Set callback
      SobotUIConfig.pulsMenu.sSobotPlusMenuListener = new SobotPlusMenuListener() {
         @Override
         public void onClick(View view, String action) {
            // action corresponds to the action in the entity class
            ToastUtil.showToast(getApplicationContext(), "action:"+action);
         }
      };
}
2
3
4
5
6
7
8
9
10
11
12
13
14
15
16
17
18
19
20
21
22
23
24
25
26
# 4. Call the dial interface API
/**
* @param phone : Passed phone no.  context : Context object
*/
CommonUtils.callUp(String phone, Context context)
2
3
4
# 5. Sobot log display ON/OFF
/**
* true : Display log information   false (not display) by default
*/
ZCSobotApi.setShowDebug(false);
2
3
4
# 6. Multi-language support
Method 1: At present, the SDK supports two languages, English and Chinese. The language will automatically switch and adapt according to the current mobile language. If the current mobile language is not identified, Chinese is used by default.
If you need to add a language pack, just save the supported language file into the corresponding language directory. E.g.: English path: sobotsdk/src/main/res/values-en/strings.xml.
Note: The language folder name is values- followed by the language label, such as values-en; The name of strings.xml remains unchanged.
Method 2:
《SDK Supported languages》 (opens new window)
/**
 * Designate the international language pack
 * @param language    Designate the language name such as "zh-Hans": Simplified Chinese "en": English .For other language codes, refer to the "SDK Supported languages"
 * @param isUse        Whether to use the designated language
 */
ZCSobotApi.setInternationalLanguage(context,language, isUse);
2
3
4
5
6
Special processing:
If the agent evaluation or bot evaluation tag is configured for the multi-language version, the multi-lingual display is not supported. The display can be hidden through the following attributes (it does not affect the use of evaluation function, and only the tag is missing in the evaluation content).
//  Whether to hide the bot evaluation tag, not hide by default. true: Hide; false: Display
info.setHideRototEvaluationLabels(false);

//  Whether to hide the agent evaluation tag, not hide by default. true: Hide; false: Display
info.setHideManualEvaluationLabels(false);
2
3
4
5
# 7. Time zone adaptation
The default system time is the GMT+8 standard Beijing time. If you need to dynamically adapt to the mobile phone time zone, configure the following code:
// false: Default GMT+8 time zone. true: Auto adapt to the phone system time zone
ZCSobotApi.setSwitchMarkStatus(MarkConfig.AUTO_MATCH_TIMEZONE, false);
2
If you want to set whether to pop up permission use prompt box upon applying for permission, configure the code below:
// Whether to pop up permission use prompt box upon applying for permission   false: Not pop up, true: Pop up
ZCSobotApi.setSwitchMarkStatus(MarkConfig.SHOW_PERMISSION_TIPS_POP, false);
2
# 9. For monitoring Back click on some function pages of Sobot system (record only, not intercept), you can add logic (such as buried point)
ZCSobotApi.setFunctionClickListener(new SobotFunctionClickListener() {
   @Override
   public void onClickFunction(Context context, SobotFunctionType functionType) {
       // 1: Back on submission page, 2: Back on chat page, 3: Back on Help Center page, 4: Back on E-commerce Message Center page, 5: Call agent
       LogUtils.i(functionType.toString());
   }
});
2
3
4
5
6
7
# 10. Security verification
Function location: Online Channel Setting - Channel Security Setting - Security Key Setting - Tick "Valid Range (APP)".
After enabling the "Security Key" function for APP in the valid range, you have to pass partnerid params in the SDK channel. In addition, the params "sign" and "createTime" are added when passing params during docking, where sign="MD5 (app_key + partnerid + key + createTime)" and createTime is the Unix millisecond timestamp; secret is a string of 32 chars, and createTime is a millisecond timestamp.
After the parameters are passed in, Sobot will decrypt the sign to verify if the passed partnerid is consistent with that in the sign. If so, the Sobot system will be accessed normally; if not, the access will fail. If customer doesn't pass partnerid or sign, it will be deemed as an illegal user, resulting in access failure. If createTime differs from the current time by 5min, it will be deemed as an illegal user, resulting in access failure.
APP "security key" ON/OFF, i.e. valid range setting takes effect in real time.
// When initiating Sobot page, pass the two params below
// Signature
info.setSign(your sign);
// Millisecond timestamp
info.setCreateTime(crete_time);
2
3
4
5
# ● Information Class Description
# 1. About ID
| Param | Type | Required | Description |
|---|---|---|---|
| app_key | String | Yes | Setting is required; if not, initialization will fail |
| choose_adminid | String | No | Designate agent ID |
| tranReceptionistFlag | Integer | No | Designate agent transfer type, 0: Transfer to any agent; 1: Transfer to the designated agent alone |
| partnerid | String | No | User's unique ID |
| robot_code | String | No | Docking bot ID |
| robot_alias | String | No | Docking bot ID alias |
| faqId | String | No | FAQ param |
| sign | String | No | Signature MD5 encryption (app_key+partnerid+secret+create_time) |
| createTime | String | No | Timestamp |
E-commerce:
Set E-commerce trans-to-agent overflow. The following attribute conflicts with transferaction. If transferaction is set, flow_type, flow_companyid, flow_groupid configuration will be overwritten.
| Param | Type | Required | Description |
|---|---|---|---|
| customer_code | String | No | Merchant docking ID (E-commerce only. In case of no app_key, it must be provided) |
# 2. Agent workbench display
| Param | Type | Required | Description |
|---|---|---|---|
| user_nick | String | No | Nickname |
| user_name | String | No | Real Name |
| user_tels | String | No | User's phone no. |
| user_emails | String | No | User's e-mail |
| String | No | ||
| remark | String | No | Note |
| face | String | No | User's custom avatar |
| visit_title | String | No | Accessed source page title |
| visit_url | String | No | Accessed source URL |
| params | String | No | User profile |
| customer_fields | String | No | Fixed KEY custom field |
| group_name | String | No | Skill Group Name |
| groupid | String | No | Skill group no. |
| isVip | String | No | Designate whether the customer is VIP |
| vip_level | String | No | VIP level |
| user_label | String | No | User tag |
# 3. About chat page
| Param | Type | Required | Description |
|---|---|---|---|
| service_mode | Integer | No | Customize access mode: 1. Bot only 2. Agent only 3. Intelligent agent - bot first 4. Intelligent agent - agent first |
# 4. Miscellaneous
| Param | Type | Required | Description |
|---|---|---|---|
| transferaction | String | No | Trans-to-agent Designated skill group Overflow |
| summary_params | String | No | Trans-to-agent custom field |
| multi_params | String | No | Multi-round chat Custom field |
| margs | String | No | Extension field of hotspot guidance questions |
| content | String | No | Auto send product order info |
| queue_first | Boolean | No | Designated customer first |
| isArtificialIntelligence | Boolean | No | Whether to carry out intelligent trans-to-agent, false by default |
| artificialIntelligenceNum | Integer | No | In case of intelligent trans-to-agent, when the unknown question or guide question occurs for (X) time(s), display Trans-to-Agent button. One time by default |
| isUseVoice | Boolean | No | Whether to use voice function. true by default, use voice function |
| isUseRobotVoice | Boolean | No | Whether to use bot voice function. false by default. Bot cannot use voice function, and voice will be transferred to text. |
| isShowLeftBackPop | Boolean | No | Whether to pop up (Do you want to end the chat?) upon clicking Back on the top left corner false: Not pop up by default |
| isShowSatisfaction | Boolean | No | When clicking Back on the left side of navigation bar, whether to pop up satisfaction evaluation window. false: Not pop up by default |
| isShowCloseSatisfaction | Boolean | No | Whether to pop up satisfaction evaluation window when clicking Close button on the navigation bar. false: Not pop up by default. |
| equipmentId | String | No | Device no. |
| tranReceptionistFlag | Integer | No | Transfer type (0-Transfer to any agent, 1-Transfer to the designated agent alone) |
| transferKeyWord | HashSet | No | Trans-to-agent keyword |
| isCloseInquiryForm | Boolean | No | Whether to close pre-query form |
| leaveMsgGuideContent | String | No | Submission guidance text |
| leaveMsgGroupId | String | No | Submission skill group |
| leaveCusFieldMap | Map | No | Submission custom field |
| leaveParamsExtends | List | No | Docking Field |
| leaveTemplateId | List | No | Submission template ID |
| hideMenuSatisfaction | Boolean | No | Hide evaluation |
| hideMenuLeave | Boolean | No | Hide submission |
| hideMenuPicture | Boolean | No | Hide photos |
| hideMenuVedio | Boolean | No | Hide videos |
| hideMenuCamera | Boolean | No | Hide camera |
| hideMenuFile | Boolean | No | Hide files |
| showLeaveDetailBackEvaluate | Boolean | No | Pop up evaluation window upon clicking Back on the submission details page |
| canBackWithNotEvaluation | Boolean | No | Not Evaluate Now button when popping up evaluation window |
| hideRototEvaluationLabels | Boolean | No | Whether to hide bot evaluation tag |
| hideManualEvaluationLabels | Boolean | No | Whether to hide agent evaluation tag |
| locale | String | No | Server API multi-language |
| helpCenterTel | String | No | Add phone nos in Help Center |
| helpCenterTelTitle | String | No | Phone no. button field in Help Center |
| hideMenuManualLeave | Boolean | No | Hide submission in agent mode |
| isShowRightMsgFace | Boolean | No | Whether to display the right-side message avatar |
| isShowRightMsgNickName | Boolean | No | Whether to display the right-side message nickname |
| isShowEveryLeftMsgFaceNickName | Boolean | No | Whether to display the nickname and avatar for every right-side message |
# Source Code and Demo
Download the Demo source code (opens new window);
Download the installation package (opens new window);
# FAQ
FAQ:
Please click link (opens new window) to enter the intelligent bot page and enter your question
# Update instructions
SDK version update instructions (opens new window)
# Description of Sobot SDK's Collection and Use of Personal Information
<<Description of Sobot SDK's Collection and Use of Personal Information>> (opens new window)
Please inform users of terms of using the Sobot SDK in the Privacy Policy. The reference terms are as follows:
SDK name: Sobot SDK

Server Type: Customer service system

Personal information to be collected: Device and system information (including operating system type, system edition/version, APP package name, APP version, device type, device manufacturer, device model, network type),Sensors (including accelerometer and distance sensor),Internet identity information (IP address).

Privacy Policy link: https:// www.sobot.com/docs/clause/sdk-clause.html
2
3
4
5
6
7