Web-JS Access Description
# Web-JS Access Description
# Overview
● Sobot Web-JS SDK aims to help the 3rd-party websites and applications to build a sound agent ecosystem and provide good agent application functions and a simple API.
● Attention should be paid to the priority of the valid params: Web-JS Code settings > Manage background settings,Take Reception Mode as an example: When the reception mode is set as bot first by the backend and agent first by the Web-JS code, the real practice will follow the configuration set in the code, and that set by the backend will not take effect.
● JS-SDK provides the following extensions
- Component Initialization
- Client Customization
- Unread Messages and Offline Messages
- Multiple Languages
- Product Card
- Order Card
- CRM Docking
- Reception Mode
- intelligent Routing Reception for VIP
- Multiple Invitation Methods
- Website Access Statistics
- Submission, Evaluation, and Attachment
- Access by Multiple Bots
- Common Function Configuration
# Relevant Restrictions and Precautions
# Desktop website docking
If the client browser is IE, it needs to be IE 10 and above.
For parameters involving Chinese and special symbols in docking, it is recommended to use encodeURIComponent to translate them before passing the parameters.
# Deployment
# ● Acquire Access Code
Add the access code provided by Sobot backend to the body of the page to dock with Sobot JS-SDK. When the page is accessed by visitors, it will execute the code and load related JS resource files of Sobot.
Sobot Console - Settings -Support Channel -<Select a Channel>- Deployment Settings - Method 2

# ● Access Code Example
<!DOCTYPE html>
<html>
  <head>
    <title>Chat Client</title>
  </head>
  <body>
  <!--html tag-->
    <script>
      (function (w, d, e, x) {
        w[e] = function () {
          w.cbk = w.cbk || []
          w.cbk.push(arguments);
        }
        x = d.createElement("script");
        x.async = true;
        x.id = "zhichiScript";
        x.src = "https://sg.sobot.io/chat/frame/v2/entrance.js?sysnum=3542411be2184c8cb6b48d66ca1b2730";
        d.body.appendChild(x);
      })(window, document, "zc");
    </script>
  <!--html tag-->
  </body>
</html>
2
3
4
5
6
7
8
9
10
11
12
13
14
15
16
17
18
19
20
21
22
23
This example is the simplest one of Sobot access. By accessing the Sobot inquiry component, users of the enterprise can quickly contact enterprise agent. The Sobot web component provides powerful user behavior collection capability and system docking capability. After successful docking, when visitors visit the customer page, the entry button (customizable) for agent will automatically appear in the bottom right of the page. Click the button to enter the chat page. < Attachment - Param >。
# Agreement
# ● Add by Codes
zc("config",{
  "color":" 04babc ",
  "uname":"Sobot"
})
2
3
4
The available params may not be introduced individually, but you can find them in the Parameter List at the end of the article, and the function description of all params will be attached.
# Default Initialization
# ● Automatic
Directly put the component link generated at the Sobot backend before the </body> tag of your website, and the automatic initialization will be completed.
<!DOCTYPE html>
<html>
  <head>
    <title>Chat Client</title>
  </head>
  <body>
  <!--html tag-->
    <script>
      (function (w, d, e, x) {
        w[e] = function () {
          w.cbk = w.cbk || []
          w.cbk.push(arguments);
        }
        x = d.createElement("script");
        x.async = true;
        x.id = "zhichiScript";
        x.src = "https://sg.sobot.io/chat/frame/v2/entrance.js?sysnum=3542411be2184c8cb6b48d66ca1b2730";
        d.body.appendChild(x);
      })(window, document, "zc");
    </script>
  <!--html tag-->
  </body>
</html>
2
3
4
5
6
7
8
9
10
11
12
13
14
15
16
17
18
19
20
21
22
23
# ● Manual
// Step 1
zc("config", {
  "manual": true, // Set to manual initialization
})

// Step 2 Perform manual initialization by events
document.getElementById("customBtn").addEventListener("click",function(){
   zc("frame_manual", function (res) {
    console.log("success")
  }
})
2
3
4
5
6
7
8
9
10
11
# Custom Initialization
zc("config",{
  "color":" 04babc ", // Client theme color (Six valid chars in the format 0-9 a-f, without #)
  "location":1, // Inquiry entry location 1-bottom right, 2- bottom left (bottom right by default)
})
2
3
4
# ● Custom Inquiry Entry
Sobot chat component will generate an inquiry button by default. To customize the button, users can set custom=true and add the class corresponding to the component to the custom button tag.
<!DOCTYPE html>
<html>
  <head>
    <title>Chat Client</title>
  </head>
  <body>
    <!--Custom button Step 3-->
    <button class="zhiCustomBtn">Your inquiries are welcomed</button>
    <!--html tag-->
    <script>
      (function (w, d, e, x) {
        w[e] = function () {
        w.cbk = w.cbk || []
        w.cbk.push(arguments);
        }
        x = d.createElement("script");
        x.async = true;
        x.id = "zhichiScript";
        x.className="zhiCustomBtn"; // Bind the class to the custom button Step 1
        x.src = "https://sg.sobot.io/chat/frame/v2/entrance.js?sysnum=3542411be2184c8cb6b48d66ca1b2730";
        d.body.appendChild(x);
      })(window, document, "zc");
      zc("config",{
        custom:true, // Set the custom button as effective Step 2
      })
    </script>
    <!--html tag-->
  </body>
</html>
2
3
4
5
6
7
8
9
10
11
12
13
14
15
16
17
18
19
20
21
22
23
24
25
26
27
28
29
# ● Create Dynamic Inquiry Entry
Since many page elements are dynamically generated when using custom buttons, custom events should be dynamically bound to make the custom inquiry entry effective
<script>
  document.getElementById("dynBtn").addEventListener("click",function(){
    // Simulate dynamic inserted data
    document.getElementById("root").innerHTML = '<button class="zhiCustomBtn">Inquiry</button>';
    // Dynamically create custom button
    zc("dynamic_ready")
  })
</script>
2
3
4
5
6
7
8
# Message
# ● Get Unread Messages
Note: This event is only triggered when the user folds the chat window and the agent sends a message to the user. zhichiReceive can also be monitored, and its functions are the same with receive_message.
zc('receive_message',function(res){
  // request: { img:" Agent Avatar ", name:"User Name ", msg:" Agent sending content ",t:" Message sending time "}
})
2
3
# ● Get Offline Messages
Get the messages sent by the offline agent after the chat between the user and the agent ended. When the user left the page, the agent can send offline messages. When the user re-enters the page, offline messages unread by the user will be pushed through this event.
zc("offline_message_count",function(res){
  console.log(res)
  //request:{
  // size: "Total count of offline messages",
  // offlineMsg: "Details of offline messages",
  // unAckMsg: "Details of unacknowledged messages",
  // unAckSize: "Count of unacknowledged messages"
  // groupId: "Skill group ID"
  // leaveToTicket: "1 indicates there are pending ticket messages not yet viewed"
  //}
})
2
3
4
5
6
7
8
9
10
11
# Multilingual
# ● Multilingual Configuration
// en-English, cn-Chinese, tw-Traditional Chinese (Simplified Chinese by default). More languages will be available later
zc("config",{
  locale:"en",
})
2
3
4
# Card
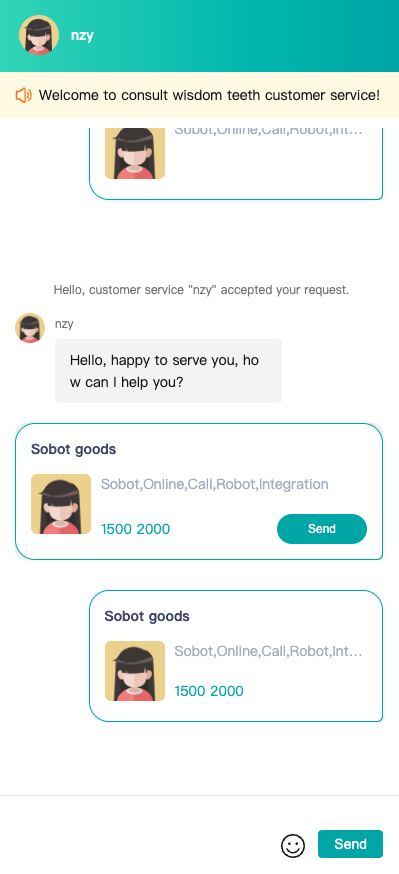
# ● Product Card
With the web component, the product information to be displayed will be set on the user side (available for H5 only)
| Param | Type | Param Description | Applicable Range |
|---|---|---|---|
| card_title | String | Product title (required) | Component and link |
| card_url | String | Product links include hyperlinks and mini program page links. The hyperlink can only be opened on the console when it starts with http or https. (it is recommended to use encodeURIComponent to escape the link); The mini program page link can only be opened within WeChat | Component and link |
| card_desc | String | Product info description (optional) | Component and link |
| card_note | String | RMB 2000 product tag example: price (optional) | Component and link |
| card_picture | String | Product thumbnail (optional) (it is recommended to escape with encodeURIComponent to prevent the link from containing special chars to cause the failure of param acquisition) | Component and link |
zc("config",{
  card_title:"Sobot",
  card_url:encodeURIComponent("http:// sg.sobot.io"),
  card_desc:"Sobot,Online,Call,Robot,Integration",
  card_note:"1500,2000",
  card_picture:encodeURIComponent("https:// img.sobot.io/console/common/face/admin.png")
})
2
3
4
5
6
7
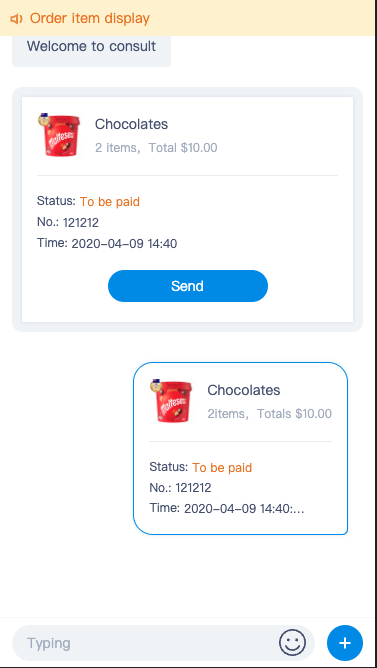
# ● Order Card
With the web component, the product information to be displayed will be set on the user side (available for H5 only)
| Param | Type | Param Description | Applicable Range |
|---|---|---|---|
| order_status | Number | Order status, 0: 'Custom status field', 1: 'To be paid', 2: 'To be delivered', 3: 'On the way', 4: 'Delivering', 5: 'Finished', 6: 'To be evaluated', 7: 'Canceled' | Component and link |
| status_custom | String | When order_status=0, the field is taken as the status of the order card | Component and link |
| create_time | Number | Creation time (ms) | Component and link |
| order_code | Number | Order no. | Component and link |
| order_url | String | Oder links include hyperlinks and mini program page links. The hyperlink can only be opened on the console when it starts with http or https. (it is recommended to use encodeURIComponent to escape the link); The mini program page link can only be opened within WeChat | Component and link |
| goods_count | Number | Product quantity | Component and link |
| total_fee | Number | Order amount (total_fee=1000 is equivalent to total_fee=10.00, decimals are not supported) | Component and link |
| goods | String | Product details array | Component and link |
goods Data Structure
| Param | Type | Param Description |
|---|---|---|
| name | String | Product name |
| pictureUrl | String | Product image link (it is recommended to escape with encodeURIComponent to prevent the link from containing special chars to cause the failure of param acquisition) |
- Component call:
var goods = [{"name":"saaadad","pictureUrl":encodeURIComponent("https:// img.sobot.io/console/common/face/admin.png")}];
zc("config", {
  order_status: 1 ,
  status_custom: " Custom status", // When order_status=0, the field is taken as the status of the order card
  create_time: " 1586414406391 ",
  order_code: 11111 ,
  order_url: encodeURIComponent("http:// sg.sobot.io"),
  goods_count: 2 ,
  total_fee: 1000 , // ( total_fee=1000 is equivalent to total_fee=10.00, decimals are not supported)
  goods: JSON.stringify(goods),
});
2
3
4
5
6
7
8
9
10
11
- Link call:
<a href='https://sg.sobot.io/chat/h5/v2/index.html?sysnum=4c349791a07b46c1a70b8ac88aa23257&order_status=1&create_time=1586414406391&order_code=121212&order_url=http:// sg.sobot.io&goods_count=2&total_fee=1000&goods=[{"name":"saaadad","pictureUrl":"https:// img.sobot.io/console/common/face/admin.png"}]' target="_blank">Your inquires are welcomed</a>
# CRM
# ● Basic Info Docking
Enterprise can configure enterprise customer information by calling the config API to associate chats in the agent system with customers in the enterprise CRM system.
zc("config",{
  uname:"dingmao", // Customer name
  realname:"dingmao", // Customer Real Name
  tel:" 18888888888 ", // Customer phone no.,
  email:"dingmao@163.com", // Customer Email
  qq:" 2345678 ", // Customer QQ no.
  face:'https:// img.sobot.io/console/common/face/admin.png', // Customer Avatar
  remark:"VIP Customer, Each response cannot exceed 5 seconds" // Customer note
})
2
3
4
5
6
7
8
9
# ● Custom Field Docking
# 1.params
params is a custom field through which customers can pass in any attribute they want to display in the workbench, and it receives the value as a Json formatted string. It will be displayed in the custom fields at the bottom of the Customer Inquiry module in the agent workbench. The custom field can be retrieved by keyword query in the backend chat statistics and can be exported by exporting chat information.
var args = {
  Level: "Boss",
  Idiomatic name: "Sobot",
  From: "Beijing"
};
zc("config",{
  params:JSON.stringify(args)
})
2
3
4
5
6
7
8
# 2.customer_fields
customer_fields is a custom field that differs from params in that it can only be used after being configured in the agent backend, and it also receives a string in Json format. It is displayed in the Customer Inquiry module of the agent workbench
var args= {
  customField4:"Sobot",
  customField5:"Robot"
};
zc("config",{
  customer_fields:JSON.stringify(args)
})
2
3
4
5
6
7
# Reception Mode
zc("config",{
  // 1: Bot only
  // 2: Agent only
  // 3: Bot first
  // 4: Agent first
  type:3,
  // Bot id Under the multiple bot mode, different bots can be configured for reception in different scenarios
  // Go to【Settings】->【Bot Info】in the backend to check
  robotid:2,
  agentid:' 1q2w3e4r ', // Agent id Designate agent for reception
  groupid:' 4r3e2w1q ', // Configure skill group Customer is required to select the business to be inquired before making an inquiry
})
2
3
4
5
6
7
8
9
10
11
12
# intelligent Routing Reception for VIP
Param description:
- actionType Execution action type:
- to_group Designated skill group;
- to_service Designated agent.
- deciId Designated skill group or agent id
- optionId Overflow tag
- 1: Overflow; when designating an agent
- 2: Non-overflow; when designating an agent
- 3: Overflow; when designating a skill group
- 4: Non-overflow; when designating a skill group
- spillId overflow conditions
- 1: Agent Offline; when designating an agent
- 2: Agent occupied; when designating an agent
- 3: Intelligent judgement; when designating an agent
- 4: No agent online in the skill group; when designating an agent group
- 5: All agents occupied in the skill group; when designating an agent group
- 6: The skill group off-duty; when designating an agent group
- 7: Intelligent judgement; when designating an agent group
  // When the previous array element in the action array overflows, the customers will be automatically transferred to the next array element
  var action = [
    {
      "actionType":"to_group",
      "optionId":"3",
      "deciId":" 162bb6bb038d4a9ea018241a30694064 ",
      "spillId":"4"
    },
    {
      "actionType": "to_group",
      "optionId": "4",
      "deciId": " cae6834444ac43e39d95b1725d2ae454 "
    }
  ];
  var payload = JSON.stringify(action);
  zc("config",{
    transfer_action:payload,
  })
2
3
4
5
6
7
8
9
10
11
12
13
14
15
16
17
18
# VIP Users
Enterprises can tag the VIP users and their VIP level, and online intelligent routing will use the VIP level as a trigger condition to assign customers based on the passed VIP level field.
Enterprises can set the VIP level by "Set Fields - VIP Level" in "Settings - Custom Fields - Customer Fields" in the admin backend.
Enterprises can set the VIP level and edit the param name of VIP level by "Set Fields - VIP Level" in "Settings - Custom Fields - Customer Fields" in the admin backend. When passing customer VIP level, both its param name and its value can be passed in.
zc("config",{
  is_vip:1, // VIP customer or not 0: General customer, 1: VIP customer General customer by default
  vip_level: " 05bcdc56e68149d1841962caf593d077 ", // The id or param name corresponding to the VIP level (id value or param name is obtained by the "Set Fields - VIP Level" in the "Settings - Custom Fields - Customer Fields" in the above admin backend). If it is passed in as a general customer field, the VIP level field passed in will be invalid.
})
2
3
4
# Customer Tag
Enterprises can set different customer tags and assign customers based on the passed customer tag field.
Enterprises can set the customer tag by "Set Fields - Customer Tag" in "Settings - Custom Fields - Customer Fields" in the admin backend.
Enterprises can set the customer tag and edit the param name of customer tag by "Set Fields - Customer Tag" in "Settings - Custom Fields - Customer Fields" in the admin backend. When passing customer tag, both its param name and its value can be passed.
zc("config",{
  user_label: " 05bcdc56e68149d1841962caf593d077 ", // The id or param name corresponding to the customer tag (the id value or param name is obtained by the "Set Fields - Customer Tag" in the "Settings - Custom Fields - Customer Fields" in the above admin backend)
})
2
3
# Multiple Invitation Methods
With the invitation function, enterprises can directly increase the opportunity to communicate with users and enhance the possibility of obtaining marketing leads. It should be noted that this function usually needs to be used in conjunction with Reception Mode to enable visitors with different characteristics to accept invitations and be received by designated agent modes, designated bots, and designated agent groups.
Set automatic invitation to visitors
# ● Make Proactive Pop-ups to Invite Users
zc("config",{
  invite:1, // Whether to enable automatic invitation 1 Enable 0 Disable Disable by default
  tip_title:"Welcome to inquire", // Proactive Invitation Text
  submit_title:"Let's start chatting", // Accept Invitation button
  first_timeout:2, // First load delay invitation time Time: s
  over_timeout:10, // Re-invitation time after rejection Time: s
  invite_count:5, // Total number of invitations in a day
})
2
3
4
5
6
7
8
# ● Set Automatic Forced Pop-ups
Enterprises can enable automatic forced pop-ups on key pages. When users enter those pages, the chat window will be automatically unfolded and complete initialization.
zc("config",{
  auto_expand:true, // true Automatically enable, and disable by default
})
2
3
# ● Proactive Chat Invitation by Agent
Enterprises need to add this API or enable the "Proactive Chat Invitation" function in "Admin Backend - Settings - Support Channels - Desktop Site", so agents can manually invite users browsing the site in the workbench. Enterprises can enable this function on some key pages according to their needs to avoid the work difficulty of agents caused by all website visitors entering the invitation list.
zc("config",{
  invite_flag:true, // true Disable, and enable by default
})
2
3
# Website Access Statistics
Admins can enable the function of displaying user browsing track on agent workbench in "Settings - Agent Workbench"
# ● Enable Browsing Track Collection
By default, Sobot does not collect user browsing tracks, and enterprises can use this API to enable the function for specific user groups under specific pages. After calling the following method to enable user browsing track collection, when a user browses a webpage, Sobot will automatically collect information about the browsed website, including the current page and its source page (the previous page of the current page).
It should be noted that Sobot will collect three types of user browsing behaviors: landing behavior (where users enter the site from), browsing behavior (which pages users view after entering the site), and inquiry initiation behavior (from which pages users initiate inquiries). Each time a user visits the site, Sobot will record these behaviors. If the user initiates an inquiry, these behaviors will be automatically associated with this inquiry chat.
Sobot will gradually launch functions of browsing track data view, statistical analysis and raw data export, so that enterprises can make full use of user behavior data to evaluate, analyze and optimize the results of promotion strategies.
zc("config",{
  man_trace:true, // Enable user access track collection Disable by default Enable in the backend
})
2
3
# ● Customize Collection Content
Enterprises can customize the content of browsing track collection to ensure that the browsing tracks seen by agents can reflect key business information, such as product IDs, product categories, and product prices in e-commerce scenarios. If the browsing track params are not customized, the system will automatically collect the URL link and page title information of the accessed page.
zc("config",{
  // Information of the previous page
  pre_visit_args:{
    'pre_abstract':'Digest of the source page. Keep blank if not available',
    'pre_visit_url': URL of the source page. Keep blank if not available',
    'pre_visit_title':'Title of the source page. Keep blank if not available',
    'pre_thumbnail': 'Thumbnail of the source page. Keep blank if not available',
    'pre_tags':'Tag of the source page. Keep blank if not available'
  },
  // Information of the current page
  cur_visit_args:{
    'cur_abstract':'Digest of the current page. Keep blank if not available',
    'cur_visit_url': 'URL of the current page. Keep blank if not available',
    'cur_visit_title':'Title of the current page. Keep blank if not available',
    'pcur_thumbnail': 'Thumbnail of the current page. Keep blank if not available',
    'cur_tags':'Tag of the current page. Keep blank if not available'
  }
})
2
3
4
5
6
7
8
9
10
11
12
13
14
15
16
17
18
# ● Manually Send Browsing Tracks
In some cases, it may be necessary to send the user browsing tracks multiple times on a specific page. For example, when a user is browsing a product in a SPA and wants to scroll to the designated product position on the page, the event will be triggered, and the browsing tracks will be sent.
document.getElementById("traceBtn").addEventListener("click",function(){
  zc("trace",{
    // Information of the previous page
    pre_visit_args:{
      'pre_abstract':'Digest of the source page. Keep blank if not available',
      'pre_visit_url': URL of the source page. Keep blank if not available',
      'pre_visit_title':'Title of the source page. Keep blank if not available',
      'pre_thumbnail': 'Thumbnail of the source page. Keep blank if not available',
      'pre_tags':'Tag of the source page. Keep blank if not available'
    },
    // Information of the current page
    cur_visit_args:{
      'cur_abstract':'Digest of the current page. Keep blank if not available',
      'cur_visit_url': 'URL of the current page. Keep blank if not available',
      'cur_visit_title':'Title of the current page. Keep blank if not available',
      'pcur_thumbnail': 'Thumbnail of the current page. Keep blank if not available',
      'cur_tags':'Tag of the current page. Keep blank if not available'
    }
  })
})
2
3
4
5
6
7
8
9
10
11
12
13
14
15
16
17
18
19
20
# Access by Multiple Bots
zc("config",{
  robotid:1, // Bot ID
})
2
3
# Common Function Configuration
# ● Submission, Attachment, and Evaluation
zc("config",{
  leave_msg_flag:true // Submission button in the menu area of the input box. true: Enable, false: Disable
  msg_flag:false, // Submission guidance prompted by the system and submission entry after the chat ended. true: Enable, false: Disable
  feedback_flag: true,// Evaluation button after a chat is established. true: Enable, false: Disable
  photo_flag: true,// Allow uploading attachments or not after an agent chat is established. true: Enable, false: Disable
  show_evaluate: 0 , // Enable evaluation or not after clicking Close.show_evaluate=1: Enable, false: Disable
})
2
3
4
5
6
7
# ● Control the Time Range for Displaying Chat History
Through the API, the time range for displaying chat history can be controlled, and the chat history exceeding the time range will not be displayed to users.
For example:
// time Time range for displaying chat history. Minutes should be passed, with the valid value being 10-2880 (10 mins-48 hrs)
zc("config",{
  time:15
})
2
3
4
# ● Jump to the Designated URL When Triggering Trans-to-Agent
This API supports setting users to jump to a designated URL when they click Trans-to-Agent, so that when a specific user initiates an inquiry from a specific entry of a specific website in bot first mode, the user can jump to a designated URL page when he or she clicks Trans-to-Agent. It is recommended to encode the URL and use https addresses.
zc("config",{
  to_customsys_flag:true,
  to_customsys_url:'https:// sg.sobot.io'
})
2
3
4
# ● Open the Inquiry Page in a New Window
JS-API supports setting whether the inquiry page is opened in a floating window or in a new window when a specific user clicks on the inquiry entry in a specific scenario.
// true Open the inquiry page in a new window, false Open the inquiry page in a floating window (default)
zc("config",{
  anchor:true
})
2
3
4
# ● Manual Control to Expand and Collapse the Chat Page
document.getElementById("btn").addEventListener("click",function(){
// Get the status of the current chat form. expand, collapse
  zc('frame_status', function(data) {
    console.log(data)
  })
})
2
3
4
5
6
# ● Get the Callback After the Completion of Chat Page Loading
// Get the callback function after iframe loading is completed
zc("frame_ready", function() {
  console.log('iframe loading is completed')
})
2
3
4
# ● Callback When Closing a Chat Page
When the chat page is closed, a postmessage request will be sent out, which can be monitored to get the status of the current chat page.
window.onmessage = function(e){
  if(e&&e.data){
    const {name,data} = JSON.parse(e.data);
    if(name==='zc_post_message'){
      const {action,} = data;
      // Monitor the postmessage with its action as chat_collapse_window
      switch(data.action){
        case 'chat_collapse_window':
        // your code here...
        break;
      }
    }
  }
}
2
3
4
5
6
7
8
9
10
11
12
13
14
# ● Whether to Reload Each Time the Chat Page Is Expanded
zc('config', {
    'reload': true  // false by default. It is recommended to disable this function
})
2
3
# ● Whether to Hide the Emoji Button after Trans-to-Agent Operation
zc("config", {
  "emoji_state": "hide" // Not hidden by default, hidden when set to "hide"
})
2
3
# ● Whether to Automatically Jump to the URL in the Chat
PC and H5 control whether the links in the chat can be automatically jumped. Available by default
zc("config", {
  "is_link": 1, // 0: unavailable jump, available by default in other circumstances
})
2
3
# ● H5 Displays Avatar or Not
H5 supports displaying agent avatar and customer avatar. show_face 1: Display agent avatar. When show_face=1 and face param is configured, customer avatar will be displayed
zc("config", {
  "show_face": 1
})
2
3
# PC/H5 security verification
# Sign encryption
After enabling "Security Key - Sign Encryption" function, partnerid param must be passed in the desktop site or mobile site. When docking with the desktop site or mobile site, the param "sign" will be added in param passing, and sign="MD5 (sysnum+key+partnerid)";
After the parameters are passed in, Sobot will decrypt the sign to verify if the passed partnerid is consistent with that in the sign. If so, the Sobot system will be accessed normally; if not, a prompt box of "The current user is verified as an illegal user and will not be allowed to access the Help Center" will pop up. If any customer doesn't pass partnerid or sign, it will be deemed as an illegal user, and the prompt box of "The current user is verified as an illegal user and will not be allowed to access the Help Center" will pop up;
"Security Key - Sign Encryption" ON/OFF. Valid range setting takes effect in real time;
# Token encryption
Enable "Security Key - Token Encryption" function;
Call API https://***.sobot.com/api/page/token to obtain the token.
When docking with the desktop site or mobile site, the token param must be passed in, and the system will verify the token. If passed, it will normally dock with the Sobot system; if not, a prompt box will pop up saying, "Sorry, your user verification has expired and you cannot access the Help Center. Contact the admin."
"Security Key - Token Encryption" ON/OFF. Valid range setting takes effect in real time;
Note: Changes in the param for obtaining the token before and after the upgrade
***Obtaining the secure token
API description: Obtain the token for the open API. After obtaining the token, users can carry the token for secure access in subsequent requests
Request method: POST
Request URL:
https://***.sobot.com/api/page/token
Request format: JSON
Request param:
| Param | Type | Required | Description |
|---|---|---|---|
| sysnum | String | Yes | Company ID |
| partnerid | String | Yes | User identity information |
| ts | String | Yes | Expiration timestamp: seconds, e.g., the timestamp for 2019-09-25 1533 is 1569397773 |
| customized_fields | String | No | Customer field list, the list of fields required by the customer (in json format) |
| sign | String | Yes | Signature: md5(sysnum + key + partnerid + ts) sign signature, secret_key is the key |
| source | Integer | No | Parent channel (must be passed after the upgrade) 0-PC 4-H5 |
| channel_flag | Integer | No | Sub-channel (must be passed after the upgrade) |
Return param:
| Param | Type | Required | Description |
|---|---|---|---|
| ret_code | String | Yes | Status code 000000 means success, others mean failure |
| ret_msg | String | Yes | Status message |
| token | String | Yes | token |
Timestamp conversion tool:
https://www.unixtimestamp.com/
sign Signature generation example:
For example, sysnum = "ABC"; key = "258eec3118705112b2c53dc8043d4d34"; partnerid = "DE"; ts = "1569397773"; customized_fields = "{"uname":"nickname"}"
sign = Md5(ABC258eec3118705112b2c53dc8043d4d34DE1569397773{"uname":"nickname"}) is 874b6f9d7926ddb84da11bf93b0ef169.
Request example:
curl --location 'https://***.sobot.com/api/page/token' \
--header 'Content-Type: application/json' \
--data-raw '{
    "sysnum":"ABC",
    "partnerid":"DE",
    "ts":"1569397773",
    "sign":"874b6f9d7926ddb84da11bf93b0ef169",
    "customized_fields":"{\"uname\":\"nickname\"}",
    "source":0,
    "channel_flag":2
}'
2
3
4
5
6
7
8
9
10
11
Return example:
{
  "ret_msg": "success",
  "ret_code": "000000",
  "token": "59a3d022993e4632bafd4f59a0f13604"
}
2
3
4
5
***Usage of token
- Connection method docking
PC: https://sg.sobot.io/chat/pc/v2/index.html?sysnum=xxx&token=obtained token
H5: https://sg.sobot.io/chat/h5/v2/index.html?sysnum=xxx&token=obtained token
- js component docking
The docking method remains unchanged, and the token parameter is added to the agreed parameters:
zc("config", { "token":"obtained token",
......})
2
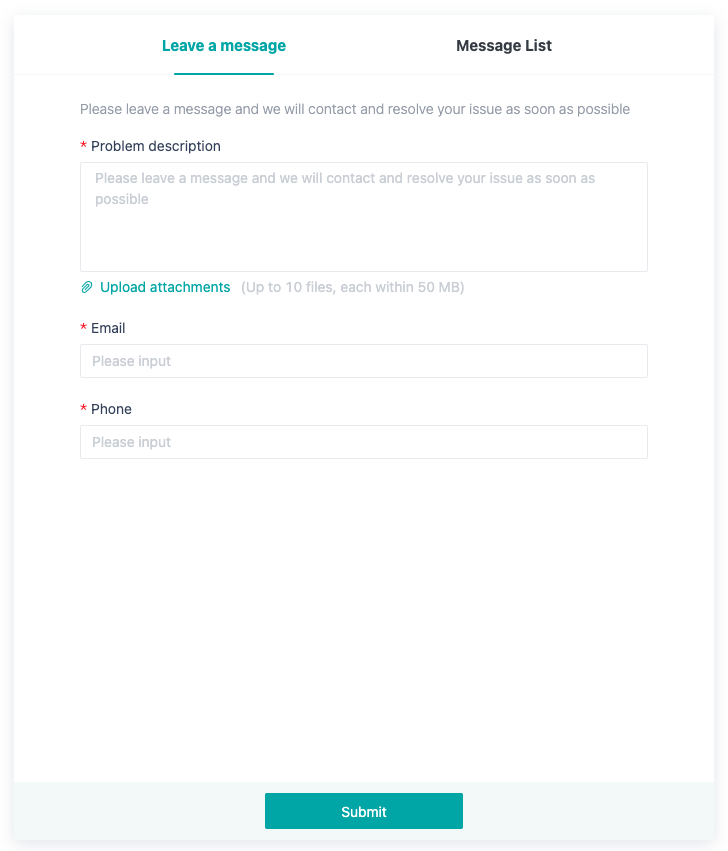
# Independent Access to Submission Page
Official account docking, mini program docking, IM native docking and other docking methods support customers to make submissions after selecting a template
// source: Fixed value as 9. Other params are spelled according to the actual situation.
// uid: Obtained by querying customer info API in CRM. The corresponding param returned by the API is userid.
// templateid: Submission template id can be viewed in Settings - Submission Template Settings module of the Sobot backend through the API.

https://sg.sobot.io/chat/h5/v2/leavemessage.html?sysnum=ed22902866fb4f6e9bc7f0fa259aaa74&uid=xxx&source=9&uname=xxx&templateid=xxx&groupid=xx&locale=cn&t=xxx
2
3
4
5
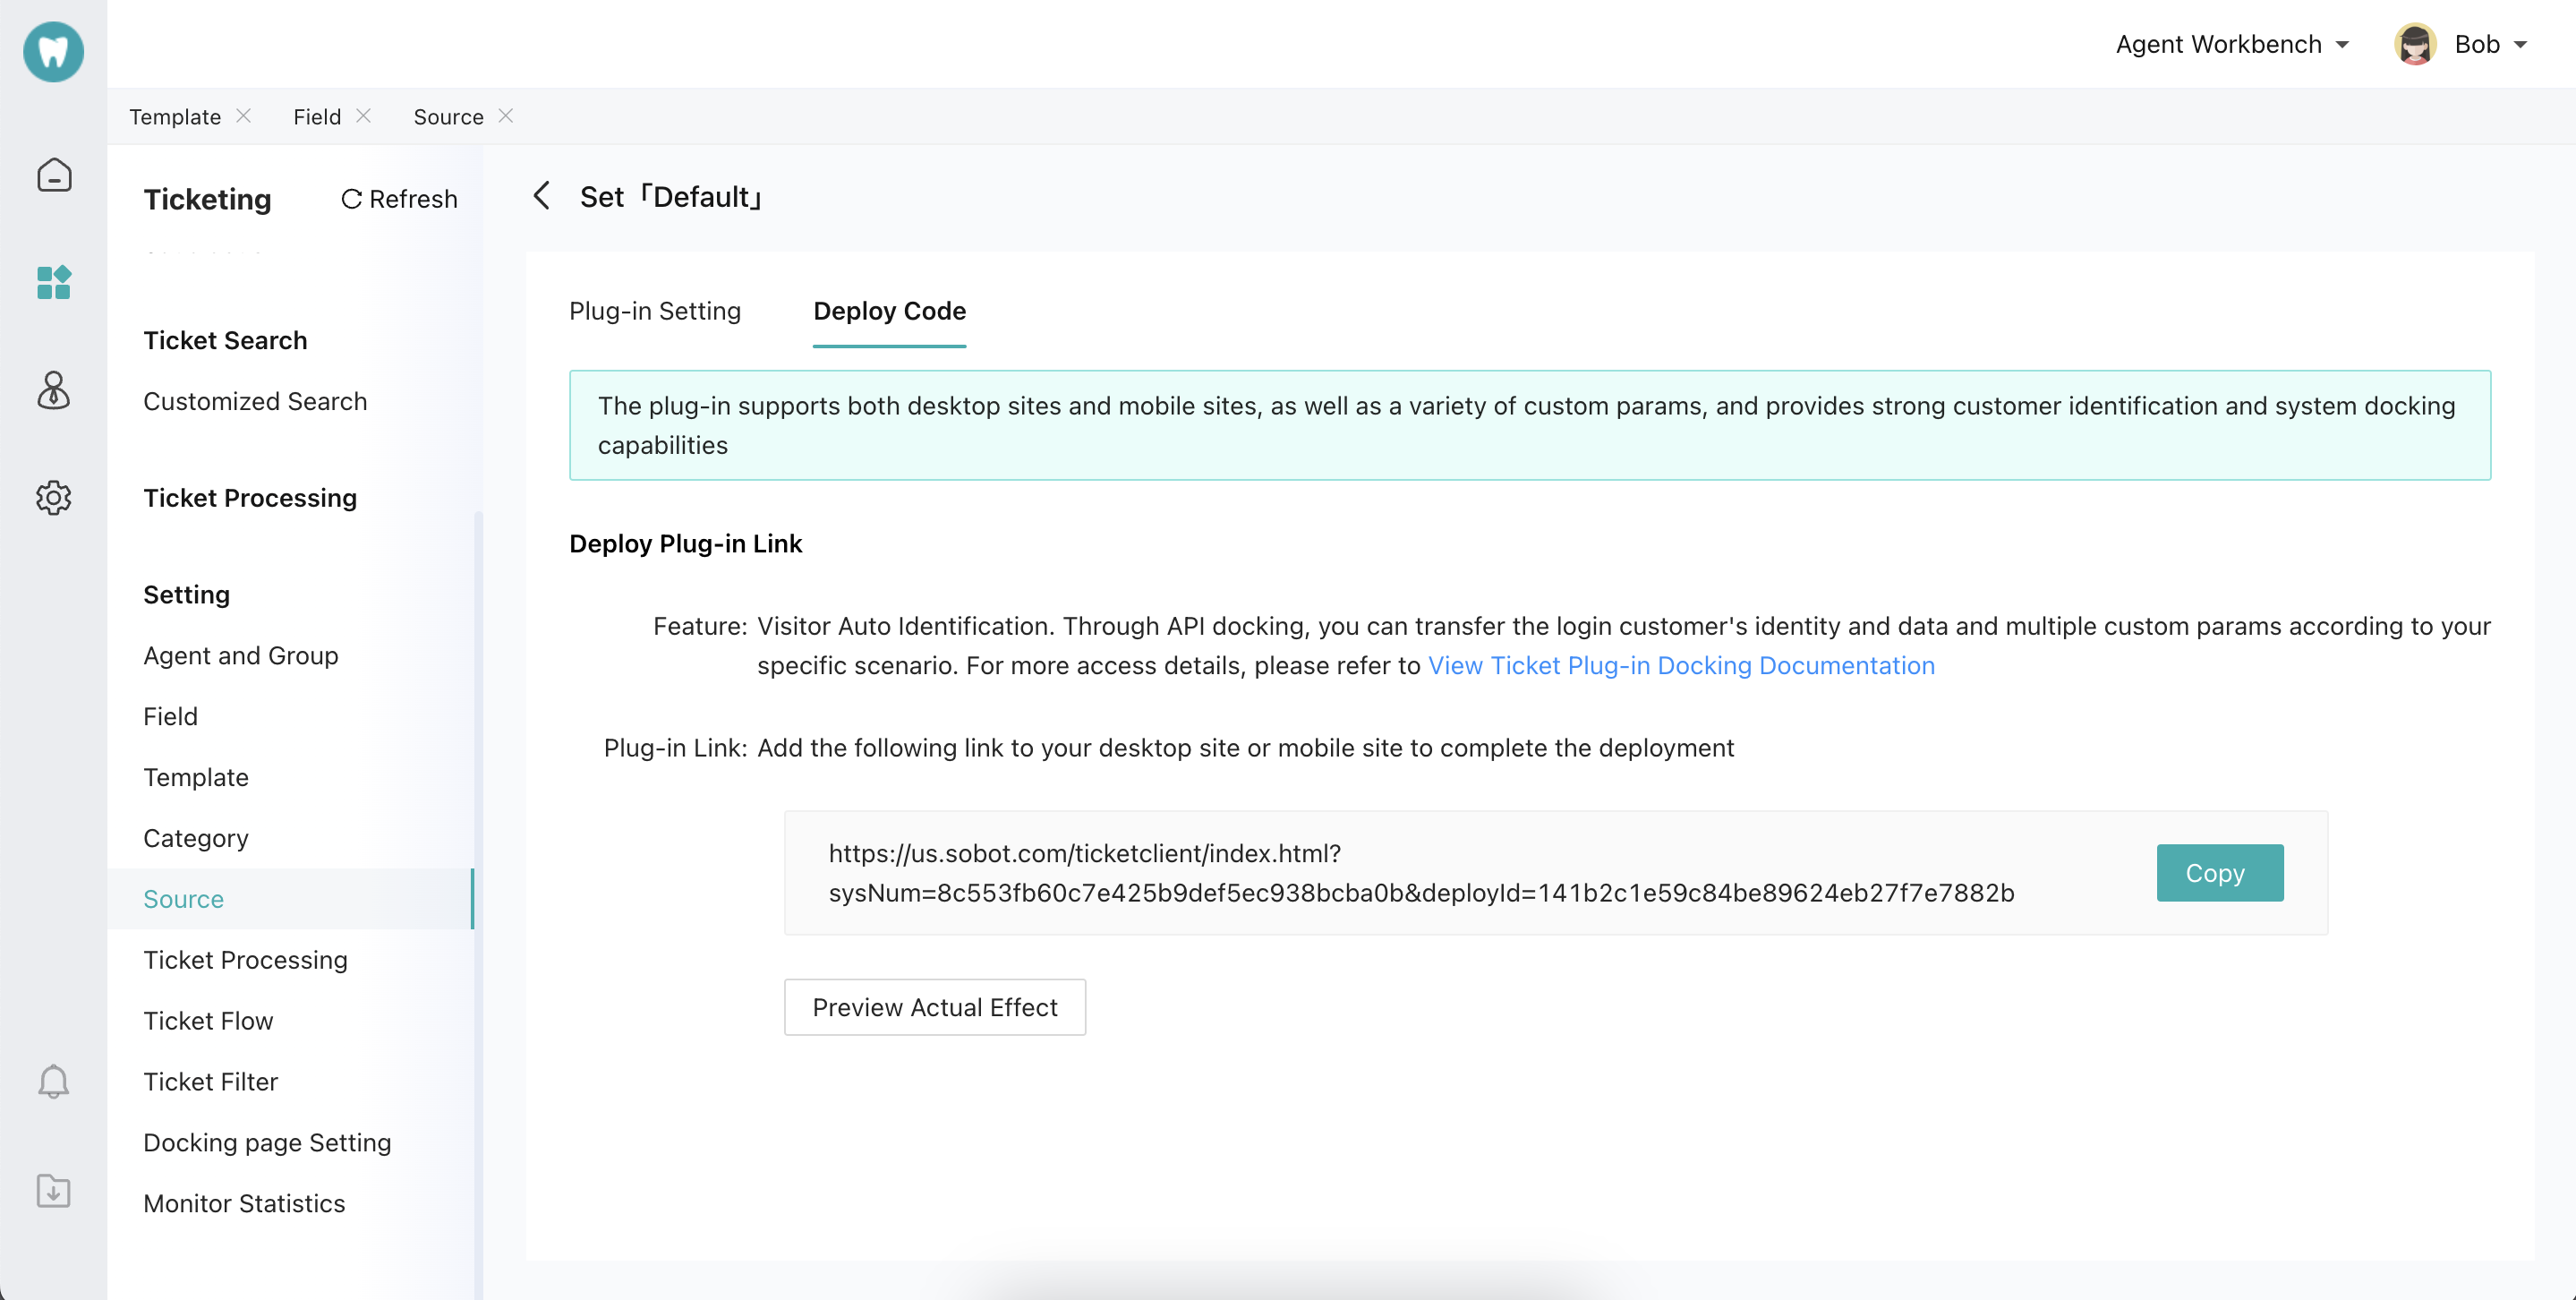
# Ticket Plug-in Access
# ● Add Custom Fields or Use Default Fields

# ● Set the Corresponding Ticket Plug-in
¶ms={"card_title":"Sobot","card_url":"http:// sg.sobot.io","card_desc":"Sobot,Online,Call,Robot,Integration","card_note":"$ 1500","card_picture":"https:// img.sobot.io/console/common/face/admin.png"}
Likewise, params must conform to JSON format and the defined fields must exist in Ticket Custom Fields -> Docking Fields.
Effect achieved is as follows:
# ● Customer identification mark
When specifying which customer to create a ticket for or view which customer's ticket, the customer's ID can be passed through parameters to represent that customer. e.g.:
https://www.soboten.com/ticketclient/index.html?sysNum=4604e18c4eef435484938f3bb1de917a&deployId=84a3a0c2d3ea452a862a1ee6ed32cb8c¶mUnionId=yuzuu-RVVVB-www
The specific supported ID fields are as follows:
| Param | Type | Required | Description | Applicable Scope |
|---|---|---|---|---|
| partnerId | String | No | Docking ID | link |
| tel | String | No | Phone no. | link |
| String | No | link | ||
| paramUnionId | String | No | WeChat UnionID | link |
| wxExternalUserIds | String | No | External contact ID of WeCom | link |
| wxOpenIds | String | No | WeChat OpenID | link |
| whatsappIds | String | No | link | |
| instagramIds | String | No | link | |
| faceBookIds | String | No | link | |
| lineIds | String | No | Line | link |
| telegramIds | String | No | Telegram | link |
| discordIds | String | No | Discord | link |
# E-commerce Platform Docking
| Param | Type | Required | Description | Applicable Range |
|---|---|---|---|---|
| platformUnionCode | String | Yes | Platform id | Link and component |
| flowType | Int | Yes | E-commerce platform field Whether to enable the overflow function (0: disable, 1-all overflow, 2-overflow at occupied status, 3-overflow at offline status; 0 by default) | Link and component |
| flowCompanyId | String | Yes | E-commerce platform field Transferred company ID when overflowing | Link and component |
| flowGroupId | String | Yes | E-commerce platform field Transferred skill group ID of the company when overflowing | Link and component |
# Parameter List
# ● User Identity and Profile Fields
| Param | Type | Required | Description | Applicable Range |
|---|---|---|---|---|
| partnerid | String | No | User id, no more than 300 chars | Link and component |
| uname | String | No | Nickname | Link and component |
| realname | String | No | Real Name | Link and component |
| String | No | Email Account | Link and component | |
| tel | String | No | Phone no. or telephone no. | Link and component |
| face | String | No | User avatar | Link and component |
| String | No | QQ number | Link and component | |
| remark | String | No | Note | Link and component |
| params | String | No | Custom Field | Link and component |
| customer_fields | String | No | Custom field (controlled by the backend) | Link and component |
| is_vip | Number | No | VIP customer or not 0: General customer, 1: VIP customer General customer by default | Link and component |
| vip_level | String | No | The id corresponding to the VIP level (id value is obtained by the above 'Query Customer Fixed Field Info' API.) If it is passed in as a general customer field, VIP level passed in will be invalid. | Link and component |
| user_label | String | No | The id corresponding to the customer tag (id value is obtained by the above 'Query Customer Fixed Field Info' API) | Link and component |
| satDegree_A | Boolean | No | true: Customer can proactively evaluate after the agent ends the chat false: Customer can not proactively evaluate | Link and component |
| enterprise_name | String | No | Company Name | Link and component |
# ● System Field
| Param | Type | Required | Description | Applicable Range |
|---|---|---|---|---|
| color | String | No | Theme color of the chat page | Link and component |
| locale | String | No | Visitor side multi-language, language code list: [language code](/pages/246fbc/#Language code) | Link and component |
| show_manual | String | No | Delay displaying the trans-to-agent button when bot encounters unknown questions. The number of delays can be set in the backend, and the ON/OFF can be configured on the url. 1: On, 0: Off | Link and component |
| type | String | No | Agent reception mode 1 Bot only 2 Agent only 3 Bot first 4 Agent first | Link and component |
| agentid | String | No | Agent ID | Link and component |
| groupid | String | No | Skill group id | Link and component |
| robotid | Int | No | Bot id | Link and component |
| msg_flag | String | No | Whether to display the submission entry when the chat ends 1 Disable 0 Enable | Link and component |
| leave_msg_flag | String | No | Submission button in the control panel 1 Enable 0 Disable | Link and component |
| feedback_flag | String | No | Evaluation button 1 Enable 0 Disable | Link and component |
| photo_flag | String | No | Upload Attachments button, available for H5 only 1 Enable 0 Disable | Link and component |
| show_evaluate | String | No | Enable evaluation or not after clicking Close. show_evaluate=1: Enable, show_evaluate=0: Disable | Link and component |
| to_customsys_flag | String | No | ON/OFF for jumping to 3rd-party pages when trans-to-agent 1 On 0 Off | Link and component |
| to_customsys_url | String | No | The URL of the 3rd-party page to jump to when trans-to-agent | Link and component |
| to_customsys_open_style | String | No | Open 3rd-party page jumped when trans-to-agent in a new window or in the current page 1 Open in a new page 0 Open in the current page | Link |
| leave_customsys_flag | String | No | Whether to enable the submission-3rd-party system transfer, available for H5 only 1 Enable 0 Disable | Link and component |
| leave_customsys_url | String | No | The URL of the submission-3rd-party system transfer, available for H5 only | Link and component |
| agent_mode_flag | String | No | Designated agent reception mode 1 Normally prompt when the agent is offline 0 Transferred to other live chats when the agent is offline | Link and component |
| top_bar_flag | String | No | Whether to display the top return bar in the chat page, available for H5 and PC only 1 Enable 0 Disable | Link |
| title_flag | String | No | Three display modes for title content: 1: Display the enterprise name set by the admin backend. 2: Display the fixed text within 1-30 chars. 3: Display the nickname of the current agent. (Only effective when used with the existing param (top_bar_flag) and top_bar_flag=1) Available for H5 only | Link and component |
| custom_title | String | No | If top_bar_flag=1, it should be used with title_flag to control the title of the top return bar of the chat page and the custom text of the page title; if top_bar_flag=0 or is not passed, it is only used as a field to control the page title and can be customized. | Link and component |
| guide_flag | String | No | Whether to enable bot guided questions 1 Enable 0 Disable | Link and component |
| cut_flag | String | No | Whether to enable or hide the screenshot tool on the pc chat page hide Disable Enable by default | Link and component |
| time | String | No | The time period when users can view the chat history (unit: mins) | Link and component |
| queueFirst | String | No | Whether the customer is designated (use when the function of designated customer first is enabled) | Link and component |
| transfer_action | String | No | Intelligent Routing Setting | Link and component |
| summaryparams | String | No | Service summary field | Link and component |
| reload | Boolean | No | Whether the chat page reloads each time it is unfolded false by default. It is recommended to disable this function | Link and component |
| emoji_state | String | No | Whether to hide the emoji button after trans-to-agent Not hide by default, hidden when set to "hide" | Link and component |
| source | String | No | Source: 0: Desktop site, 1: WeChat, 2: APP, 3: Weibo, 4: Mobile site, 9: WeCom, 10: WeChat mini program | Link and component |
| is_link | Number | No | 0: unavailable jump, available by default in other circumstances | Link and component |
| show_face | Number | No | show_face 1: Display agent avatar. When show_face=1 and face param is configured, customer avatar will be displayed | Link and component |
| anchor | String | No | Open the inquiry page in a new window | Component |
| async | String | No | Automatically load JS components when entering a page 0 by default 1 Enable 0 Disable | Component |
| invite | String | No | Whether to enable automatic invitation 1 Enable 0 Disable | Component |
| tip_title | String | No | Invitation Text | Component |
| submit_title | String | No | Accept Invitation button | Component |
| first_timeout | String | No | First load delay invitation time Time: s | Component |
| over_timeout | String | No | Re-invitation time after rejection Time: s | Component |
| invite_count | String | No | Total number of invitations in a day | Component |
| invite_imgsrc | String | No | Logo image of the invitation pop-up | Component |
| container_style | String | No | Custom style of PC component chat form ( height and width settings are unavailable) | Component |
| height | String | No | Custom height of PC component chat form | Component |
| width | String | No | Custom width of PC component chat form | Component |
| platformUnionCode | String | No | Designated platform id | Component |
| refresh | Boolean | No | Whether to refresh each time the chat component is expanded false by default | Component |
| faqid | Number | No | FAQ group of the designated bot | Link and component |
| expand_size | String | No | Specify the pop-up height of the chat component in the H5 side. half: Half screen, full: Full screen. Full screen by default | Component |
| gif | Number | No | Specify whether the default chat entry icon uses the gif icon on the PC/H5 side. 1: Enable, 0: Disable. Disable by default | Component |
| auto_expand | String | No | Control whether the chat component pops up automatically when visitors enter the page. true: Pop up, not pop up by default | Component |
| end_of_close | Boolean | No | Close the chat window after the chat ends. Enable by default (Effective only for pc components): true: Enable, false: Disable | Component |
| dragging | Boolean | No | PC component chat window support drag-drop movements (disable by default, and effective only for pc components): true: Enable, false: Disable | Component |
| full | Number | No | The chat window width is 100% and the height is 100%. 1 means enabled, not enabled by default. | Link |
# Language code
| Language | Code |
|---|---|
| Chinese | zh |
| English | en |
| ChineseTraditional | zh-Hant |
| Arabic | ar |
| French | fr |
| Portuguese | pt |
| Korean | ko |
| Spanish | es |
| Italian | it |
| Japanese | ja |
| German | de |
| Malaysian | ms |
| Indonesian | id |
| Russian | ru |
| Thai | th |
| Vietnamese | vi |
| Turkish | tr |
# ● Message Fields
| Param | Type | Required | Description | Applicable Range |
|---|---|---|---|---|
| card_title | String | No | Message card name | Link and component |
| card_url | String | No | Message card URL | Link and component |
| card_note | String | No | Message card description | Link and component |
| card_desc | String | No | Message car details | Link and component |
| card_picture | String | No | Message card icon | Link and component |
| order_status | Number | No | Order status of the order card, 1: 'To be paid', 2: 'To be delivered', 3: 'On the way', 4: 'Delivering', 5: 'Finished', 6: 'To be evaluated', 7: 'Canceled', | Component and link |
| create_time | String | No | Order card creation time (ms) | Component and link |
| order_code | String | No | Order no. of order card | Component and link |
| order_url | String | No | Order link of order card | Component and link |
| goods_count | Number | No | Product quantity of order card | Component and link |
| total_fee | Number | No | Order amount of order card (total_fee=1000 is equivalent to total_fee=10.00, decimals are not supported) | Component and link |
| goods | String | No | Product details array (see the table below for data structure) | Component and link |
| robot_hello_word | String | No | Bot Greeting | Link and component |
| agent_hello_word | String | No | Agent Greeting | Link and component |
| agent_offline_title | String | No | Prompt of agent offline | Link and component |
| pre_abstract | String | No | Source page digest | Component |
| pre_visit_url | String | No | Source Page URL | Component |
| pre_visit_title | String | No | Source page title | Component |
| pre_thumbnail | String | No | Source page thumbnail | Component |
| pre_tags | String | No | Source page tag | Component |
| cur_abstract | String | No | Current page digest | Component |
| cur_visit_url | String | No | Current page URL | Component |
| cur_visit_title | String | No | Current page title | Component |
| cur_thumbnail | String | No | Current page thumbnail | Component |
| cur_tags | String | No | Current page tag | Component |
# goods Data Structure
| Param | Type | Required | Description | Applicable Scope |
|---|---|---|---|---|
| name | String | No | Product name | Component and link |
| pictureUrl | String | No | Product image link | Link and component |